Ga door naar hoofdinhoud

Gateway NE56R27u Screen Replacement

Wat je nodig hebt

  1. Gateway NE56R27u Screen Replacement, Battery: stap 1, afbeelding 1 van 2 Gateway NE56R27u Screen Replacement, Battery: stap 1, afbeelding 2 van 2
    • Using the spudger, push the orange tab to the unlock position.

  2. Gateway NE56R27u Screen Replacement: stap 2, afbeelding 1 van 2 Gateway NE56R27u Screen Replacement: stap 2, afbeelding 2 van 2
    • Lift the battery from its compartment.

    • When reinstalling, insert back end of battery first, then clicking into place.

  3. Gateway NE56R27u Screen Replacement, Screen: stap 3, afbeelding 1 van 3 Gateway NE56R27u Screen Replacement, Screen: stap 3, afbeelding 2 van 3 Gateway NE56R27u Screen Replacement, Screen: stap 3, afbeelding 3 van 3
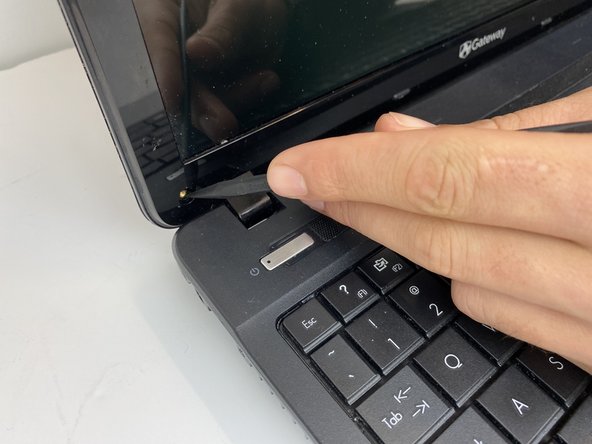
    • Using the spudger, remove the protective caps for the screen to expose the screws.

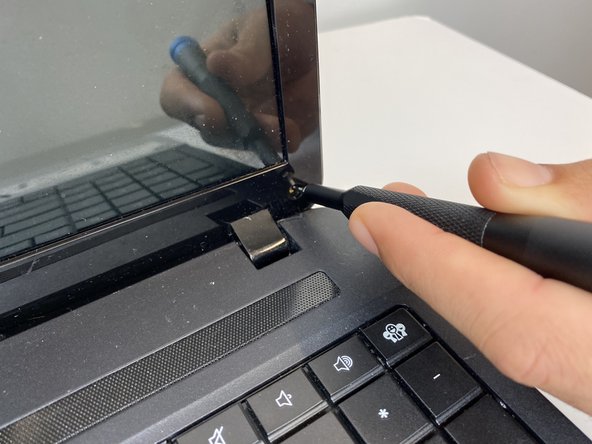
    • Using the Phillips #000 screwdriver, unscrew the bottom two 1mm screws.

  4. Gateway NE56R27u Screen Replacement: stap 4, afbeelding 1 van 3 Gateway NE56R27u Screen Replacement: stap 4, afbeelding 2 van 3 Gateway NE56R27u Screen Replacement: stap 4, afbeelding 3 van 3
    • Using the opening pick in between the front cover and bezel, gently loosen and lift the plastic bezel from the screen and backing.

  5. Gateway NE56R27u Screen Replacement: stap 5, afbeelding 1 van 2 Gateway NE56R27u Screen Replacement: stap 5, afbeelding 2 van 2
    • Gently lift the frame of the screen from the top to unhook the frame from the base.

    • When reassembling, hook the bottom of the screen to the base of the laptop before snapping into place.

  6. Gateway NE56R27u Screen Replacement: stap 6, afbeelding 1 van 3 Gateway NE56R27u Screen Replacement: stap 6, afbeelding 2 van 3 Gateway NE56R27u Screen Replacement: stap 6, afbeelding 3 van 3
    • Using the Phillips #000 screwdriver, unscrew the four 1 mm screws in the front corners of the metal frame.

    • Lift the screen slightly to expose the connector board.

  7. Gateway NE56R27u Screen Replacement: stap 7, afbeelding 1 van 2 Gateway NE56R27u Screen Replacement: stap 7, afbeelding 2 van 2
    • Using the spudger, carefully remove the webcam connector from the metal frame.

  8. Gateway NE56R27u Screen Replacement: stap 8, afbeelding 1 van 2 Gateway NE56R27u Screen Replacement: stap 8, afbeelding 2 van 2
    • Peel the tape covering the display cable, releasing the wire from the metal frame.

    • Unplug the display cable from the image processing board on the screen.

  9. Gateway NE56R27u Screen Replacement: stap 9, afbeelding 1 van 2 Gateway NE56R27u Screen Replacement: stap 9, afbeelding 2 van 2
    • Using the Phillips #000 screwdriver, unscrew the four 1 mm screws from the sides of the metal frame.

    • Remove the screen from the metal frame.

Conclusie

To reassemble your device, follow these instructions in reverse order.

Één andere persoon heeft deze handleiding voltooid.

0 opmerkingen

Voeg opmerking toe

Weergavestatistieken:

Afgelopen 24 uren: 0

Afgelopen 7 dagen: 2

Afgelopen 30 dagen: 4

Altijd: 213