Ga door naar hoofdinhoud

Gateway ID49C07U Keyboard Replacement

Wat je nodig hebt

  1. Gateway ID49C07U Keyboard Replacement, Battery: stap 1, afbeelding 1 van 1
    • Turn the laptop over so the bottom of the device is facing upwards with the hinge facing away from you.

  2. Gateway ID49C07U Keyboard Replacement: stap 2, afbeelding 1 van 2 Gateway ID49C07U Keyboard Replacement: stap 2, afbeelding 2 van 2
    • Locate the switch on the top left of the laptop labeled with a padlock symbol.

    • Flip the switch in the direction of the unlocked padlock symbol.

  3. Gateway ID49C07U Keyboard Replacement: stap 3, afbeelding 1 van 1
    • Locate the switch that releases the battery and slide it to the right.

  4. Gateway ID49C07U Keyboard Replacement: stap 4, afbeelding 1 van 1
    • While holding the release switch to the right, pull the battery away from you.

  5. Gateway ID49C07U Keyboard Replacement, Keyboard: stap 5, afbeelding 1 van 1
    • Turn the laptop over and open

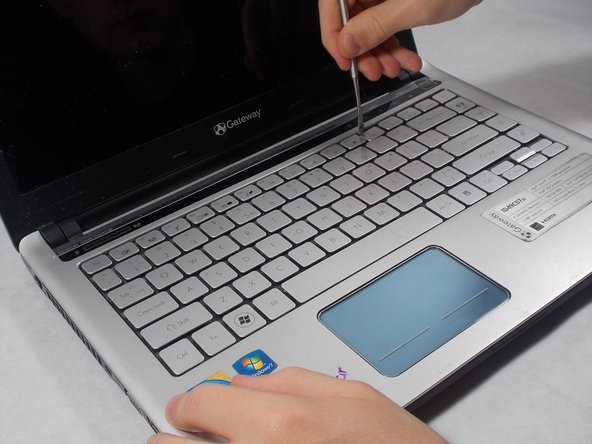
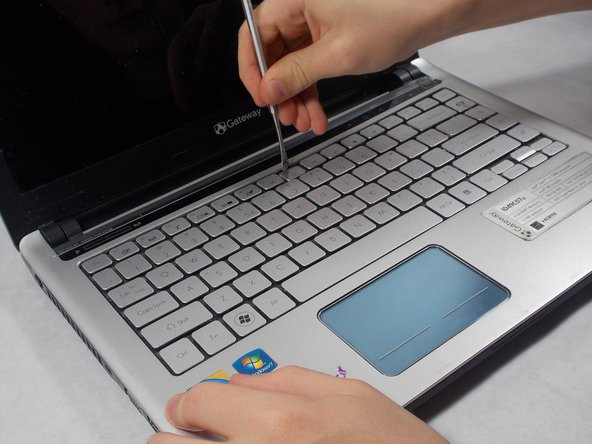
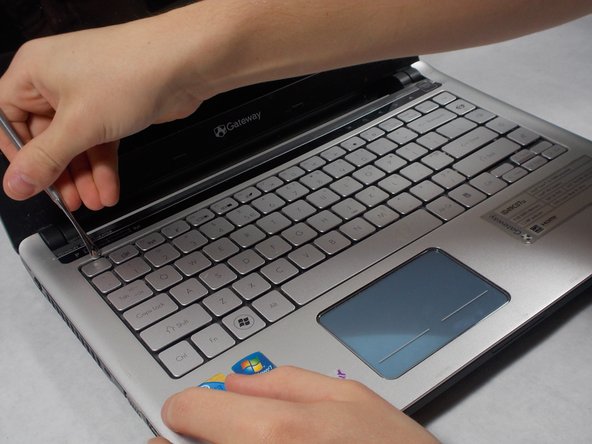
  6. Gateway ID49C07U Keyboard Replacement: stap 6, afbeelding 1 van 3 Gateway ID49C07U Keyboard Replacement: stap 6, afbeelding 2 van 3 Gateway ID49C07U Keyboard Replacement: stap 6, afbeelding 3 van 3
    • Use the small metal spudger to push in each of the clips on the keyboard

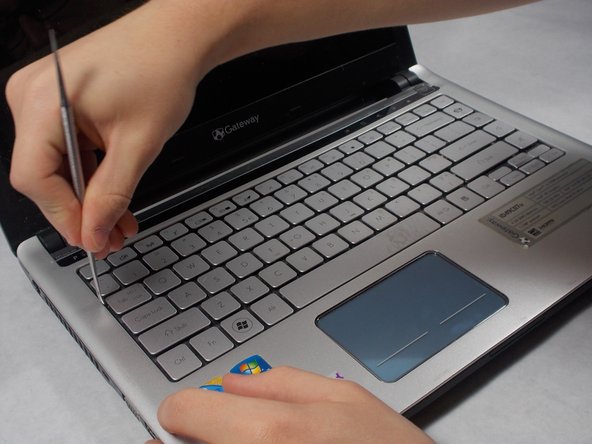
  7. Gateway ID49C07U Keyboard Replacement: stap 7, afbeelding 1 van 3 Gateway ID49C07U Keyboard Replacement: stap 7, afbeelding 2 van 3 Gateway ID49C07U Keyboard Replacement: stap 7, afbeelding 3 van 3
    • Continued

  8. Gateway ID49C07U Keyboard Replacement: stap 8, afbeelding 1 van 2 Gateway ID49C07U Keyboard Replacement: stap 8, afbeelding 2 van 2
    • Use the small spudger to pick up the corner

  9. Gateway ID49C07U Keyboard Replacement: stap 9, afbeelding 1 van 1
    • Slide keyboard towards the screen

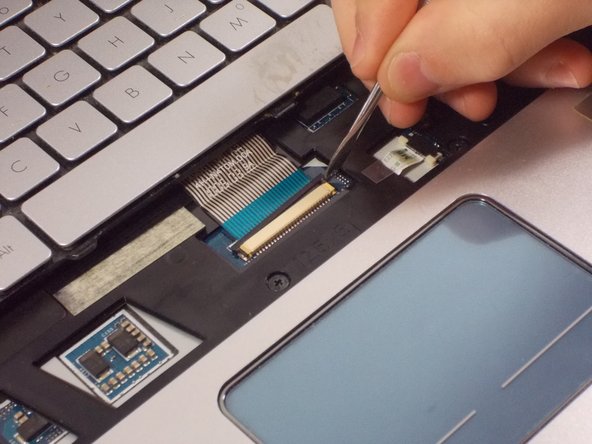
  10. Gateway ID49C07U Keyboard Replacement: stap 10, afbeelding 1 van 2 Gateway ID49C07U Keyboard Replacement: stap 10, afbeelding 2 van 2
    • Use the small spudger to slide the cable lock up on both sides of the connector and slide the cable out

Conclusie

To reassemble your device, follow these instructions in reverse order.

2 andere personen hebben deze handleiding voltooid.

Ryan Howlett

Lid sinds: 03/06/17

267 Reputatie

2 handleidingen geschreven

Team

UMass Dartmouth, Team S6-G4, Isaacson Spring 2017 Lid van UMass Dartmouth, Team S6-G4, Isaacson Spring 2017

UMASSD-ISAACSON-S17S6G4

3 Leden

10 handleidingen geschreven

0 opmerkingen

Voeg opmerking toe

Weergavestatistieken:

Afgelopen 24 uren: 0

Afgelopen 7 dagen: 3

Afgelopen 30 dagen: 7

Altijd: 511