Ga door naar hoofdinhoud

Garmin Nuvi 50LM Charging Port Replacement

Wat je nodig hebt

  1. Garmin Nuvi 50LM Charging Port Replacement, Charging Port Replacement: stap 1, afbeelding 1 van 1
    • Place the device on a flat surface with the LCD touchscreen face down.

  2. Garmin Nuvi 50LM Charging Port Replacement: stap 2, afbeelding 1 van 2 Garmin Nuvi 50LM Charging Port Replacement: stap 2, afbeelding 2 van 2
    • Remove the four 9 mm screws on the back of the GPS with the Torx T-4 screwdriver set.

  3. Garmin Nuvi 50LM Charging Port Replacement: stap 3, afbeelding 1 van 3 Garmin Nuvi 50LM Charging Port Replacement: stap 3, afbeelding 2 van 3 Garmin Nuvi 50LM Charging Port Replacement: stap 3, afbeelding 3 van 3
    • Use the iFixit Plastic Opening Tool to separate the front cover and the rear cover on all four sides.

    • Be careful not to damage the orange ribbon cable while opening the device.

  4. Garmin Nuvi 50LM Charging Port Replacement: stap 4, afbeelding 1 van 1
    • Remove the two 0.5 cm screws using the T4 Torx screwdriver attaching the motherboard to rear cover of the GPS unit.

  5. Garmin Nuvi 50LM Charging Port Replacement: stap 5, afbeelding 1 van 1
    • Unplug the battery from the motherboard.

  6. Garmin Nuvi 50LM Charging Port Replacement: stap 6, afbeelding 1 van 3 Garmin Nuvi 50LM Charging Port Replacement: stap 6, afbeelding 2 van 3 Garmin Nuvi 50LM Charging Port Replacement: stap 6, afbeelding 3 van 3
    • Use a pair of wire cutters to cut and separate the black speaker wire from the motherboard.

    • Use a pair of wire cutters to cut and separate the blue speaker wire from the motherboard.

    • To reattach the new speaker, you must use a soldering iron to solder the speaker cables to the motherboard.

  7. Garmin Nuvi 50LM Charging Port Replacement: stap 7, afbeelding 1 van 1
    • Use your fingers to remove the motherboard from the rear case of the system.

  8. Garmin Nuvi 50LM Charging Port Replacement: stap 8, afbeelding 1 van 2 Garmin Nuvi 50LM Charging Port Replacement: stap 8, afbeelding 2 van 2
    • Place the replacement motherboard in the navigation system, and solder the speaker cables on the replacement motherboard.

    • Solder the black wire to the motherboard.

    • Solder the blue wire to the motherboard.

    • The soldering iron is extremely hot, so use prudence when working with the soldering iron.

    • The black speaker wire is the wire closest to the battery.

Conclusie

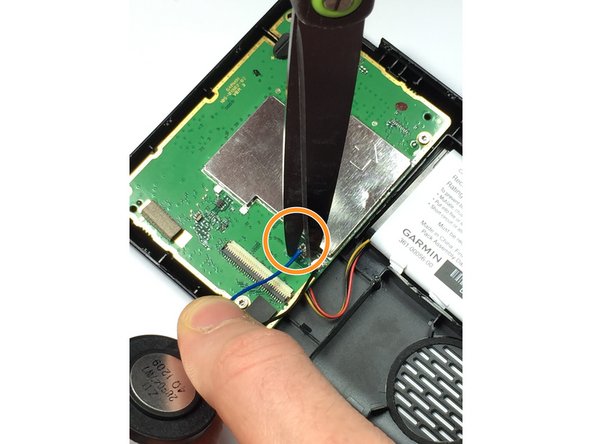
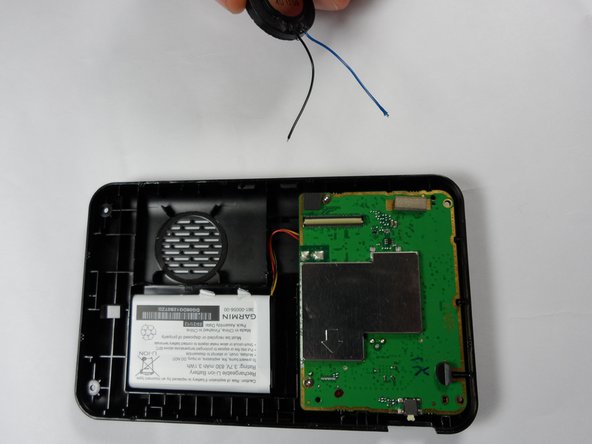
To reassemble your device, follow these instructions in reverse order with the exception of cutting the blue and black speaker wires.

2 andere personen hebben deze handleiding voltooid.

Maurice Thomas

Lid sinds: 10/13/15

661 Reputatie

5 handleidingen geschreven

Team

4 opmerkingen

It's not a "Charging Port Replacement", it's a whole motherboard replacement, described in this guide. That's not what I'm looking for, and it's not what the guide's headline suggests.

ginxare - Antwoord

Yes, you are right!

Tiago Martins - Antwoord

I was hoping it will go into SMD soldering/desoldering (using hot air, etc). Where would you find a new “motherboard”, anyways? At that point it becomes difficult to see the value in “fixing” the device.

Dan - Antwoord

BE VERY CAREFUL WHEN OPENING YOUR GARMIN - IT IS EXCEPTIONALLY EASY TO “TEAR” THE YELLOW FLEXIBLE CONNECTOR IF YOU ARE NOT AWARE OF THIS CONNECTOR -THEN THE GARMIN IS SCRAP - I find that the charge socket is the weakest point on these units & before I opened my last unit I threw a few out because the charge port had been damaged. The USB type C charge port can be replaced with a spare bought from an electronics part supplier, I found that I reinforced the port onto the board by soldering resistor leads to the USB socket casing & then soldered the other side onto the board to support also adding a some of glue from my glue gun. Seems that this modification increases the durability & lifespan of the unit. I also think that if the port gets damaged again I might try do a modification on the port & try solder the charger cable directly onto the board but be warned, because of the traffic antenna built into the cable I have no idea what effect this may have on the traffic function, possibly worth a try.

Alfred - Antwoord

Voeg opmerking toe

Weergavestatistieken:

Afgelopen 24 uren: 0

Afgelopen 7 dagen: 1

Afgelopen 30 dagen: 1

Altijd: 2,836