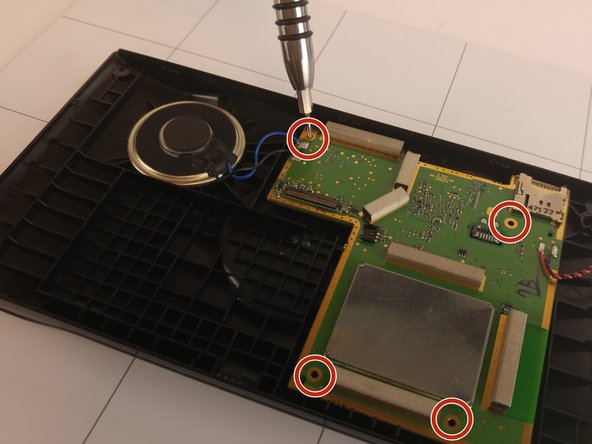
Ga door naar hoofdinhoud

Garmin Nuvi 2689LMT Main Circuit Board Replacement

Wat je nodig hebt

  1. Garmin Nuvi 2689LMT Main Circuit Board Replacement, Main Circuit Board: stap 1, afbeelding 1 van 1
    • Begin by removing the stand by depressing the tab and rocking the round interface back toward you, pulling it away from the Garmin unit.

  2. Garmin Nuvi 2689LMT Main Circuit Board Replacement: stap 2, afbeelding 1 van 1
    • Remove the four, 4mm hex screws at the four corners of the device using a T5 bit.

  3. Garmin Nuvi 2689LMT Main Circuit Board Replacement: stap 3, afbeelding 1 van 1
    • Place the unit screen-side down flat, with the bottom facing you. There are two seams, the one on top is artificial.

    • Pry open the seam with a prying tool.

  4. Garmin Nuvi 2689LMT Main Circuit Board Replacement: stap 4, afbeelding 1 van 1
    • Firmly force a plastic spudger into the bottom seam and pry open a section. Use a prying/pushing motion to force the spudger into the unit.

    • Repeat this all the way around the seam.

  5. Garmin Nuvi 2689LMT Main Circuit Board Replacement: stap 5, afbeelding 1 van 1
    • Do not attempt to separate the unit until all the tabs have been separated. Once the seam is completely separated, you can lift the back away from the screen easily.

  6. Garmin Nuvi 2689LMT Main Circuit Board Replacement: stap 6, afbeelding 1 van 1
    • The battery is connected to the main circuit board via two wires, red and green in color, and is attached with a white connector.

    • Detach with a pry tool.

  7. Garmin Nuvi 2689LMT Main Circuit Board Replacement: stap 7, afbeelding 1 van 1
    • The white battery is attached to the casing with an adhesive. Separate it with a prying tool.

    • Removing the battery protects it from damage and gives you more room to work.

  8. Garmin Nuvi 2689LMT Main Circuit Board Replacement: stap 8, afbeelding 1 van 2 Garmin Nuvi 2689LMT Main Circuit Board Replacement: stap 8, afbeelding 2 van 2
    • Remove the four, 4mm hex screws with a T5 bit.

    • These are located near the four corners of the main circuit board, as shown.

  9. Garmin Nuvi 2689LMT Main Circuit Board Replacement: stap 9, afbeelding 1 van 1
    • Carefully pick up and remove the main circuit board from the device’s plastic casing.

  10. Garmin Nuvi 2689LMT Main Circuit Board Replacement: stap 10, afbeelding 1 van 1
    • Remove the speaker - located on the device as shown - from the plastic casing using a prying tool. Use the prying tool around the entire rim of the speaker to ensure a clean removal.

Conclusie

To reassemble your device, follow these instructions in reverse order, using a new circuit board.

Spencer

Lid sinds: 09/26/16

273 Reputatie

2 handleidingen geschreven

Team

USF Tampa, Team 16-5, Eyestone Fall 2016 Lid van USF Tampa, Team 16-5, Eyestone Fall 2016

USFT-EYESTONE-F16S16G5

3 Leden

5 handleidingen geschreven

0 opmerkingen

Voeg opmerking toe

Weergavestatistieken:

Afgelopen 24 uren: 0

Afgelopen 7 dagen: 1

Afgelopen 30 dagen: 2

Altijd: 574