Inleiding
If the battery is not holding a charge as long as it should, or is failing to charge at all, use this guide to replace the battery. You will need a T6 Torx screwdriver, a T5 Torx screwdriver, and a spudger.
Wat je nodig hebt
-
-
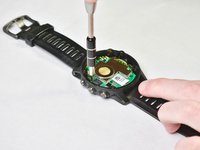
Use a T6 screwdriver to remove the five 1.7 mm screws from the watch face.
 Vraag FixBot
-
-
-
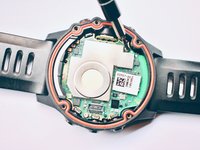
Use a spudger to lift up and free the screen ribbon cable's press-fit connector from the motherboard.
-
-
-
Gereedschap gebruikt in deze stap:Tweezers$4.99
-
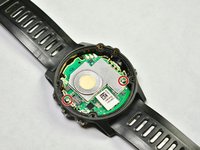
Use a T5 screwdriver to remove the two silver 1.4 mm screws from the motherboard.
-
-
-
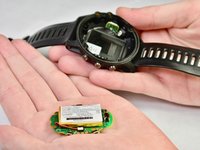
Lift the watch and turn it over one hand. The motherboard should fall out easily.
-
-
-
Using the spludger, separate the battery from the motherboard, which are both held together with a mild adhesive. Note that the battery connector lifts upward away from the circuit board by simply lifting the wires up should pop the connector.
-





To reassemble your device, follow these instructions in reverse order.
Annuleren: ik heb deze handleiding niet afgemaakt.
22 andere personen hebben deze handleiding voltooid.

Team

Appalachian State University, Team S1-G3, Menagarishvili Fall 2018 Lid van Appalachian State University, Team S1-G3, Menagarishvili Fall 2018
APSU-MENAGARISHVILI-F18S1G3
3 Leden
11 handleidingen geschreven
37Gids Commentaar
Ruined my watch… The battery connection socket ripped off with the battery connector…
I have taken apart phones and laptops in the past without issue, so I am not inexperienced by any means. I was as careful as possible.
Sounds like it may have had a factory defect. I did the same fix and it worked fine, just like any other computer or phone.
Excellent guide - thanks! My Fenix3 wasn't charging any more so following your guide I replaced the ‘dead’ battery with a new one with ease. However, when reassembled, the new battery worked but would not charge. I took it apart again, and found slight corrosion or gunk on the motherboard terminals where they contact the inner side of the charging pins. After a good clean with meths and a cotton bud I popped the original battery back in, reassembled it, and hey presto! it started charging! Very happy!
I appreciate the guide as my Fenix 3 after 6 years of owning it could barely make it 24 hours without charging it.
The only thing I’d add to the guide is that you can reuse the adhesive from the existing battery as it’s only double-sided tape. Other than, it went flawless!
Thanks for this. Just did it successfully. A quick note, when you are separating the battery from the motherboard, it pulls up/perpendicular to the device and not parallel to it as I had initially thought. Luckily I did not break the battery connector to the motherboard. When I put it back in I needed to push it towards the motherboard to properly seat it. Look closely to make sure no part of the connector is sticking up, even a hair or it will not work.
