Ga door naar hoofdinhoud

Game Boy Pocket LCD Screen Replacement

Wat je nodig hebt

  1. Game Boy Pocket LCD Screen Replacement, Remove the external screws: stap 1, afbeelding 1 van 3 Game Boy Pocket LCD Screen Replacement, Remove the external screws: stap 1, afbeelding 2 van 3 Game Boy Pocket LCD Screen Replacement, Remove the external screws: stap 1, afbeelding 3 van 3
    • Place the Game Boy Pocket face-down on a clean, flat surface.

    • Remove batteries from battery compartment.

    • Use a Y1 tri-wing screwdriver and turn counterclockwise to remove the four external screws.

    • Use a Y1 tri-wing screwdriver and turn counterclockwise to remove the two screws inside the battery compartment.

    Where do I find a oem lcd replacement?

    Alex Bone - Antwoord

  2. Game Boy Pocket LCD Screen Replacement, Open the device: stap 2, afbeelding 1 van 3 Game Boy Pocket LCD Screen Replacement, Open the device: stap 2, afbeelding 2 van 3 Game Boy Pocket LCD Screen Replacement, Open the device: stap 2, afbeelding 3 van 3
    • Place your hands on the front and back covers of the Game Boy Pocket, and carefully separate the device.

    • Set the back cover aside. You will need it to reassemble the device.

  3. Game Boy Pocket LCD Screen Replacement, Remove the motherboard screws: stap 3, afbeelding 1 van 1
    • Use a Phillips #1 screwdriver and turn counterclockwise to remove the three screws on the motherboard.

  4. Game Boy Pocket LCD Screen Replacement, Remove the clip securing the ribbon cable: stap 4, afbeelding 1 van 3 Game Boy Pocket LCD Screen Replacement, Remove the clip securing the ribbon cable: stap 4, afbeelding 2 van 3 Game Boy Pocket LCD Screen Replacement, Remove the clip securing the ribbon cable: stap 4, afbeelding 3 van 3
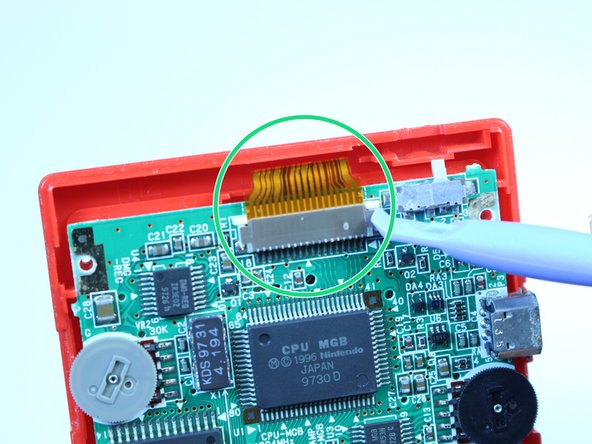
    • Use a plastic opening tool to dislodge and remove the clip securing the ribbon cable.

    • Make sure you apply pressure on both sides of the clip to loosen it.

  5. Game Boy Pocket LCD Screen Replacement, Dislodge the ribbon cable: stap 5, afbeelding 1 van 2 Game Boy Pocket LCD Screen Replacement, Dislodge the ribbon cable: stap 5, afbeelding 2 van 2
    • Use a plastic opening tool to dislodge the ribbon cable.

    • Be gentle to prevent tearing the ribbon.

  6. Game Boy Pocket LCD Screen Replacement, Remove the motherboard: stap 6, afbeelding 1 van 3 Game Boy Pocket LCD Screen Replacement, Remove the motherboard: stap 6, afbeelding 2 van 3 Game Boy Pocket LCD Screen Replacement, Remove the motherboard: stap 6, afbeelding 3 van 3
    • Grab the black piece protruding from the motherboard, and lift up to remove the motherboard.

    • Set the motherboard aside. You will need it to reassemble the device.

  7. Game Boy Pocket LCD Screen Replacement, Remove the LCD screen: stap 7, afbeelding 1 van 3 Game Boy Pocket LCD Screen Replacement, Remove the LCD screen: stap 7, afbeelding 2 van 3 Game Boy Pocket LCD Screen Replacement, Remove the LCD screen: stap 7, afbeelding 3 van 3
    • Use a plastic opening tool to lift the LCD screen away from the front cover.

    • Use your fingers to remove the LCD screen.

    Where did you find a replacement part I need one myself?

    Luis - Antwoord

Conclusie

To reassemble your device, follow these instructions in reverse order.

15 andere personen hebben deze handleiding voltooid.

Adriana Rahrig

Lid sinds: 10/07/14

1.523 Reputatie

5 handleidingen geschreven

Team

USF Tampa, Team 1-1, Leahy Fall 2014 Lid van USF Tampa, Team 1-1, Leahy Fall 2014

USFT-LEAHY-F14S1G1

4 Leden

13 handleidingen geschreven

3 opmerkingen

please can anyone give me a website that sells replacemtn screens for the Gameboy pocket?

help please - Antwoord

There's no website that sells replacement screens the only way to get one is to order another Gameboy off of eBay and take out the screen

Isaac fraser -

I get mine from Handheld Legend. They have all the Gameboy parts you could ever want.

Chris Pavlik -

Voeg opmerking toe

Weergavestatistieken:

Afgelopen 24 uren: 21

Afgelopen 7 dagen: 76

Afgelopen 30 dagen: 315

Altijd: 22,507