Ga door naar hoofdinhoud

Game Boy Advance IPS Backlight mod

Wat je nodig hebt

  1. Game Boy Advance IPS Backlight mod, Game Boy Advance Teardown: stap 1, afbeelding 1 van 3 Game Boy Advance IPS Backlight mod, Game Boy Advance Teardown: stap 1, afbeelding 2 van 3 Game Boy Advance IPS Backlight mod, Game Boy Advance Teardown: stap 1, afbeelding 3 van 3
    • Remove the back battery cover by pinching down on the tab and pulling outward.

  2. Game Boy Advance IPS Backlight mod: stap 2, afbeelding 1 van 1
    • Remove the six back panel screws using a Y1 screw driver.

  3. Game Boy Advance IPS Backlight mod: stap 3, afbeelding 1 van 1
    • Remove bottom back panel screw with a Phillips #1 screw driver.

  4. Game Boy Advance IPS Backlight mod: stap 4, afbeelding 1 van 1
    • Remove the back panel by pulling away with one hand and the front secured in the other hand.

    • Beware of right and left triggers, the right and left panels, and the power switch falling off as the back panel is removed.

  5. Game Boy Advance IPS Backlight mod: stap 5, afbeelding 1 van 2 Game Boy Advance IPS Backlight mod: stap 5, afbeelding 2 van 2
    • Remove left and right triggers by lifting and pulling them away from the system.

    • Do the same for side panels.

    • For finicky or jammed triggers only. Adjust and correct triggers and reassemble. Most jammed triggers are caused by buttons misplaced or jammed in its enclosure.

  6. Game Boy Advance IPS Backlight mod: stap 6, afbeelding 1 van 2 Game Boy Advance IPS Backlight mod: stap 6, afbeelding 2 van 2
    • Remove the gray On/Off Switch by pulling up and away from the unit. Replace with another switch if necessary.

  7. Game Boy Advance IPS Backlight mod: stap 7, afbeelding 1 van 1
    • Remove the three screws on the circuit board with a Phillips #1 screw driver.

    • The last screw on the right is not included on some Game Boy Advance systems.

  8. Game Boy Advance IPS Backlight mod: stap 8, afbeelding 1 van 2 Game Boy Advance IPS Backlight mod: stap 8, afbeelding 2 van 2
    • Pull circuit board away from the front panel by pulling up at the bottom of the circuit board, keeping the top ribbon still connected.

    • Beware not to damage the top ribbon by pulling up gently.

  9. Game Boy Advance IPS Backlight mod: stap 9, afbeelding 1 van 3 Game Boy Advance IPS Backlight mod: stap 9, afbeelding 2 van 3 Game Boy Advance IPS Backlight mod: stap 9, afbeelding 3 van 3
    • Remove the rubber button pads from their pockets.

    • Remove the plastic buttons and the D-pad from beneath the rubber pads with tweezers or by hand.

  10. Game Boy Advance IPS Backlight mod: stap 10, afbeelding 1 van 3 Game Boy Advance IPS Backlight mod: stap 10, afbeelding 2 van 3 Game Boy Advance IPS Backlight mod: stap 10, afbeelding 3 van 3
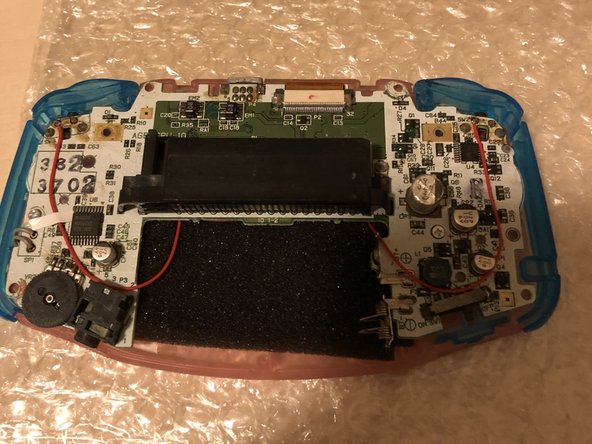
    • Use a spudger/tweezers/fingernail to unlatch the LCD ribbon port by pulling the grey tabs on the sides upwards (towards the top edge of the PCB).

    • Once the LCD ribbon port has been unlatched, the LCD ribbon should very easily slide out and can be removed with zero force using fingers or tweezers.

  11. Game Boy Advance IPS Backlight mod: stap 11, afbeelding 1 van 3 Game Boy Advance IPS Backlight mod: stap 11, afbeelding 2 van 3 Game Boy Advance IPS Backlight mod: stap 11, afbeelding 3 van 3
    • Use the spudger to lift the screen from the front panel. Place the spudger in the space directly left of the D-pad.

    • The screen and the front panel is connected by a black tape that could rip if not removed carefully.

    • You can use an iOpener or a hair dryer on the other side of the front panel in order to soften the black tape.

  12. Game Boy Advance IPS Backlight mod: stap 12, afbeelding 1 van 1
    • Use the tweezers to remove the black tape if needed.

  13. Game Boy Advance IPS Backlight mod, Prepare adapter/screen: stap 13, afbeelding 1 van 3 Game Boy Advance IPS Backlight mod, Prepare adapter/screen: stap 13, afbeelding 2 van 3 Game Boy Advance IPS Backlight mod, Prepare adapter/screen: stap 13, afbeelding 3 van 3
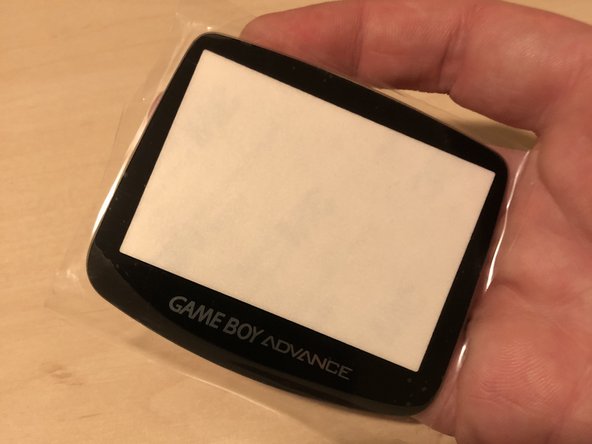
    • First of all, unpack everything and check if it's all good.

    • The connector where the screen needs to be attached is circled in red. It's the only connector on the adapter.

    • Press the LCD cable straight on the connector (be sure that's it aligned correctly, otherwise you could damage the connector!)

  14. Game Boy Advance IPS Backlight mod, Prepare adapter: stap 14, afbeelding 1 van 2 Game Boy Advance IPS Backlight mod, Prepare adapter: stap 14, afbeelding 2 van 2
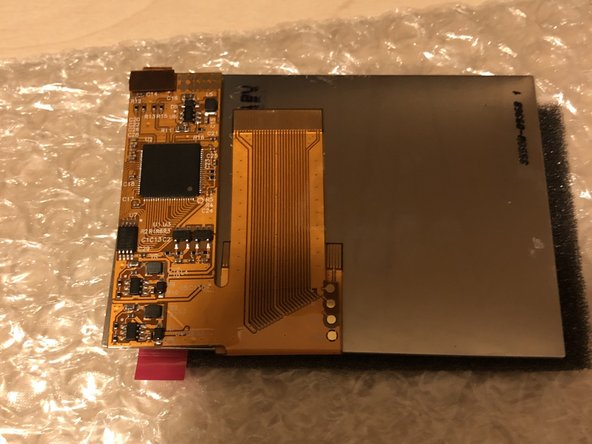
    • Fold the adapter to the backside of the screen and check if everything looks good and falls in place. If it looks like the 1st photo, it should be good to go.

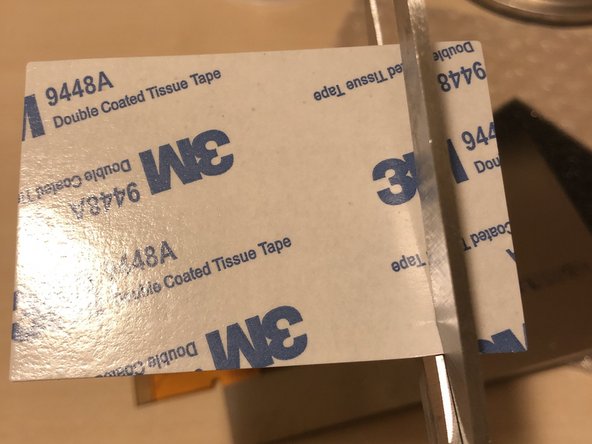
    • Cut some double side tape for the next step.

  15. Game Boy Advance IPS Backlight mod, Adhere the adapter: stap 15, afbeelding 1 van 3 Game Boy Advance IPS Backlight mod, Adhere the adapter: stap 15, afbeelding 2 van 3 Game Boy Advance IPS Backlight mod, Adhere the adapter: stap 15, afbeelding 3 van 3
    • Paste the double side tape with one side to the backside of the IPS screen (align it with the adapter)!

    • Remove the paper from the tape

    • And adhere the adapter to the backside of the screen, if it looks like the 3rd photo, it's all good to go.

    • Be sure that the IPS screen is connected with the cable to the adapter! Otherwise it will be difficult to align it correctly.

  16. Game Boy Advance IPS Backlight mod, Prepare adapter for 32 pin motherboard: stap 16, afbeelding 1 van 2 Game Boy Advance IPS Backlight mod, Prepare adapter for 32 pin motherboard: stap 16, afbeelding 2 van 2
    • This is required for 32 Pin motherboards only. Skip this step if you have a 40 pin motherboard! If you are not sure which motherboard you have, please refer to Google. The 32 pin motherboards start with 1 and the 40 pin motherboards start with 0.

    • Fold the 40 pin cable underneath the adapter as shown in the photos. (only suitable if you have a 32 Pin motherboard!!).

    • For 40 pin motherboard, just leave the cable be, no additional adjustments are required.

  17. Game Boy Advance IPS Backlight mod, Prepare the shell: stap 17, afbeelding 1 van 2 Game Boy Advance IPS Backlight mod, Prepare the shell: stap 17, afbeelding 2 van 2
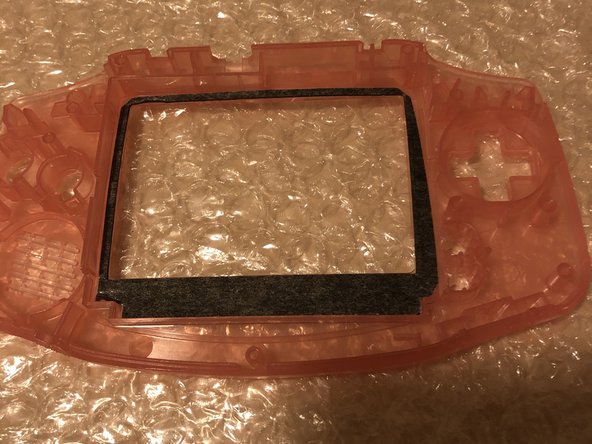
    • You have 2 options. Option 1: buy a pre-trimmed shell. Option 2: Trim the shell by yourself. I have a pre-trimmed shell as it's a very critical step. This guide is meant for pre-trimmed shells only. If you need to trim your own shell, please check on Google what needs to be trimmed and make sure it's trimmed perfectly.

    • Put the double side tape in the shell as shown on photo 2. Make sure it's good at it's place.

  18. Game Boy Advance IPS Backlight mod, Place IPS screen in shell: stap 18, afbeelding 1 van 2 Game Boy Advance IPS Backlight mod, Place IPS screen in shell: stap 18, afbeelding 2 van 2
    • You are approaching the point of no return if you follow this step!

    • Remove the foil from the front of the IPS screen.

    • Make sure everything is completely dust free before you continue!

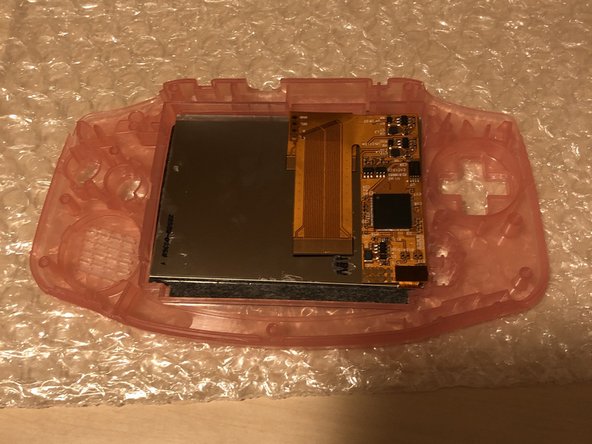
    • Place the IPS screen in the shell. Make sure you place it EXACTLY as shown in photo 2.

    • If your screen is shipped with a blue bracket. Please install the bracket to the LCD before you place it in the shell!

  19. Game Boy Advance IPS Backlight mod, Add plastic bars: stap 19, afbeelding 1 van 3 Game Boy Advance IPS Backlight mod, Add plastic bars: stap 19, afbeelding 2 van 3 Game Boy Advance IPS Backlight mod, Add plastic bars: stap 19, afbeelding 3 van 3
    • Some of the screens are delivered with a blue bracket, if this is the case. Please skip this step.

    • Take the 2 plastic clear bars. You have a thin bar and a somewhat thicker bar.

    • Place the thin plastic bar to the left side of the shell. If it won't fit perfectly in, just leave it be. And the thicker bar needs to be placed at the downside in the shell.

  20. Game Boy Advance IPS Backlight mod, Check screen and place lens: stap 20, afbeelding 1 van 3 Game Boy Advance IPS Backlight mod, Check screen and place lens: stap 20, afbeelding 2 van 3 Game Boy Advance IPS Backlight mod, Check screen and place lens: stap 20, afbeelding 3 van 3
    • Turn the shell and check if the IPS screen sits properly. This is your last change to make sure that the screen is dust free!

    • Take a new lens and put it in, make sure that everything is dust free before you attach it.

  21. Game Boy Advance IPS Backlight mod, Locate the golden round pads: stap 21, afbeelding 1 van 2 Game Boy Advance IPS Backlight mod, Locate the golden round pads: stap 21, afbeelding 2 van 2
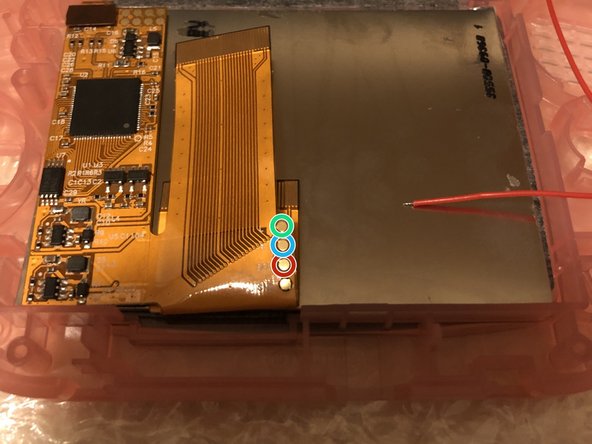
    • Check the ribbon cable. You will see 3 golden round pads with the following text next to it. L, R and SEL.

    • Red circled = the SEL (Select)

    • Blue circled = the R

    • Green circled = the L

  22. Game Boy Advance IPS Backlight mod, Solder the cables to the pads: stap 22, afbeelding 1 van 3 Game Boy Advance IPS Backlight mod, Solder the cables to the pads: stap 22, afbeelding 2 van 3 Game Boy Advance IPS Backlight mod, Solder the cables to the pads: stap 22, afbeelding 3 van 3
    • Put some solder on the pads as shown in the 2nd photo.

    • Solder the 3 cables to the pads. I advise to use 3 different cable colours, but if your kit only have red cables, use them.

  23. Game Boy Advance IPS Backlight mod, Solder SEL cable to TP2: stap 23, afbeelding 1 van 3 Game Boy Advance IPS Backlight mod, Solder SEL cable to TP2: stap 23, afbeelding 2 van 3 Game Boy Advance IPS Backlight mod, Solder SEL cable to TP2: stap 23, afbeelding 3 van 3
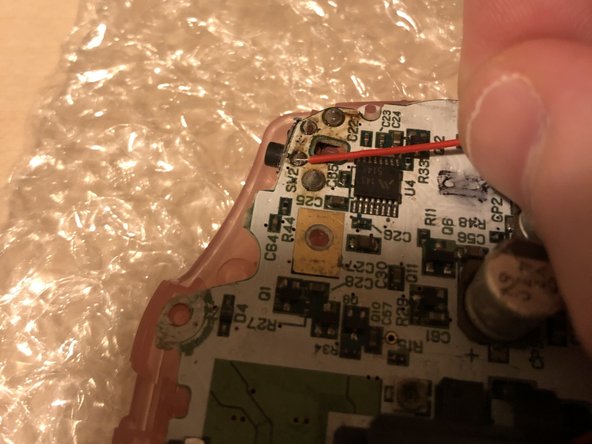
    • Locate the TP2 pad on the motherboard. Put some solder on the pad.

    • Solder the SEL cable to the TP2 pad on the motherboard.

    • For the finishing touch, you can put some tape on it.

  24. Game Boy Advance IPS Backlight mod, Fold cable for 32 pin motherboards: stap 24, afbeelding 1 van 2 Game Boy Advance IPS Backlight mod, Fold cable for 32 pin motherboards: stap 24, afbeelding 2 van 2
    • If you have a 40 pin motherboard, you can skip this step. Make sure that the 40 pin cable is correctly attached to the motherboard.

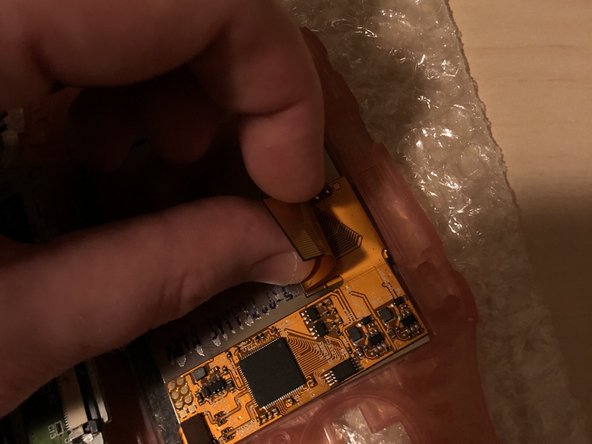
    • For 32 pin motherboards, please fold the cable as shown in the pictures.

  25. Game Boy Advance IPS Backlight mod, Connect the cable: stap 25, afbeelding 1 van 3 Game Boy Advance IPS Backlight mod, Connect the cable: stap 25, afbeelding 2 van 3 Game Boy Advance IPS Backlight mod, Connect the cable: stap 25, afbeelding 3 van 3
    • Put the cable in as showed.

    • You should be able to bend the cable a bit if required.

    • This is shown for 32 pin motherboards but the 40 pin cable should fit as easily as this one.

  26. Game Boy Advance IPS Backlight mod, Add buttons: stap 26, afbeelding 1 van 3 Game Boy Advance IPS Backlight mod, Add buttons: stap 26, afbeelding 2 van 3 Game Boy Advance IPS Backlight mod, Add buttons: stap 26, afbeelding 3 van 3
    • Before you put the motherboard in, don't forget to put in the buttons first!

    • And don't forget the plastic LED cover and rubbers.

  27. Game Boy Advance IPS Backlight mod, Attach motherboard to shell: stap 27, afbeelding 1 van 3 Game Boy Advance IPS Backlight mod, Attach motherboard to shell: stap 27, afbeelding 2 van 3 Game Boy Advance IPS Backlight mod, Attach motherboard to shell: stap 27, afbeelding 3 van 3
    • If you got some black foam in the kit. Just place it in now, before you attach the motherboard. This is not necessary, but will protect the motherboard and the cables soldered to the adapter.

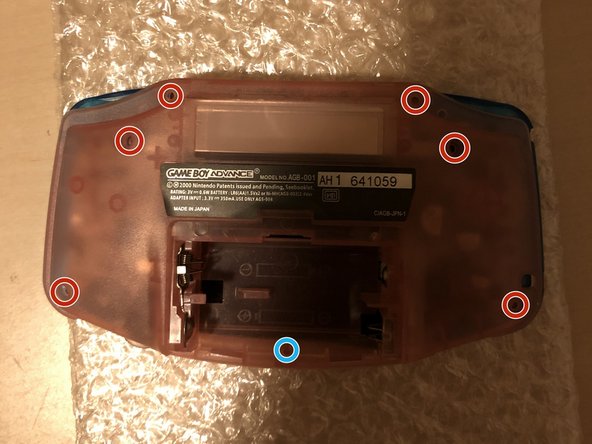
    • Attach the 2 screws circled in red. Be aware.

    • The 2 green arrow shows how you can route the L and R cables. The L cable needs to go the RIGHT side and the R cable needs to go to the LEFT side of the gameboy in this case. (This is because we have flipped the gameboy as shown in the picture, it's mirrored)!!

    • The last pictures shows when it's all good and when you are ready to follow the next step.

    • Do not forget to install the cable to the motherboard and to lock the connector.

    • Some models have a third screw circled in blue.

  28. Game Boy Advance IPS Backlight mod, Solder L and R cables to motherboard: stap 28, afbeelding 1 van 3 Game Boy Advance IPS Backlight mod, Solder L and R cables to motherboard: stap 28, afbeelding 2 van 3 Game Boy Advance IPS Backlight mod, Solder L and R cables to motherboard: stap 28, afbeelding 3 van 3
    • Solder the R cable to the left side. Please check the first picture to which solder pad it needs to be soldered on.

    • Solder the L cable to the Right side. Please check the second picture to which solder pad it needs to be soldered on.

    • Check the red arrows to confirm if it's all good. If it looks like the last photo, you are good to go.

  29. Game Boy Advance IPS Backlight mod, Put in the buttons and screws: stap 29, afbeelding 1 van 3 Game Boy Advance IPS Backlight mod, Put in the buttons and screws: stap 29, afbeelding 2 van 3 Game Boy Advance IPS Backlight mod, Put in the buttons and screws: stap 29, afbeelding 3 van 3
    • If the cables won't seat where you want them to be, just use some tape again.

    • Now put on the other buttons!

    • Put in the screws back again, circled in red. Please be aware, the blue circled screw is smaller than all the other screws.

  30. Game Boy Advance IPS Backlight mod, Test the Gameboy: stap 30, afbeelding 1 van 3 Game Boy Advance IPS Backlight mod, Test the Gameboy: stap 30, afbeelding 2 van 3 Game Boy Advance IPS Backlight mod, Test the Gameboy: stap 30, afbeelding 3 van 3
    • Put in some batteries and test the gameboy. When it looks like the 1st picture, it's a success!

    • Hold the SELECT button and press the L button to decrease the brightness. Hold the SELECT button and press the R button to increase the brightness.

    • You can click multiple times to increase and decrease the brightness.

    • Put in a game and test if it works. If it's working fine, congratulations with your IPS screen!

Conclusie

And that’s all! If everything went well, you should have a blacklight screen installed in your GBA.

7 andere personen hebben deze handleiding voltooid.

koppie007

Lid sinds: 08/22/13

10.603 Reputatie

9 handleidingen geschreven

7 opmerkingen

Since you did both. Which do you prefer the ips or the ags 101?

jp1357 - Antwoord

Hi! I prefer the IPS. This because it’s easier to fit (in a pre-cut case) and your batteries will last longer. You can also increase and decrease the brightness of the backlight.

koppie007 -

Hi I already have a gba with the ips backlight installed already and I'm looking to replace the buttons, shell, and, screen lens. Will I need to solder anything or do I just replace it?

Demitrius Graham - Antwoord

Hi! No, you can take out the motherboard with the adapter, BUT be sure you unplug the screen from the adapter first. When you did this, transfer the screen first. When the screen sits flush, connect it to the adapter and build it back in :). Good luck!

koppie007 -

did every step but when i turn on my gameboy i get a blackscreen with backlight but no video. i think my ips display is broken.

Parvis Parvis - Antwoord

Voeg opmerking toe

Weergavestatistieken:

Afgelopen 24 uren: 39

Afgelopen 7 dagen: 169

Afgelopen 30 dagen: 729

Altijd: 31,323