Ga door naar hoofdinhoud

Flip Video Ultra Camera lense Replacement

Wat je nodig hebt

  1. Flip Video Ultra Camera lense Replacement, Circuit Board: stap 1, afbeelding 1 van 1
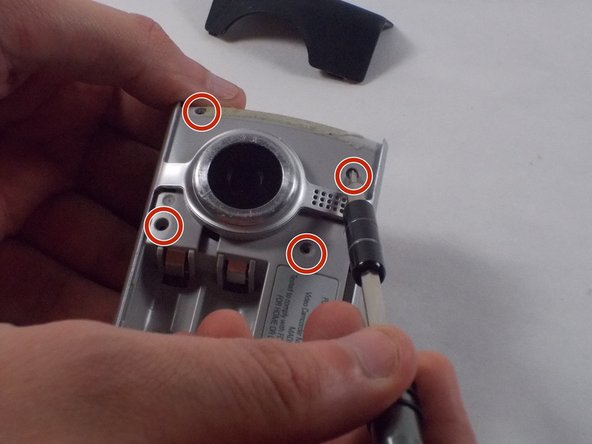
    • Unlock the battery cover by sliding the switch to the unlock position.

  2. Flip Video Ultra Camera lense Replacement: stap 2, afbeelding 1 van 1
    • Remove the battery cover by sliding it down the camera.

  3. Flip Video Ultra Camera lense Replacement: stap 3, afbeelding 1 van 1
    • Remove the batteries

  4. Flip Video Ultra Camera lense Replacement: stap 4, afbeelding 1 van 1
    • Slide the black upper casing off from the device.

  5. Flip Video Ultra Camera lense Replacement: stap 5, afbeelding 1 van 2 Flip Video Ultra Camera lense Replacement: stap 5, afbeelding 2 van 2
    • Remove the six 1mm screws from the back and upper casing with the Phillips Head screwdriver.

  6. Flip Video Ultra Camera lense Replacement: stap 6, afbeelding 1 van 1
    • Remove the top casing from the bottom to reveal the inner circuit board.

  7. Flip Video Ultra Camera lense Replacement: stap 7, afbeelding 1 van 2 Flip Video Ultra Camera lense Replacement: stap 7, afbeelding 2 van 2
    • When removing the back panel, the rubber buttons will become loose and likely fall off the board. This is normal and can easily placed back on the board once finished.

    • Remove the six 1mm screws with the 1 Phillips head screwdriver.

  8. Flip Video Ultra Camera lense Replacement: stap 8, afbeelding 1 van 1
    • Gently separate the circuit board from the casing.

  9. Flip Video Ultra Camera lense Replacement: stap 9, afbeelding 1 van 2 Flip Video Ultra Camera lense Replacement: stap 9, afbeelding 2 van 2
    • Unscrew the single 1mm screw from USB housing unit.

  10. Flip Video Ultra Camera lense Replacement: stap 10, afbeelding 1 van 2 Flip Video Ultra Camera lense Replacement: stap 10, afbeelding 2 van 2
    • Unscrew the 2 1mm screws and gently separate camera wires from plastic casing.

  11. Flip Video Ultra Camera lense Replacement: stap 11, afbeelding 1 van 1
    • Gently pry out the USB housing unit with the Ifxit Opening Tool.

  12. Flip Video Ultra Camera lense Replacement: stap 12, afbeelding 1 van 3 Flip Video Ultra Camera lense Replacement: stap 12, afbeelding 2 van 3 Flip Video Ultra Camera lense Replacement: stap 12, afbeelding 3 van 3
    • Remove the two 1mm screws and separate the circuit board and camera from the plastic casing.

  13. Flip Video Ultra Camera lense Replacement: stap 13, afbeelding 1 van 1
    • Unscrew the camera housing unit from the plastic case.

  14. Flip Video Ultra Camera lense Replacement: stap 14, afbeelding 1 van 3 Flip Video Ultra Camera lense Replacement: stap 14, afbeelding 2 van 3 Flip Video Ultra Camera lense Replacement: stap 14, afbeelding 3 van 3
    Gereedschap gebruikt in deze stap:
    Tweezers
    $4.99
    Koop
    • With tweezers, remove the microphone and USB connections.

  15. Flip Video Ultra Camera lense Replacement: stap 15, afbeelding 1 van 2 Flip Video Ultra Camera lense Replacement: stap 15, afbeelding 2 van 2
    • Unscrew the two 1mm screws from the board shown. Remove screen from circuit board.

  16. Flip Video Ultra Camera lense Replacement: stap 16, afbeelding 1 van 2 Flip Video Ultra Camera lense Replacement: stap 16, afbeelding 2 van 2
    • Remove the single 2.1 mm screw and separate camera from the circuit board.

  17. Flip Video Ultra Camera lense Replacement, Camera lense: stap 17, afbeelding 1 van 1
    • Camera lens is now separated from the circuit board.

Conclusie

To reassemble your device, follow these instructions in reverse order.

Nathaniel Ruf

Lid sinds: 10/18/16

514 Reputatie

5 handleidingen geschreven

Team

UMass Dartmouth, Team 5-7, Martin Fall 2016 Lid van UMass Dartmouth, Team 5-7, Martin Fall 2016

UMASSD-MARTIN-F16S5G7

3 Leden

10 handleidingen geschreven

0 opmerkingen

Voeg opmerking toe

Weergavestatistieken:

Afgelopen 24 uren: 0

Afgelopen 7 dagen: 1

Afgelopen 30 dagen: 7

Altijd: 211