Ga door naar hoofdinhoud

Epson Stylus C84 Paper Feeder Repair

Wat je nodig hebt

  1. Epson Stylus C84 Paper Feeder Repair, Removing the Back Panel: stap 1, afbeelding 1 van 2 Epson Stylus C84 Paper Feeder Repair, Removing the Back Panel: stap 1, afbeelding 2 van 2
    • Turn the printer around so the printer's front is facing away from you. Then, remove the rounded black panel from the paper guide by lifting it straight up.

    • Left Panel

    • Right Panel

    • Printer Front

    • Back Panel

  2. Epson Stylus C84 Paper Feeder Repair, Removing the "Parallel" Cover: stap 2, afbeelding 1 van 3 Epson Stylus C84 Paper Feeder Repair, Removing the "Parallel" Cover: stap 2, afbeelding 2 van 3 Epson Stylus C84 Paper Feeder Repair, Removing the "Parallel" Cover: stap 2, afbeelding 3 van 3
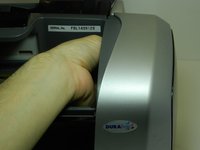
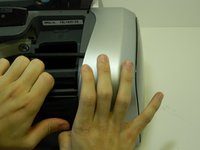
    • Wedge the flat end of the spudger between the top of the “Parallel” cover and the right panel, and gently pry the upper edge cover away. Completely remove the cover by hand if necessary. The Parallel and USB ports should be exposed.

  3. Epson Stylus C84 Paper Feeder Repair, Releasing the Prongs: stap 3, afbeelding 1 van 1
    • Next, turn the printer so that it's laying on its front side.

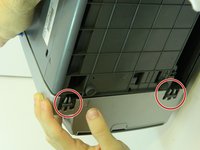
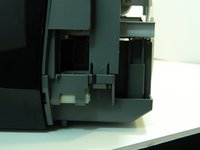
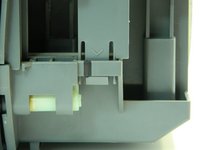
    • Locate the two plastic prongs on the bottom of the right panel.

    • Gently pinch the prongs together and push them with your fingers through the clips until they are free.

    • Do not use extreme force or bend the prongs in such a way that they break.

  4. Epson Stylus C84 Paper Feeder Repair, Pushing In the Interior Tabs: stap 4, afbeelding 1 van 3 Epson Stylus C84 Paper Feeder Repair, Pushing In the Interior Tabs: stap 4, afbeelding 2 van 3 Epson Stylus C84 Paper Feeder Repair, Pushing In the Interior Tabs: stap 4, afbeelding 3 van 3
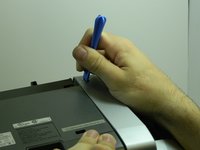
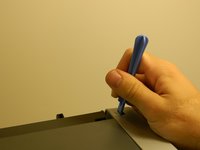
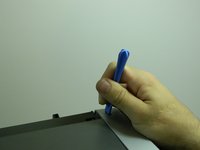
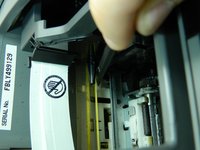
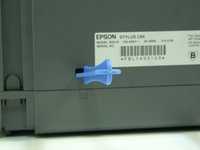
    • Wedge a wide-tipped blue plastic opening tool inside the gray tab on the upper left-hand corner of the right panel, next to the arrow.

  5. Epson Stylus C84 Paper Feeder Repair, Releasing the Interior Tabs: stap 5, afbeelding 1 van 2 Epson Stylus C84 Paper Feeder Repair, Releasing the Interior Tabs: stap 5, afbeelding 2 van 2
    • Push in the gray tab until it becomes separated from the rest of the panel.

  6. Epson Stylus C84 Paper Feeder Repair, Holding the Right Panel in Place: stap 6, afbeelding 1 van 2 Epson Stylus C84 Paper Feeder Repair, Holding the Right Panel in Place: stap 6, afbeelding 2 van 2
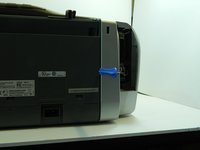
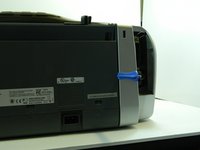
    • Set the printer back down on its bottom.

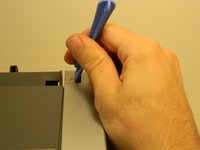
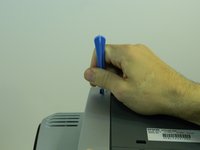
    • Wedge one of the blue plastic separators between the back of the right panel and the rest of the printer’s housing to keep it separated.

  7. Epson Stylus C84 Paper Feeder Repair, Unclipping the Right Panel: stap 7, afbeelding 1 van 1
    • Turn the printer around so the front is facing toward you.

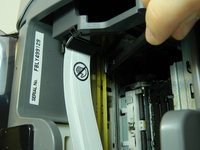
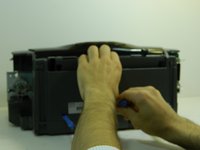
    • Open the printer’s cover, place your hand inside the right panel and unclip it from the rest of the printer with your thumb and forefinger.

    • Do not use extreme force when unclipping the panel.

  8. Epson Stylus C84 Paper Feeder Repair, Holding the Separated Right Panel: stap 8, afbeelding 1 van 1
    • Wedge a blue plastic separator between the plastic housing and the rest of the right panel and push the panel out from the inside to free it.

  9. Epson Stylus C84 Paper Feeder Repair, Removing the Right Panel: stap 9, afbeelding 1 van 1
    • Gently push the panel to the right to separate it from the printer.

  10. Epson Stylus C84 Paper Feeder Repair, Releasing the Ink Cartridge Carrier: stap 10, afbeelding 1 van 2 Epson Stylus C84 Paper Feeder Repair, Releasing the Ink Cartridge Carrier: stap 10, afbeelding 2 van 2
    • Use the flat end of the spudger to push the white button next to the ink cartridge carrier.

  11. Epson Stylus C84 Paper Feeder Repair, Manually Sliding the Ink Cartridge Carrier: stap 11, afbeelding 1 van 1
    • Gently slide the ink cartridge carrier by hand to the left to gain access to the inside of the left panel.

  12. Epson Stylus C84 Paper Feeder Repair, Removing the Left Panel's Prongs: stap 12, afbeelding 1 van 2 Epson Stylus C84 Paper Feeder Repair, Removing the Left Panel's Prongs: stap 12, afbeelding 2 van 2
    • Turn the printer so that it's on its front side again. Now there are two sets of prongs to undo for the left panel. Repeat step #2 for each set of prongs.

    • Do not use extreme force when removing the prongs.

  13. Epson Stylus C84 Paper Feeder Repair, Unclipping the Left Panel Upper Notch: stap 13, afbeelding 1 van 3 Epson Stylus C84 Paper Feeder Repair, Unclipping the Left Panel Upper Notch: stap 13, afbeelding 2 van 3 Epson Stylus C84 Paper Feeder Repair, Unclipping the Left Panel Upper Notch: stap 13, afbeelding 3 van 3
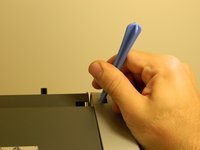
    • Wedge a blue plastic separator in the gray tab on the upper right-hand corner of the left panel.

    • Unclip the panel from inside the printer, and remove it.

  14. Epson Stylus C84 Paper Feeder Repair, Unclipping the Back Panel: stap 14, afbeelding 1 van 3 Epson Stylus C84 Paper Feeder Repair, Unclipping the Back Panel: stap 14, afbeelding 2 van 3 Epson Stylus C84 Paper Feeder Repair, Unclipping the Back Panel: stap 14, afbeelding 3 van 3
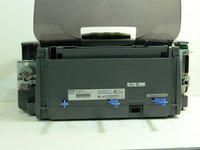
    • Turn the printer around so the front is facing away. Use three wide-tip blue plastic opening tools and place them inside the notches on the back panel of the printer.

  15. Epson Stylus C84 Paper Feeder Repair, Separating the Notches: stap 15, afbeelding 1 van 2 Epson Stylus C84 Paper Feeder Repair, Separating the Notches: stap 15, afbeelding 2 van 2
    • Push on each notch until the retaining tabs are separated from the back plastic cover.

  16. Epson Stylus C84 Paper Feeder Repair, Releasing the Tabs: stap 16, afbeelding 1 van 2 Epson Stylus C84 Paper Feeder Repair, Releasing the Tabs: stap 16, afbeelding 2 van 2
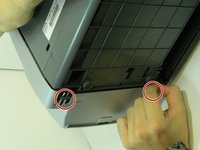
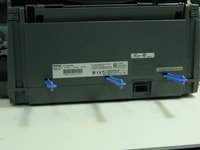
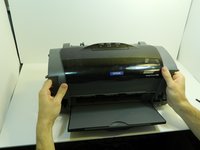
    • Turn the printer around so the front is facing you and gently push up on each tab of the front plastic panel, above the arrows. Make sure the prongs are detached from the clips.

  17. Epson Stylus C84 Paper Feeder Repair, Removing the Casing: stap 17, afbeelding 1 van 3 Epson Stylus C84 Paper Feeder Repair, Removing the Casing: stap 17, afbeelding 2 van 3 Epson Stylus C84 Paper Feeder Repair, Removing the Casing: stap 17, afbeelding 3 van 3
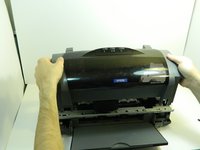
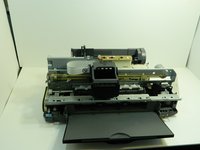
    • Gently pull the plastic housing upward to remove the back panel and reveal the inner components of the printer.

  18. Epson Stylus C84 Paper Feeder Repair, Epson Stylus C84 Paper Feeder Repair: stap 18, afbeelding 1 van 1
    • Once you’ve turned the printer around so the back is faced towards you, locate the screw at the bottom left-hand corner of the paper feeder and unscrew it with a Phillips #1 screwdriver.

  19. Epson Stylus C84 Paper Feeder Repair: stap 19, afbeelding 1 van 1
    • Unscrew the second screw securing the bottom-right hand corner of the feeder. The screw is integrated into the back of the printer and is supported by a washer.

  20. Epson Stylus C84 Paper Feeder Repair: stap 20, afbeelding 1 van 1
    • Locate and unscrew the third and final screw underneath the feeder at the bottom left-hand side.

    • This picture shows the location (hole) of the screw, not the screw it self, when the feeder is removed. It is difficult to show clearly when the feeder is in place.

  21. Epson Stylus C84 Paper Feeder Repair: stap 21, afbeelding 1 van 1
    • Gently remove the feeder from its place and set it aside from the printer.

  22. Epson Stylus C84 Paper Feeder Repair: stap 22, afbeelding 1 van 1
    • When the grey, rubber wheel comes out of place, use tape, glue, or whatever means you find necessary to keep it in the position shown here.

Conclusie

To reassemble your device, follow these instructions in reverse order.

Cameron Hashemi-Pour

Lid sinds: 09/20/13

201 Reputatie

2 handleidingen geschreven

Team

UMass Dartmouth, Team 1-3, Gulbrandsen Fall 2013 Lid van UMass Dartmouth, Team 1-3, Gulbrandsen Fall 2013

UMASSD-GULBRANDSEN-F13S1G3

3 Leden

10 handleidingen geschreven

0 opmerkingen

Voeg opmerking toe

Weergavestatistieken:

Afgelopen 24 uren: 0

Afgelopen 7 dagen: 0

Afgelopen 30 dagen: 2

Altijd: 539