Ga door naar hoofdinhoud

Display

Alleen vereisten
Deze handleiding is alleen bedoeld als vereiste voor andere handleidingen. Het staat niet op zichzelf.

Wat je nodig hebt

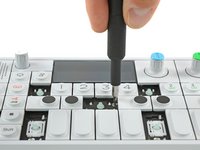
  1. Display, key removal: stap 1, afbeelding 1 van 3 Display, key removal: stap 1, afbeelding 2 van 3 Display, key removal: stap 1, afbeelding 3 van 3
    • To get to the screws beneath the keyboard you need to take some keys off. You can use either an opening tool or an opening pick. The first picture shows how it should look like with all the necessary keys off (12 in total).

    • The four longer keys from the fingerboard are to be handled from the left side to get them off.

    • The eight smaller keys need to be levered from the bottom up.

  2. Display, removing scissors mechanisms: stap 2, afbeelding 1 van 2 Display, removing scissors mechanisms: stap 2, afbeelding 2 van 2
    • The scissor mechanism of the eight small keys are obstructing the underlying screws.

    • By using again an opening tool or opening pick these can be snapped off easily.

    • When reassembling be sure to place them in with the correct side facing upwards.

  3. Display, unscrew keyboard: stap 3, afbeelding 1 van 3 Display, unscrew keyboard: stap 3, afbeelding 2 van 3 Display, unscrew keyboard: stap 3, afbeelding 3 van 3
    • Loosen those 12 screws with a Phillips #00 screwdriver.

    • Then just pull off the four rotary knobs and the volume knob.

    • Now it is possible to slightly lift the keyboard and set it back.

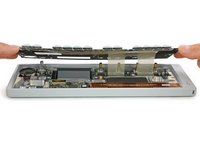
  4. Display, unplug and remove keyboard: stap 4, afbeelding 1 van 1
    • Unlock the flex cables by pushing the two black nibs on both sides of each connector.

    • Now you can pull the flex cables out and remove the keyboard completely.

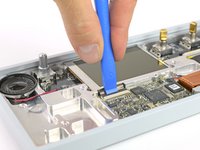
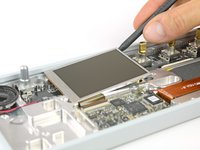
  5. Display, remove display: stap 5, afbeelding 1 van 3 Display, remove display: stap 5, afbeelding 2 van 3 Display, remove display: stap 5, afbeelding 3 van 3
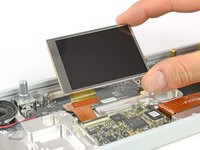
    • Open the display cable connector by using a plastic opening tool to flip the latch upwards.

    • The display is held in place with a mild adhesive. A spudger helps you to get it free.

    • Now you can unplug the cable and take out the whole display.

Conclusie

To reassemble your device, follow these instructions in reverse order.

Tobias Isakeit

Lid sinds: 03/31/14

117.238 Reputatie

188 handleidingen geschreven

Team

Master Techs Lid van Master Techs

Community

322 Leden

2.520 handleidingen geschreven

0 opmerkingen

Voeg opmerking toe

Weergavestatistieken:

Afgelopen 24 uren: 0

Afgelopen 7 dagen: 0

Afgelopen 30 dagen: 0

Altijd: 153