Deze versie kan foutieve bewerkingen bevatten. Schakel over naar de recentste gecontroleerde momentopname.
Wat je nodig hebt
-
Deze stap is niet vertaald. Help het te vertalen
-
Loosen the exhaust strap:
-
Use an 12mm wrench to loosen the exhaust band lock nut.
-
A 6mm Allen key is required to unscrew the bolt at the bottom of the band.
-
Once the bottom of the strap is loose, you can push it upward and slide the retaining pin that secures the top of the strap out to release it.
-
-
Deze stap is niet vertaald. Help het te vertalen
-
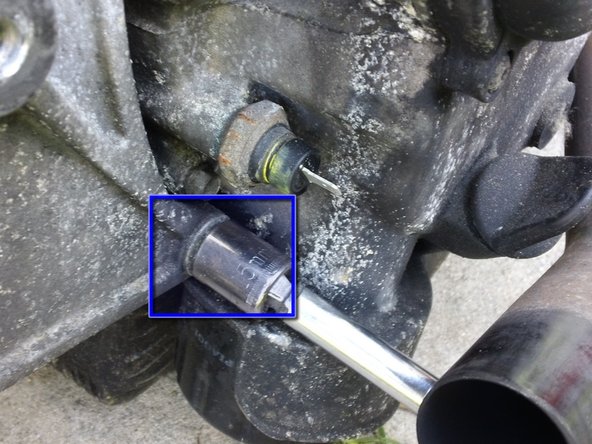
Use a 13mm socket to loosen the clamp between the muffler and header pipe.
-
-
Deze stap is niet vertaald. Help het te vertalen
-
A Torx T40 driver is required to remove the final bolt securing the exhaust.
-
The Exhaust assembly is now free. Pull and wiggle the muffler back (taking care not to damage your exhaust joint gasket) until the muffler comes free from the header pipe.
-
-
-
Deze stap is niet vertaald. Help het te vertalen
-
Remove the 15mm nut securing the upper front corner of the swingarm.
-
Remove the 15mm nut securing the lower front corner of the swing arm.
-
-
Deze stap is niet vertaald. Help het te vertalen
-
Straighten and remove the cotter pin securing the rear hub nut cover.
-
Remove the cover from the rear hub nut.
-
-
Deze stap is niet vertaald. Help het te vertalen
-
Remove the 24mm rear hub nut. Having a friend hold the rear brake handle will help break it loose. You can also use an impact wrench to remove it if you cannot get enough torque with a hand ratchet.
-
There is a spacer behind the rear hub nut. It will slide off with little or no force.
-
There is a spacer behind the rear hub nut. It will slide off with little or no force.
-
-
Deze stap is niet vertaald. Help het te vertalen
-
Grip the swingarm and pull it free of the 2 15mm studs and rear axle. You will now have access to the rear wheel.
-
and dont forget to remove 2 allen screws from shocks absorber and tilt it to remove swingers and tyre
-


Annuleren: ik heb deze handleiding niet afgemaakt.
2 andere personen hebben deze handleiding voltooid.

