Inleiding
The hood is wonderful it just has one incredibly annoying feature: it will turn on the fan and then resist all attempts to turn it off until if feels it is cool enough.
This is a result of poor temperature sensor placement. The sensor is mounted directly onto the metal and since the metal gets hot sooner and stay hot longer than is necessary for proper ventilation the hood never seems to turn off.
This guide will show you how to disable this, either by moving the sensor to a new location or disabling it completely.
Edit: I recently found a video someone else produced detailing the same steps that may also be helpful: https://www.youtube.com/watch?v=d38RxDPh...
Wat je nodig hebt
-
-
First we need to remove the grease grates on the bottom of the hood to access the internal components. There are two separate grates.
-
Locate the grey latches at the front of the grates. Pull the latch down and towards you while supporting the grate. Once released you will be able to wiggle it down and out.
-
Repeat for the other grate.
-
-
-
Next we will remove the grey pan protecting the internal components from the stove.
-
There are 6 (sometimes only 4) screws holding the pan in place. Using a standard Phillips screwdriver remove each one.
-
Have someone support the pan so it doesn't fall. If no one else is around put something soft under it so it doesn't get damaged when it falls.
-
-
-
-
Once the grates and pan have been removed, we can find the sensor at the back of the hood, in the center, screwed into the back of the piece of metal.
-
Trace the small black wire away from the sensor and up to the logic board so you can see where it connects.
-
Steps 4 and 5 are alternate methods of disabling the sensor. If you would simply like to move the sensor so it doesn't trigger as early go to step 4. If you would like to disable the sensor so the fan only operates manually go to step 5.
-
-
-
Since the sensor is mounted onto the metal of the hood it gets false readings because the metal gets hot quicker and stay hot longer.
-
To move the sensor, undo the screw holding it in place using a flathead screwdriver. Hold the back of it as you undo the screw.
-
Once the sensor has been detached, move it so that it hangs in the air and is not touching any metal surfaces.
-
-
-
To ensure that the hood will never turn on of its own accord again, we can disable the temperate sensor and operate the hood manually only.
-
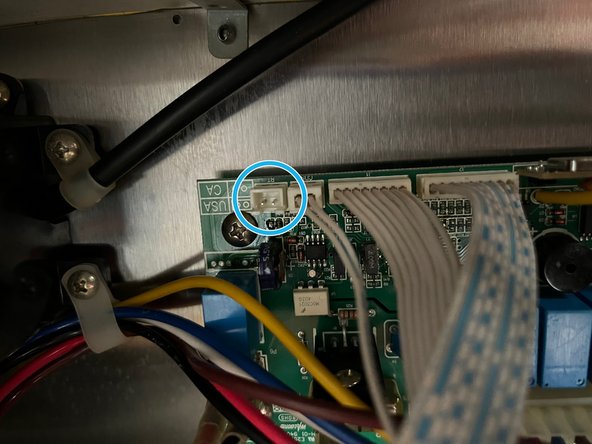
Follow the black sensor wire (circled in red) up to the logic board (circled in green) and see where it connects. It is located in the top left and is circled in blue on the second image with the wire removed.
-
The wire has a white connector that plugs into a white socket. Use your nails to pull the connector out of the socket. Wrap this connector somewhere out of the way.
-
On some models removing the sensor makes an error code always show on the display. The hood will still operate normally it will just display this instead of the time.
-


To reassemble your device, follow steps 2 and 1 in reverse order.
To reassemble your device, follow steps 2 and 1 in reverse order.
Annuleren: ik heb deze handleiding niet afgemaakt.
4 andere personen hebben deze handleiding voltooid.

8 opmerkingen
I was ready to buy a new range hood fan because the fan kept going on the turbo speed even if we were not cooking! Luckily, we have it connected to a wall switch and could shut it off. I asked somebody from Broan what the issue could be, and they said the heat sensor. I googled how to install one and I saw your page.
This was so easy to fix and saved me from buying a new fan. The hardest part was reaching over stove to get to the rear screws of pan but otherwise it took me 10 minutes to disconnect that sensor wire and put everything back together.
Thank you so much for your guidance !
I am so happy to hear it helped you achieve success! Had the exact same situation with ours, it was maddening. Felt such a waste to get rid of the thing for one dumb feature though I tried to fix it first.
My first thought was that if it had been that annoying for us there had to be others who could use the same fix. It makes my day knowing this guide has helped save someone some money and restore another fan to working order!
Completely perfect solution for our Broan range hood heat sensitive fan issue. Has anyone done any research for getting rid of the error code on the display? I have tried in vain to find a solution to no avail. But, if you press the button with the clock face to the right of the display, you can at least still see your time, etc. Thank you for all this helpful information. Duff
You are quite welcome! Happy it could help solve the issue for you, it is quite a frustrating one to have linger. I have not as of yet had the success of a finding a solution to the error code. For some, it doesn't appear either which makes it more puzzling. Hopefully someone will find it in the future and be able to chime in.
I am intrigued at your suggestion. Are you talking about the rightmost of the two buttons under the display we see in the first image of the guide?
The fan on our Broan range hood went on high by itself over an hour after we had used the cooktop. We were not able to turn it off. We found your suggestions and disabled the heat sensor. The error code now is I-L. We have no idea what caused this to happen. We may call Broan and see if they have an explanation? If this is the only fix, we can hid the error code with a little bit of black tape. Thank you for your post on this issue.