Inleiding
Na jaren van relatieve verwaarlozing heeft Apple de geliefde MacBook Air weer eens ge-update. Bevat deze lichtgewicht laptop alles om bij te blijven met de ultra-portables die in 2018 werden gereleased? Of is het allemaal gebakken lucht? Laten we de laptop openen om het voor onszelf uit te vinden!
Volg ons op Facebook, Instagram en Twitter om op de hoogte te blijven van al het laatste demontagenieuws! Schrijf je in voor onze nieuwsbrief om de demontages direct in je inbox te ontvangen.
Wat je nodig hebt
Video overzicht
-
-
Laten we de lucht (pun intended!) klaren over de specs van deze laptop:
-
13.3" LED-backlit IPS Retina-scherm: 2560 x 1600 resolutie (227 ppi)
-
1.6 GHz dual-core Intel Core i5 (Turbo Boost tot 3.6 GHz) met geïntegreerde Intel UHD Graphics 617
-
Apple T2 op maat gemaakte security-chip/coprocessor
-
8 GB aan 2133 MHz LPDDR3 SDRAM
-
128 GB PCIe-based SSD
-
802.11ac Wi-Fi en Bluetooth 4.2
-
Twee Thunderbolt 3 (USB-C) poorten die onder andere het opladen, de DisplayPort, Thunderbolt en USB 3.1 2e gen. ondersteunen.
-
-
-
Voordat we de reis naar binnen wagen, nemen we een kijkje aan de buitenkant van de laptop.
-
Op de onderbuik vinden we een mooie coating en een aantal pentalobe-schroeven in hetzelfde kleurtje.
-
Bij het openklappen van het scherm worden we begroet door het voor ons welbekende butterfly-toetsenbord van de 3e generatie, wat ons direct MacBook Pro flashbacks oplevert.
-
De Air vertoont een verbazingwekkende gelijkenis met de Touch Bar-loze 13" MacBook Pro—los van de dikte en de Touch ID zijn ze haast niet van elkaar te onderscheiden.
-
...en ondanks de "Air"-naamgeving laat deze laptop de 12" MacBook lijken op een lichtgewicht.
-
-
-
Uiteraard zouden we het bekijken van de buitenkant niet voltooien zonder een aantal mooie röntgenfoto's.
-
Met behulp van onze vrienden van Creative Electron krijgen we alvast een sneak peek in de binnenkant.
-
-
-
Nog een laatste omweg voordat we naar binnen treden: we kunnen het niet weerstaan om toch even snel onze favoriete Command-toets van het toetsenbord af te trekken om te kijken naar het
geluidsverminderendewaterdichte membraan. -
Love it or hate it, het lijkt erop dat de vlinder nog wel even rond zal blijven vliegen.
-
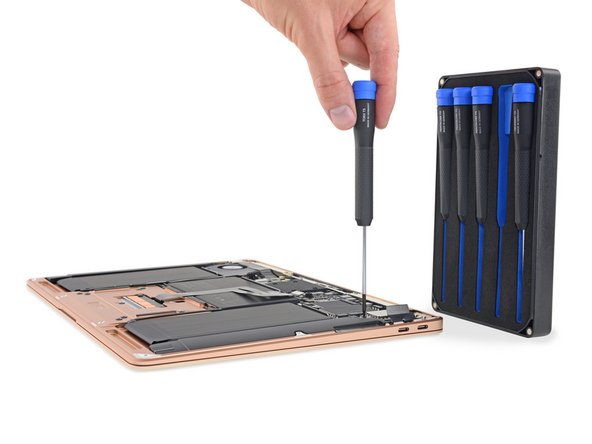
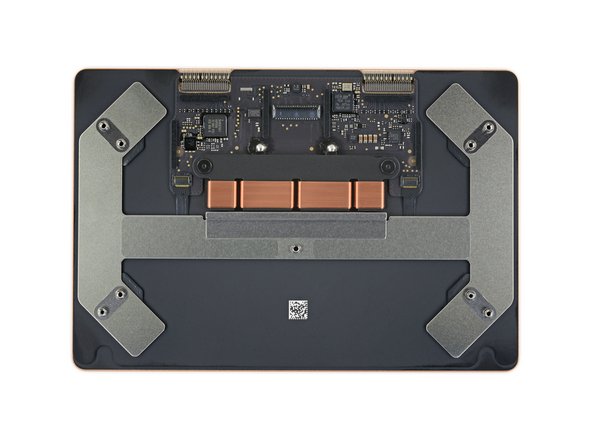
Met een paar draaien van onze pentalobe-schroevendraaier en een stevige ruk komt de onderste behuizing los uit de twee klemmen en hebben we de binnenkant officieel bereikt.
-
Aan de binnenkant zien we in de eerste oogopslag: een klein logic board, een eenzame ventilator, een paar grote, langwerpige speakers en een interessant, radiator-achtig koellichaam.
Louis Rossmann expresses concern that the fan on the redesigned MacBook Air would not be particularly effective at cooling. Looking at the photos in this teardown, I would concur. Can anyone explain how the fan actually cools the computer, and how effective is it? Rossmann posted a video of this on YouTube in response to a dead CPU caused by overheating.
Hi Anthony,
The first string of comments at the bottom of this teardown goes into the cooling setup in more detail.
-
-
KoopGereedschap gebruikt in deze stap:Marlin Screwdriver Set - 5 Torx Precision Screwdrivers$19.99
-
Slechts zes Torx-schroeven en een aantal kabelaansluitiingen staan tussen ons en het verwijderen van het logic board—dat is niet slecht! En een dergelijke procedure kan onze schroevendraaierset van Marlin met gemak aan.
-
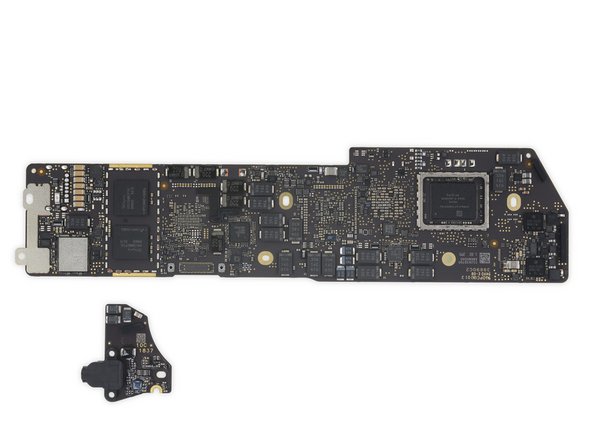
En zo komt het eruit! Het logic board van de Air is niet zo snorrig als die van de Pro's, toch is het ook niet zo miniscuul als in de MacBook's.
-
Daaropvolgend nemen we het dochterbord eruit, welke een (in levensgevaar verkerende) hoofdtelefoonjack en een aantal aansluitingen voor de speakers en de Touch ID-sensor bevat.
-
Wat we tevens op dit bord vinden: een Cirrus Logic CS42L83A audio codec.
-
-
-
-
Dit bord kan dan niet heel groot zijn, toch bevat het een stevige portie aan processing power:
-
Intel SREKQ Core i5-8210Y processor
-
Apple APL1027 339S00535 T2 coprocessor
-
SanDisk SDSGFBF12 043G flashgeheugen (128 GB in totaal)
-
Intel JHL7540 Thunderbolt 3-controller
-
338S00267-A0 (waarschijnlijk een Apple PMIC)
The Apple T2 Chip is already almost as large as the Intel i5 Chip. Imagine what will happen in a few years when ARM is replacing x86-64 on MacBook.
Who knows? Apple may announce for macOS 10.16 an ARM version of the OS that can run on existing T2 devices.
Haha
where can I buy this board, I want to upgrade my ram and also my storage. Actually I have 8gb of Ram and 128gb of storage
-
-
-
En bij het omdraaien van het bord vinden we nóg meer silicoon:
-
2x SKhynix H9CCNNNCPTAL LPDDR3 RAM (8 GB in totaal)
-
Murata 339S00446 1ZE SS8915047 (waarschijnlijk een Wi-Fi-module)
-
Intersil 95828A HRTZ X829PMJ
-
NXP 80V18 secure NFC module
-
Macronix MX25U3235F serieel multi I/O flashgeheugen
-
Texas Instruments CD32-15C00 power controller
-
Texas Instruments TPS51980A synchronische buck converter
I believe that TI’s CD3215C00 is a USB 3.1 redriver.
-
-
-
Tegenover de hoofdtelefoonjack vinden we een aantal super modulaire Thunderbolt-poorten!
-
Deze MacBook is wat ons betreft goed begonnen aan deze demontage—alle poorten bevinden zich op hun eigen bord en zijn relatief makkelijk te vervangen.
-
Eindelijk vinden we het onderdeel dat verantwoordelijk is voor het rondblazen van lucht in deze... Air.
How does this fan cool the CPU? They seem separate.
It doesn’t https://youtu.be/iiCBYAP_Sgg
I think the fan creates a slight vacuum/negative space in the chassis, pulling fresh air from vents across the board and expelling it out the back.
I heard you can’t swap out the SSD in the 2018’s?? I wanted to put a 256GB in, can I do it? I was told no.
You heard correctly! The flash storage is integrated into the logic board and and paired to the T2 chip so it cannot be swapped out, unfortunately. You can see it in step 6.
if you will put a fan, at least put in the cpu, not as a chasis fan, that’s stupid.
I want to replace the Ports for my MacBook Pro (13-inch, 2018, Four Thunderbolt 3 Ports). Can you tell me the tools and the parts I need, and how much they will cost?
Bouna
-
-
-
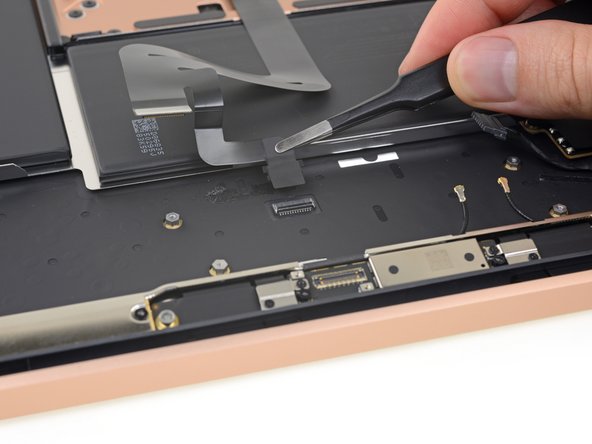
Overeenkomstig met de reparatie-vriendelijke (of op z'n minst vriendelijkere) trend vinden we nu ook uitrekbare kleefstrips met treklip onder deze langwerpige speakers!
-
Daarbij moeten we melden dat we niet per se liefhebbers zijn van lijm—herbruikbare schroeven zijn altijd beter— maar hey, het uit het toestel trekken van deze iPhone-achtige kleefstrips is vele malen beter dan kleverige brokken lijm en het blind los moeten wrikken van onderdelen.
-
Plus, enkel de aanwezigheid van deze kleefstrips met treklip tonen al aan dat tenminste íémand nadacht over mogelijke reparatie- en demontagesituaties.
-
-
-
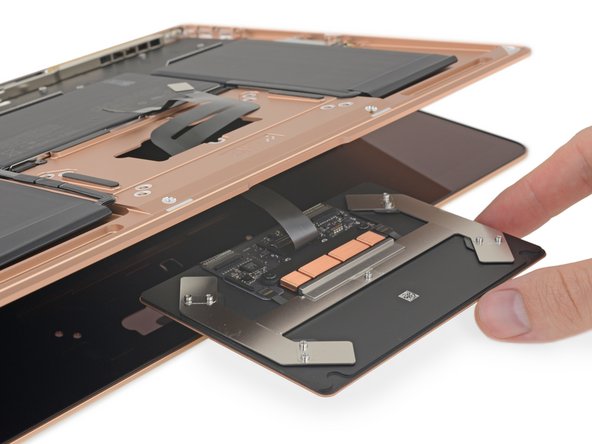
Ons volgende slachtoffer is het trackpad.
-
Anders dan bij de nieuwere MacBook Pro's, die een first-step vervangbaar trackpad bevatten, deelt dit trackpad een kabel met het toetsenbord welke onder het logic board is vastgezet.
-
Bij het eruit komen van het trackpad kunnen we het niet helpen om te denken aan een zekere TIE-vechter...
Are you certain that the split in that trackpad cable over the center battery wouldn’t allow a bit of “service loop”, just enough to disengage the cable connector from the socket on the trackpad with a spudger without needing to remove the logic board? Seems a rather conspicuous cable design to not provide some benefit. If anything, I’d bet that flexing that cable split does yield some length, yet also leaves permanent (no warranty for you!) evidence it was done.
No guarantees, but it didn’t look like it could be done safely. The end of the cable is also pretty firmly glued to the trackpad near its socket, so getting it off would be tricky, and there’s not really any slack to speak of. The photograph that has been circulating from Apple’s internal service manual for replacing the battery also appears to show the logic board removed.
These are so much shittier to work on than the older macbook airs
-
-
-
Met dank aan onze vrienden bij MacRumors hadden we reeds een vermoeden dat het verwijderen van deze batterij een minder grote nachtmerrie zou zijn dan in sommige Retina's die we zijn tegengekomen.
-
Zonder twijfel stuiten we nog steeds op vier schroeven en zes vriendelijke kleefstrips met treklip die de power pack van deze Air bevestigen.
-
Een stevig frame, die vaag lijkt op die van de Air's van weleer, ondersteunt deze horde batterijcellen en zorgt ervoor dat het verwijderen in een fluitje van een cent gebeurt.
-
Hier issie dan: de 49.9 Wh sterke energiecentrale. Voor degenen die het bijhouden is dat ietwat minder dan de nieuwe XPS 13 van Dell (52 Wh), maar groter dan Microsoft's Surface-laptop 2 (45.2 Wh) en HP's aankomende Spectre x360 (43.7 Wh).
Are the battery cells terraced / wedge shaped or the same Z-height throughout? I can’t quite make that out from the photos…
The batteries are not terraced and reside in the same plane. All three cells are laid flat on top of the metal tray.
-
-
-
We beginnen ons steeds luchtiger te voelen in dit gouden chassis (snap je 'm?)—we kunnen de eindstreep al bijna zien!
-
Wat nog rest boven het hol van de batterij zijn een metalen antennebeugel en de nieuwe (modulaire!) Touch ID-sensor, welke beide met Torx-schroeven bevestigd zijn.
-
FYI: de Touch ID-sensor kan direct na het verwijderen van het kleinere audiobord worden verwijderd—wij hebben er echter voor gekozen om het te laten hangen.
-
Een aantal Torx-schroeven later komt het scherm er ook uit! Dit nieuwe Retina-paneel is bijna dezelfde als degene die we vonden in de MacBook Pro-lijn en verschilt enkel in de maximale helderheid (slechts 300 nits vs. 500 van de Pro) en ondersteuning van een P3 kleurenpalet.
How do you get the heat sync bar off?
I have run into an issue, I’m replacing the display and managed to get one screw from the three metal plates covering the connectors, they look to be all the same size, but I can’t get the others. Those are all I need to remove and then I can pop the new one on…..any idea which torx screwdriver is used here? I thought it was T3.
-
-
-
We laten deze MacBook Air even uit zodat jij alle losse onderdelen kunt bewonderen!
-
Met modulaire poorten en kleefstrips met treklip steekt deze MacBook Air met kop en schouders uit boven een reeks van steeds slechter repareerbare Apple-laptops.
-
Helaas zul je nog steeds je weg moeten vinden tussen de pentalobe-schroeven en is het geheugen noch de RAM upgradebaar. Hoewel deze upgrade vaak vooral interessant is voor de meer ervaren techneuten in plaats van voor de gemiddelde doe-het-zelver, hopen we dat dit een eerste stap richting repareerbare MacBook's is.
-
- Veel onderdelen zijn modulair en gemakkelijk te bereiken—waaronder de poorten, de ventilator en de speakers.
- Los van de nog steeds vervelende pentalobe-schroeven krijg je deze laptop bijna net zo makkelijk open als iedere andere laptop.
- De batterij is bevestigd met een combinatie van schroeven en reparatie-vriendelijke kleefstrips met treklip—maar je zult het logic board en de speakers moeten verwijderen om de batterij te kunnen bereiken.
- Het toetsenbord is in de bovenste behuizing geïntegreerd, wat dus betekent dat je een volledige demontage zult uit moeten voeren als je deze wilt onderhouden of repareren.
- Vastgesoldeerd, niet-repareerbaar en niet-upgradebaar geheugen en RAM is een stevige teleurstelling op een laptop van meer dan $1200.


Laatste gedachten
Repareerbaarheidsscore


(10 is gemakkelijkst te repareren)
Met dank aan deze vertalers:
55%

Thomas Keulemans helpt ons de wereld te herstellen! Wil je bijdragen?
Begin met vertalen ›

61 opmerkingen
Am I losing my eyesight, or is that fan not directly connected to any type of heat dissipating hardware? Looks like it’s either just providing a general low-pressure-air-flow throughout the internals - OR - it pushes air back through that antenna/heatsink-bracket-type-thing and coming out the other end of it?
Could you confirm or explain this in more detail?
I think it is just an exhaust fan, that removes hot air from a laptop case outside (from the right side of the case, under the screen) and creates a negative pressure inside, which helps a laptop to “suck“ some cool air from the outside through the intake on the left side of case, under the screen. The shape of the radiator ribs also suggests some airflow from left/right side of the case to the opposite side.
Serge B. -
The only thing that fan is doing is moving a (tiny) bit of air indirectly across the logic board and the heatsink. Or at least that is what I think it does. As there is no direct heat conduction from logic board to case, the fan isn’t there to cool the case, that’s for sure.
Yeah it is just a case ventilation fan, it doesn’t blow any heatsinks directly. Although with the very low TDP of the processor, a case fan with radiator type heat sink should do the job.
Tom Chai -
Yes, as the 12” Macbook with a ~5W TDP chip manages without a fan, I’m sure a slower general airflow together with that heatsink works well for the 7W chip in the 2018 MBA.
And when looking closer - the vents on either side of the antenna bracket, that the fan exhausts through on one side - air is drawn in on the other side and then guided by the vanes in the ventilation holes, allowing it to flow easily from right to left (when viewing bottom/inside of the MBA) over the heatsink cooling fins. There doesn’t appear to be any other openings in the chassi, so Apple has probably designed the airflow pretty efficiently in this fashion.
Pretty cool! Only Mac laptop I’ve seen with a fan but without heat-pipes/sinks by the fan.
This thermal design reminds me of the old Titanium Powerbooks, especially the heatsink. That had two fans I believe, one pulling in from the side and one blowing out the back. I think this pulls air from one side of the monitor hinge vents and exhausts out the other.
Why don’t they use the aluminum body directly as a huge heatsink?
You’ll notice that they’ve sealed the mid-area under the display bezel, with only an opening on the side furthest from the fan, nothing above the CPU, and an outlet the fan blows air out of.
I’m guessing they did this to cool both the low power, yet still warm T2, as well as draw air over the CPU.
It’s not blowing directly on a heatsink connected via heatpipe to the CPU, no, but I’m guessing they weighed up the pro’s and con’s of heatpipes, and decided that sucking air through a tightly controlled path is preferable to the bulk added by heatpipes.
It’s no different than the trashcan mac pro, is it? That just sucks air up over the heatsinks if I remember correctly.
What matters is that airflow is limited to a strict path, that’s in the left side of the laptop, over the T2 and SSD’s heatspreader, over the CPU’s radiator, through the fan, and out the right side.
It’s really bad to know that neither storage nor RAM is upgradable. If I go for 128 GB SSD and 8 GB RAM then I can never upgrade them, disappointed :(
That is the main reason why you should avoid those Apple new laptops. The other one is that each of the Apple laptops has design flaws (and this has happened for many years) : check Louis Rossmann videos on youtube, this is eye opening.
Oli Wek -
When will the new iPad pro teardown be revealed plz. Deadly waiting for it
They’re still heating up the glue.
Interesting, confirms what I thought in their render that showed the insides, that the fan was too close to the back for their usual spacing for a heatsink there. Looks like the fan just ambiently cools the chassis and moves internal air, rather than directly passes over a heatsink.
These MacBook logic boards are gonna end up in iPhones soon if they continue shrinking
lol that was a nice one :)
“These MacBook logic boards are gonna end up in iPhones soon if they continue shrinking”
I think you have that backwards.
I’m still confused about how the display data cables interact with the hinge. In the 2016 MBP teardown, I thought iFixit said they get rolled up or something. While the pictures in this teardown helped shed some light on this mechanism, I’d really like to see some detailed shots of how exactly that all works. Maybe in classic iFixit style where the position of just a few things within the frame changes seemingly magically between two pics. Thoughts/comments?
Hey iEvan! This is a teardown, which is an entertaining (and abbreviated) peek inside the device, not a step-by-step disassembly guide, hence the “magical” changes. If you want to see how MacBook Air display cables and hinges interact, check out our MacBook Air display replacement guide, in concept the process hasn’t changed.
If I am reading this correctly, there is absolutely nothing about Battery being better positioned to be easily replaceable. Merely that Apple guidelines now allow Battery to be replaced without changing the top case.
That is Apple stopping all those who had Apple Care to get a new top case with their battery replacement or people getting ( used to ) getting around their Keyboard problem with battery replacement.
Thanks for a great review. I’m really enjoyed your works. Thumbs up..
I think this review just swayed me from Surface Laptop 2 to the new Air. I can live with two cores vs having to throw away the laptop at the first hurdle. Plus the resale value of all surface devices is, well, pretty much non-exitent. And for a good reason.
Where is the hardware microphone disconnect?
Why there is a NFC chip on board? Does MacBook Air even support NFC?
Or it’s some kind of secure enclave?
Secure Enclave would be on the Apple T2; good question about that NFC if that’s its sole function
VaughnSC -
NFC chips tend to pop up on devices without NFC from time to time, the Droid Razr had one, I’ve seen them from time to time on other phones, and now this.
I’m half guessing they’re added on in production, and nearing the end NFC gets cut from the hardware for whatever reason and it gets left there.
I’m sure some schematics, or in time, Louis rossmann will work it out (when it dying ends up killing boards)
I’d say secure enclave, but that’s the T2’s job. Maybe the T2 (coughA10cough) depended on the NFC chip it expected on iPhones, so they through it on just to keep the thing happy? I wonder if the iMac Pro has one…
Still, I’d expect NFC to be a more Macbook thing, maybe a reader under the trackpad for pairing that got scrapped?
What about the hinges? Did you guys take a good look at them? Are they the same as the MBP, or did Apple use a different design? Wondering what their durability is going to be over the long term.
can this retina display be installed on old macbook air models? like early 2015 model
comes with mojave oder high sierra? Dragon Dictate discontinued :-(
It comes with MacOS Mojave installed.
So is there absolutely no way to replace the SSD in this machine?
There is no way to replace the flash storage in any current Mac (MacBook Pro, mini, iMac, iMac Pro, and the Air) with a T2 chip acting as the storage controller/encryptor.
jbgurman -
Thank you for doing this guys.
Thank you very much for doing this. I had been turning away business on this MBA 2018.
Could I add external micro SSD to USB c I mean is there any space inside the laptop to put external SSD and connect it to USB c by mini USB hub? Will be a maybe good idea to add more storage
Aren’t there three identical SanDisk chips on the logic board? The two labeled ones on one side, and one unlabeled one on the other… doesn’t this mean that this MBA contains 192 GB of NAND?
@getalmeardolis The “043G” on the package indicates a 43 GB chip. Three chips x 43 GB = 129 GB. (There’s probably some rounding to account for the extra GB.) But yeah, three identical chips!
Does it uses the same flex cables that were used in MacBook Pro 2016 onwards?
and is there a chance that MacBook Air(2018) will suffer the notorious flex gate problem?
The display cable arrangement is a bit different from the MacBook Pro, but it uses similar thin (and non-replaceable) ribbon cables. If I had to guess, I’d say it will develop similar problems over time—but that is emphatically just a guess and it’s too early to say anything for sure.
I have currently my new MacBook air 13” retina being repaired by the Apple store Parly II (France), they have to replace the logic board and the touch id. The problem was that it didn’t restart after one night in power safe mode (no display but still heating). After replacing the logic board they called me to inform that the touch id they ordered to replace is not recognized by the logic board, so they have to order once again a new one.
I noticed that it frequently (weekly) had display bugs (white screen with vertical lines and square pixels when moving mouse cursor) while waking up from safe mode, and sometime for no reason while browsing the web in safari.
The technical guy from Genius bar told me that it’s the first time they have to repair a MacBook Air retina 2018, so I’m very unlucky … I guess
components prices :
(661-09714) Logic Board i5, 1.6GHz, 16GB, 256GB : 342€
(661-11677) Touch ID board : 18€
(S1490LL/A) Hardware repair Labor : 79€
Total : 439€ (under guarantee)
(probably not including VAT)
I went to the Apple store Parly 2 to get my MacBook back (repaired) but I refused it at the genius bar because during repair they have damaged the alloy top case, there are now 2 dents (near the touch id and another one near Esc key) that have probably caused by a screwing too hard, the dents are vertically localized just above 2 of the screws which maintain the amovible lower case.
They ordered a new “Top Case with Keyboard, Space Grey, FRA” (price 225€ under warranty + 79€ repair labor).
So now I will have a MacBook Air 13 with almost all part replaced (except battery and screen) !!!
I asked them to replace the whole MacBook but they refused because their policy doesn’t allow it for Mac products (laptops/desktops).
In my opinion, the recycled alloy used in the MacBook air 13 retina manufacturing is not as much resistant as the previous models.
The repair process didn’t take into account the tenderness of this alloy, a dynamometric screwdrivers but they should be used for this models to prevent damages.
Apple CEO’S: Let’s build and design a fanless laptop!
Apple Manafacturers: Okay!
*Slips fan into main design*
Wish the guide was a bit more detailed with the nuances of removing the ZIF connectors, etc with the flip up tabs. Didn’t realize until it was too late and may have damaged something.
Hi Brian,
I’m sorry to hear that! As stated in the warning op top, this teardown is an educational first look at the device, and is not meant to be used as a guide. Our repair guides will show up here, and contain accurate details (such as tools needed, how to unlock ZIF connectors, etc.) as well as step by step instructions on how to complete the repair.
Hi,
I spilled hot chocolate on my macbook air and I want to change the keyboard and the trackpad. There is no way to only change the keyboard without demantling everything?
That is correct. The keyboard is part of the top case and is not easily replaceable. The trackpad, on the other hand, can be removed pretty easily.
Hi, thanks for all the tips in this breakdown. Question for you, I have a sticky down arrow key on my keyboard, can I somehow pop it off and clean underneath it ?? I see in step for you use a tool to pop off the apple key, so wondering/hoping this can be done on the down arrow key !
While cleaning my then-new MBA Model A1932, some specks of something came between the screen and the machine, making tiny punctures that killed the screen. I now am able to buy a screen replacement assembly for about $300 (it was over $500 before). I understand this isn’t the easiest machine to take apart, but if it’s only replacing the screen assembly, is it manageable? My dealer wanted $1000 for a total replacement, which is about the same price as buying a new one. Am I pulling a job I can do, as a seasoned Macbook Pro upgrader, or is this just too exotic?
Hi Bob,
It depends on the screen you’re buying. If it is a complete top assembly, I think it is pretty doable. Take a look at our guide and see how comfortable you would be with the procedure.
What about MBP having pull tabs?
Ciao Fedo! Purtroppo è integrata alla scheda madre quindi non è possibile sostituirla. Bisogna cambiare l'intera scheda madre.