Ga door naar hoofdinhoud

Dell XPS 15 9550 Wireless Card Replacement

Wat je nodig hebt

  1. Dell XPS 15 9550 Wireless Card Replacement, Back/Underside Panel: stap 1, afbeelding 1 van 1
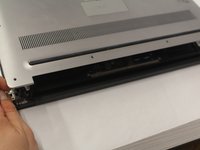
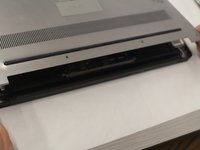
    • Turn the laptop upside down.

    • Make sure the laptop is turned off.

    • Use a T5 Torx Screwdriver to remove the ten 3 mm long screws from the perimeter of the back of the laptop.

  2. Dell XPS 15 9550 Wireless Card Replacement: stap 2, afbeelding 1 van 2 Dell XPS 15 9550 Wireless Card Replacement: stap 2, afbeelding 2 van 2
    • Open up the information panel door (on the middle of the back side).

    • While holding the door open, use a Phillips #00 Screwdriver to remove the two 10 mm long screws.

  3. Dell XPS 15 9550 Wireless Card Replacement: stap 3, afbeelding 1 van 3 Dell XPS 15 9550 Wireless Card Replacement: stap 3, afbeelding 2 van 3 Dell XPS 15 9550 Wireless Card Replacement: stap 3, afbeelding 3 van 3
    • Carefully lift the 2 corners of the back panel close to the hinge upwards, to release the whole panel.

    • Do not force the panel off. If it does not come off easily, try to use a plastic spudger where it is stuck.

  4. Dell XPS 15 9550 Wireless Card Replacement, Wireless Card: stap 4, afbeelding 1 van 1
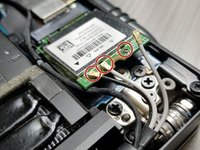
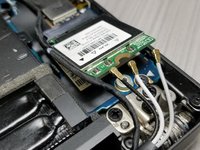
    • With a Philips #00 Screwdriver bit, remove one 4 mm long black screw located by the antenna connections on the wireless card.

    • Set the screw and metal holder aside.

  5. Dell XPS 15 9550 Wireless Card Replacement: stap 5, afbeelding 1 van 2 Dell XPS 15 9550 Wireless Card Replacement: stap 5, afbeelding 2 van 2
    • Gently lift up each of the antennas (3) to disconnect them from the wireless card.

    • These are similar to a coat button, the antennas snap on and snap off.

  6. Dell XPS 15 9550 Wireless Card Replacement: stap 6, afbeelding 1 van 3 Dell XPS 15 9550 Wireless Card Replacement: stap 6, afbeelding 2 van 3 Dell XPS 15 9550 Wireless Card Replacement: stap 6, afbeelding 3 van 3
    • With the antennas disconnected, gently pull the wireless card out at the angle it sits at.

    • The wireless card has been successfully removed!

Conclusie

To reassemble your device, follow these instructions in reverse order.

4 andere personen hebben deze handleiding voltooid.

Hunter J Laska

Lid sinds: 10/04/18

157 Reputatie

1 Handleiding geschreven

Team

UW Stout, Team S6-G1, Ogden Fall 2018 Lid van UW Stout, Team S6-G1, Ogden Fall 2018

UWSTOUT-OGDEN-F18S6G1

4 Leden

23 handleidingen geschreven

0 opmerkingen

Voeg opmerking toe

Weergavestatistieken:

Afgelopen 24 uren: 5

Afgelopen 7 dagen: 11

Afgelopen 30 dagen: 54

Altijd: 9,410