Ga door naar hoofdinhoud

Dell Latitude E6510 LCD Screen Assembly Replacement

Wat je nodig hebt

  1. Dell Latitude E6510 LCD Screen Assembly Replacement, LCD Screen Assembly: stap 1, afbeelding 1 van 3 Dell Latitude E6510 LCD Screen Assembly Replacement, LCD Screen Assembly: stap 1, afbeelding 2 van 3 Dell Latitude E6510 LCD Screen Assembly Replacement, LCD Screen Assembly: stap 1, afbeelding 3 van 3
    • Orient your laptop so that the bottom is facing up towards you.

    • Place your thumbs on the grooved sections above the battery and firmly pull away from each other.

    • Slide the battery out and separate it from the laptop.

  2. Dell Latitude E6510 LCD Screen Assembly Replacement: stap 2, afbeelding 1 van 3 Dell Latitude E6510 LCD Screen Assembly Replacement: stap 2, afbeelding 2 van 3 Dell Latitude E6510 LCD Screen Assembly Replacement: stap 2, afbeelding 3 van 3
    • Remove the 5 screws from the back panel with a type 0 Philips head.

    • Then pull the panel towards you in a slightly upwards motion.

    • Separate the panel from the laptop.

  3. Dell Latitude E6510 LCD Screen Assembly Replacement: stap 3, afbeelding 1 van 3 Dell Latitude E6510 LCD Screen Assembly Replacement: stap 3, afbeelding 2 van 3 Dell Latitude E6510 LCD Screen Assembly Replacement: stap 3, afbeelding 3 van 3
    • Take the silver panels from both sides of the back of the laptop by removing the screw using a type 0 Philips head.

    • Slide the silver panel away from you to revel some wires.

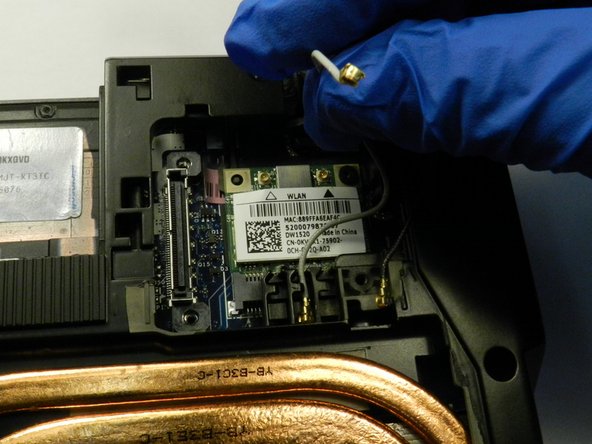
    • Remove the two wires white and gray by gently pulling up and detaching them.

    • After the wires are detached, gently pull the wires away from you to remove them from the groove they are in.

  4. Dell Latitude E6510 LCD Screen Assembly Replacement: stap 4, afbeelding 1 van 3 Dell Latitude E6510 LCD Screen Assembly Replacement: stap 4, afbeelding 2 van 3 Dell Latitude E6510 LCD Screen Assembly Replacement: stap 4, afbeelding 3 van 3
    • Under the ride silver panel, there is a channel. To disconnect gently use your nail and flick it up and to the right.

    • Once the channel is disconnect, there are two wires. Repeat the same method as the channel to disconnect the wires.

    • Move the channel and wires out of the groove to remove the screen.

  5. Dell Latitude E6510 LCD Screen Assembly Replacement: stap 5, afbeelding 1 van 3 Dell Latitude E6510 LCD Screen Assembly Replacement: stap 5, afbeelding 2 van 3 Dell Latitude E6510 LCD Screen Assembly Replacement: stap 5, afbeelding 3 van 3
    • Orient the laptop on its side, prop it slightly open to keep it stable on your desk.

    • Unscrew the silver screw on the left side using a type 0 Phillip's head.

    • Unscrew the black screw on the right side using a type 0 Philips head.

  6. Dell Latitude E6510 LCD Screen Assembly Replacement: stap 6, afbeelding 1 van 3 Dell Latitude E6510 LCD Screen Assembly Replacement: stap 6, afbeelding 2 van 3 Dell Latitude E6510 LCD Screen Assembly Replacement: stap 6, afbeelding 3 van 3
    • Since the screws and wires are disconnect, the screen is ready to be disconnected also.

    • Gently hold the LCD screen with your pointer fingers on either side.

    • While firmly holding the bottom of the laptop with your thumbs pull the two parts away from each other.

Conclusie

To reassemble your device, follow these instructions in reverse order.

3 andere personen hebben deze handleiding voltooid.

0 opmerkingen

Voeg opmerking toe

Weergavestatistieken:

Afgelopen 24 uren: 0

Afgelopen 7 dagen: 5

Afgelopen 30 dagen: 11

Altijd: 1,635