Ga door naar hoofdinhoud

Dell Inspiron m5030 Surface Around the Keyboard Replacement

Wat je nodig hebt

  1. Dell Inspiron m5030 Surface Around the Keyboard Replacement, Keyboard: stap 1, afbeelding 1 van 2 Dell Inspiron m5030 Surface Around the Keyboard Replacement, Keyboard: stap 1, afbeelding 2 van 2
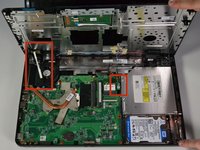
    • Remove all fourteen Phillips #0 7/16" screws from the bottom of the laptop.

    • Remove the two Phillips #0 5/16" screws from the bottom of the laptop.

  2. Dell Inspiron m5030 Surface Around the Keyboard Replacement: stap 2, afbeelding 1 van 2 Dell Inspiron m5030 Surface Around the Keyboard Replacement: stap 2, afbeelding 2 van 2
    • Turn the laptop over and open the lid.

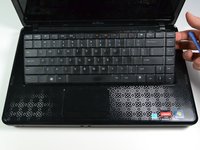
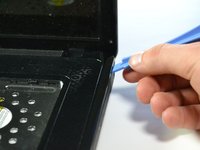
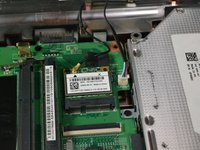
    • Locate the three tabs above the first row of keys on the top of the keyboard, found above the F1, F6, and PrntScr keys.

    • With one of your hands, push the leftmost tab down with the plastic opening tool (above the F1 key). With your other hand, lift the left side of the keyboard.

    • Push the middle tab down with the plastic opening tool and continue lifting from the left side of the keyboard to the right side (above the F6 key).

    • Push the rightmost tab down with the plastic opening tool and continue lifting from the left side of the keyboard to the right side (above the PrntScr key). The keyboard should be loosened from the laptop after these steps.

  3. Dell Inspiron m5030 Surface Around the Keyboard Replacement: stap 3, afbeelding 1 van 2 Dell Inspiron m5030 Surface Around the Keyboard Replacement: stap 3, afbeelding 2 van 2
    • After the top edge of the keyboard is loose, pull up on the keyboard gently.

    • Do not pull the keyboard up forcefully as the keyboard is still attached to the laptop by a ribbon.

  4. Dell Inspiron m5030 Surface Around the Keyboard Replacement: stap 4, afbeelding 1 van 3 Dell Inspiron m5030 Surface Around the Keyboard Replacement: stap 4, afbeelding 2 van 3 Dell Inspiron m5030 Surface Around the Keyboard Replacement: stap 4, afbeelding 3 van 3
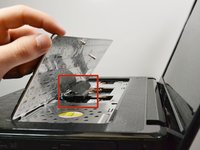
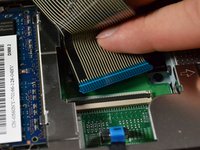
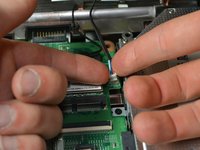
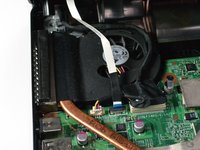
    • Pull up the bottom side of the keyboard and locate the ribbon connecting the keyboard to the motherboard.

    • Locate the blue end of the ribbon which is connected to the motherboard.

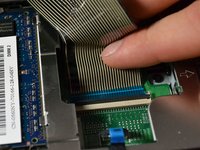
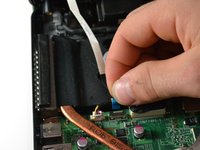
    • Lift up the black flap on the connector and gently pull the ribbon away from the connector which is parallel to the motherboard.

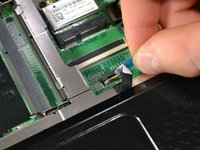
    • Lift the keyboard up and off of the motherboard. Detach the blue end of the ribbon from the connector.

  5. Dell Inspiron m5030 Surface Around the Keyboard Replacement, Surface Around the Keyboard: stap 5, afbeelding 1 van 2 Dell Inspiron m5030 Surface Around the Keyboard Replacement, Surface Around the Keyboard: stap 5, afbeelding 2 van 2
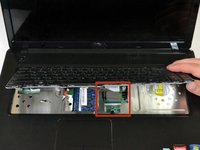
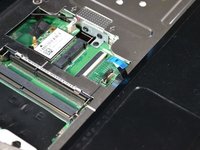
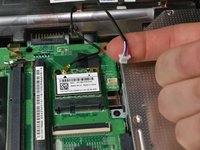
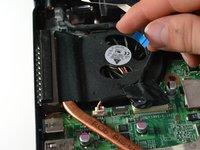
    • Disconnect the blue tab located just above the touch pad of the laptop.

    • Lift the black locking tab a small way up, away from the Green PCB, until a click is heard. Before pullinh on blue tab.

  6. Dell Inspiron m5030 Surface Around the Keyboard Replacement: stap 7, afbeelding 1 van 2 Dell Inspiron m5030 Surface Around the Keyboard Replacement: stap 7, afbeelding 2 van 2
    • Use a plastic opening tool to pry up the plastic covering of the laptop by wedging it underneath one side of the covering and lift up.

    • Do not lift off the cover all the way as it is still connected by two wires on the side nearest to the screen.

  7. Dell Inspiron m5030 Surface Around the Keyboard Replacement: stap 8, afbeelding 1 van 3 Dell Inspiron m5030 Surface Around the Keyboard Replacement: stap 8, afbeelding 2 van 3 Dell Inspiron m5030 Surface Around the Keyboard Replacement: stap 8, afbeelding 3 van 3
    • Disconnect the white block of wires which is the right-most wire connecting the covering to the laptop.

  8. Dell Inspiron m5030 Surface Around the Keyboard Replacement: stap 9, afbeelding 1 van 3 Dell Inspiron m5030 Surface Around the Keyboard Replacement: stap 9, afbeelding 2 van 3 Dell Inspiron m5030 Surface Around the Keyboard Replacement: stap 9, afbeelding 3 van 3
    • Disconnect the wire with the blue tab which is the left-most wire connecting the covering to the laptop.

    • You can now remove the plastic covering.

Conclusie

To reassemble your device, follow these instructions in reverse order.

4 andere personen hebben deze handleiding voltooid.

Marek Moreno

Lid sinds: 04/16/14

434 Reputatie

2 handleidingen geschreven

Team

Cal Poly, Team 3-44, Maness Spring 2014 Lid van Cal Poly, Team 3-44, Maness Spring 2014

CPSU-MANESS-S14S3G44

4 Leden

6 handleidingen geschreven

0 opmerkingen

Voeg opmerking toe

Weergavestatistieken:

Afgelopen 24 uren: 0

Afgelopen 7 dagen: 1

Afgelopen 30 dagen: 2

Altijd: 833