Deze versie kan foutieve bewerkingen bevatten. Schakel over naar de recentste gecontroleerde momentopname.
Wat je nodig hebt
-
Deze stap is niet vertaald. Help het te vertalen
-
Unlock the battery by sliding the right-hand switch to the right.
-
-
Deze stap is niet vertaald. Help het te vertalen
-
While holding the left-hand switch to the left position, pull the battery away from the laptop.
-
-
Deze stap is niet vertaald. Help het te vertalen
-
The battery is now fully removed and the laptop will not power on without it.
-
-
Deze stap is niet vertaald. Help het te vertalen
-
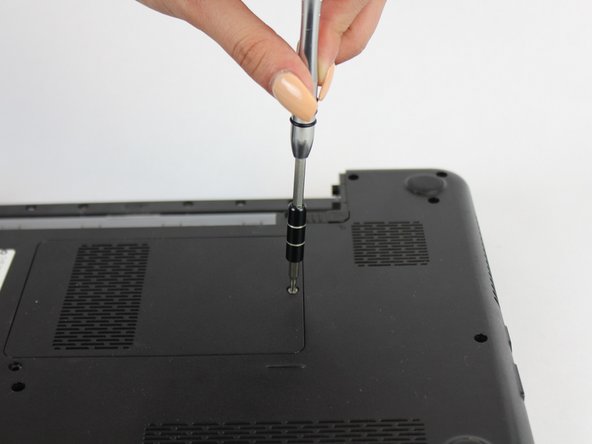
Using the #0 Philips head, unscrew the indicated screw.
-
Carefully pull the RAM cover up and away.
-
-
Deze stap is niet vertaald. Help het te vertalen
-
Unscrew the indicated 5.7mm screw beneath the RAM Cover.
-
-
-
Deze stap is niet vertaald. Help het te vertalen
-
Using a thin plastic tool (such as a guitar pick or spudger) at the top of the keyboard just above the F7 key, gently pry the keyboard away.
-
Move the spudger to either end at the top of the keyboard to fully undo all plastic clips.
-
-
Deze stap is niet vertaald. Help het te vertalen
-
Carefully tip the keyboard upwards and pull it slightly away from the body of the laptop.
-
-
Deze stap is niet vertaald. Help het te vertalen
-
Carefully unclip the ribbon cable by tipping the keyboard towards the screen.
-
-
Deze stap is niet vertaald. Help het te vertalen
-
Remove the indicated 5.7mm screws.
-
Remove the smaller 3mm screws from underneath the battery compartment.
-
-
Deze stap is niet vertaald. Help het te vertalen
-
With a plastic spudger, pry away the silver top cover from the black casing.
-
Move the tool to the right and left along the seams to fully disconnect the cover.
-
-
Deze stap is niet vertaald. Help het te vertalen
-
Disconnect the indicated ribbon cables underneath where the keyboard sits.
-
-
Deze stap is niet vertaald. Help het te vertalen
-
Lift the cover upwards and away from the body of the laptop, after removing the optical drive and unscrewing the three screws on the right
-


Team

USF Tampa, Team S13-G5, Boczar Fall 2017 Lid van USF Tampa, Team S13-G5, Boczar Fall 2017
USFT-BOCZAR-F17S13G5
5 Leden
9 handleidingen geschreven