Ga door naar hoofdinhoud

Dell Inspiron 15 5584 Wi-Fi Card Replacement

Wat je nodig hebt

  1. Dell Inspiron 15 5584 Wi-Fi Card Replacement, Bottom Cover: stap 1, afbeelding 1 van 1
    • Make sure to turn off and unplug your laptop before starting.

    • Turn over the laptop so that the bottom is facing upwards, and the Inspiron logo is upside-down.

  2. Dell Inspiron 15 5584 Wi-Fi Card Replacement: stap 2, afbeelding 1 van 3 Dell Inspiron 15 5584 Wi-Fi Card Replacement: stap 2, afbeelding 2 van 3 Dell Inspiron 15 5584 Wi-Fi Card Replacement: stap 2, afbeelding 3 van 3
    • Remove the seven 7 mm screws from the bottom using a Phillips #0 screwdriver.

    • Loosen the two captive back corner screws using a Phillips #0 screwdriver.

    • The two corner screws are not removable. A clicking sounds indicates that the screw is fully loosened.

  3. Dell Inspiron 15 5584 Wi-Fi Card Replacement: stap 3, afbeelding 1 van 2 Dell Inspiron 15 5584 Wi-Fi Card Replacement: stap 3, afbeelding 2 van 2
    • Slide an iFixit opening tool underneath the right side USB port and the keyboard.

    • Gently trace the iFixit opening tool along the entire outer rim of the laptop, carefully applying an upwards pressure.

    • Be careful not to force open the plate or push too much off without loosening the other sides. This can cause the bottom cover to crack.

  4. Dell Inspiron 15 5584 Wi-Fi Card Replacement: stap 4, afbeelding 1 van 2 Dell Inspiron 15 5584 Wi-Fi Card Replacement: stap 4, afbeelding 2 van 2
    • Gently pry off the bottom cover from the laptop.

    • Use the iFixit opening tool to loosen any spots you may have missed from Step 3.

  5. Dell Inspiron 15 5584 Wi-Fi Card Replacement, Wi-Fi Card: stap 5, afbeelding 1 van 3 Dell Inspiron 15 5584 Wi-Fi Card Replacement, Wi-Fi Card: stap 5, afbeelding 2 van 3 Dell Inspiron 15 5584 Wi-Fi Card Replacement, Wi-Fi Card: stap 5, afbeelding 3 van 3
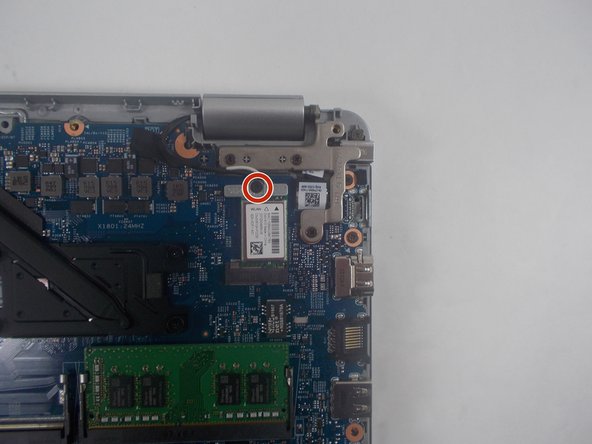
    • Remove the single 3 mm screw that holds down the Wi-Fi card using a Phillips #0 screwdriver.

    • Remove the Wi-Fi card from the motherboard.

Conclusie

To reassemble your device, follow these instructions in reverse order.

Één andere persoon heeft deze handleiding voltooid.

Kristen Gismondi

Lid sinds: 11/12/14

82.722 Reputatie

202 handleidingen geschreven

Team

iFixit Lid van iFixit

Staff

136 Leden

17.430 handleidingen geschreven

Één opmerking

The problem isn't taking the card out. It's putting it in and especially attaching the micro connectors to the card without messing them up. This is a poor design which literally requires a electron microscope to see what your doing. I would like ot know how one does this and with what tools.

SCWD - Antwoord

Voeg opmerking toe

Weergavestatistieken:

Afgelopen 24 uren: 1

Afgelopen 7 dagen: 3

Afgelopen 30 dagen: 6

Altijd: 105