Deze vertaling geeft mogelijk niet de meest recente updates van de bronhandleiding weer. Help ons met het updaten van de vertaling of bekijk de bronhandleiding.
Inleiding
Om de kwaliteit van draadisolatie en krimp te beoordelen: IPC / WHMA-A-620, klasse 2.
Wat je nodig hebt
-
-
De antistatische bekleding voor de tafel wordt gesneden met een mes in overeenstemming met de lengte en breedte van de tafel.
-
De antistatische bekleding op de planken wordt gesneden met een inkeping in overeenstemming met de lengte en breedte van de plank.
-
-
-
In het midden van de tafelbekleding wordt een gat geponst.
-
De clip wordt vast gezet met een drukknop.
-
In de linker rand van de plankafdekking wordt een gat geponst.
-
-
Deze stap is niet vertaald. Help het te vertalen
-
Cut a 30 cm long cord (for a table).
-
Cut cable 1.3 m long cable (shelves).
-
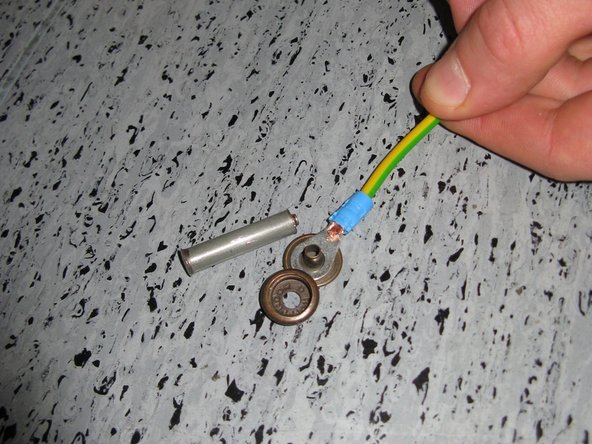
The wire is insulated at both ends. Setting the insulation pliers at the 10 mm mark.
-
A quick-connect contact is clamped to one end of the cord.
-
The loop contact is pressed onto the other end and a pin with a hammer is hammered onto it.
-
For both wires, one end is terminated with a quick-connect contact, the other end with a pin with a head.
-
-
-
Deze stap is niet vertaald. Help het te vertalen
-
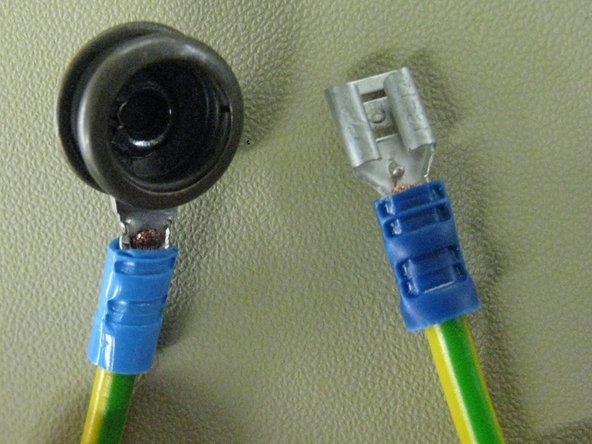
A 2.5 m long cable is cut (between the pole and the table).
-
The wire is insulated at both ends. Setting the insulation pliers at the 10 mm mark.
-
Quick-connect contacts are clamped at both ends.
-
-
Deze stap is niet vertaald. Help het te vertalen
-
A bracelet grounding socket is attached to the front of the table, 50 cm from the left edge.
-
Socket screwed 2 pcs. with hexagonal self-tapping screws.
-
-
Deze stap is niet vertaald. Help het te vertalen
-
The cord runs through the inside of the table and the cord is wrapped around the left leg of the table from the inside.
-
The cord is then routed straight to the left rear leg of the table. From the inside, the cord is wrapped around the leg and routed as close to the center of the table as possible.
-
After this self-tapping screw 1 pcs. the contact block is placed first on the head and the contact of the loop is placed under the block.
-
A block with a socket and a self-tapping screw is placed from below under a metal table beam.
-
The table construction is drilled with a self-tapping screw and a block with a socket loop is screwed on.
-
-
Deze stap is niet vertaald. Help het te vertalen
-
A contact pad is screwed horizontally onto the ground pole with a self-tapping screw.
-
-
Deze stap is niet vertaald. Help het te vertalen
-
The prepared table and shelf coverings are placed on the table.
-
The table cover is connected to the contact pad.
-
The shelf cover is connected to the contact pad.
-
The table contact pad is connected with a wire to the ground tube contact pad.
-


Controleer na montage alle bedradingsaansluitingen opnieuw of voltooi ze:
1. De aardingsaansluiting van de armband is verbonden met het contactblok en het tafelframe.
2. Het tafelblad is verbonden met het contactframe van het tafelframe.
3. De plankafdekking is verbonden met het contactframe van het tafelframe.
4. Het contactframe van het tafelframe is verbonden met het contactblok van de aardingspool.
Annuleren: ik heb deze handleiding niet afgemaakt.
2 andere personen hebben deze handleiding voltooid.
Met dank aan deze vertalers:
36%

Toon Konings helpt ons de wereld te herstellen! Wil je bijdragen?
Begin met vertalen ›