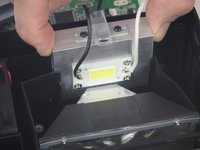
Ga door naar hoofdinhoud

DBPOWER RD-810 Imager Replacement

Wat je nodig hebt

  1. DBPOWER RD-810 Imager Replacement, Top Cover: stap 1, afbeelding 1 van 2 DBPOWER RD-810 Imager Replacement, Top Cover: stap 1, afbeelding 2 van 2
    • Make sure the projector is unplugged before starting

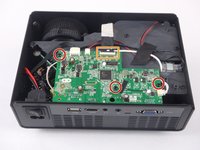
    • Place the projector upside down to access the screws on the bottom.

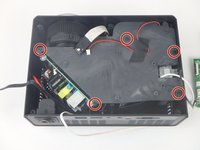
    • Remove the five 7mm long screws using a #3 Phillips screwdriver at least 2 inches long.

  2. DBPOWER RD-810 Imager Replacement: stap 2, afbeelding 1 van 1
    • Flip the projector over and then remove the cover by lifting it up.

  3. DBPOWER RD-810 Imager Replacement, Motherboard and LED Bulb: stap 3, afbeelding 1 van 3 DBPOWER RD-810 Imager Replacement, Motherboard and LED Bulb: stap 3, afbeelding 2 van 3 DBPOWER RD-810 Imager Replacement, Motherboard and LED Bulb: stap 3, afbeelding 3 van 3
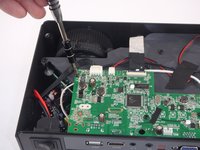
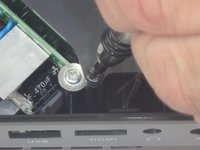
    • Remove the three 6mm PH2 phillips head screws.

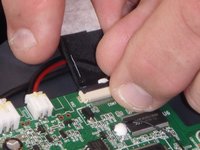
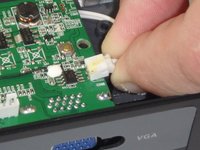
    • Disconnect the ribbon cable by flipping up the latch on the connector and then pull the ribbon out.

  4. DBPOWER RD-810 Imager Replacement: stap 4, afbeelding 1 van 3 DBPOWER RD-810 Imager Replacement: stap 4, afbeelding 2 van 3 DBPOWER RD-810 Imager Replacement: stap 4, afbeelding 3 van 3
    • Disconnect the three wire connectors. Grasp both sides of the connector and pull apart.

    • Keep the connector parallel to the mother board to avoid breaking the solder connection.

    • Lift the motherboard up and place it out of the way.

  5. DBPOWER RD-810 Imager Replacement: stap 5, afbeelding 1 van 3 DBPOWER RD-810 Imager Replacement: stap 5, afbeelding 2 van 3 DBPOWER RD-810 Imager Replacement: stap 5, afbeelding 3 van 3
    • Remove the five 7mm PH2 phillips head screws on the black plate and lift the plate out.

    • Lift the aluminum heat sink up to remove it from the projector.

    • The motherboard is already removed in this step.

  6. DBPOWER RD-810 Imager Replacement, Imager: stap 6, afbeelding 1 van 1
    • Lift the imager straight up to remove it from the projector.

Conclusie

To reassemble your device, follow these instructions in reverse order.

2 andere personen hebben deze handleiding voltooid.

John Russell

Lid sinds: 02/14/18

914 Reputatie

9 handleidingen geschreven

Team

USF Tampa, Team S5-G3, Eyestone Spring 2018 Lid van USF Tampa, Team S5-G3, Eyestone Spring 2018

USFT-EYESTONE-S18S5G3

3 Leden

9 handleidingen geschreven

0 opmerkingen

Voeg opmerking toe

Weergavestatistieken:

Afgelopen 24 uren: 0

Afgelopen 7 dagen: 0

Afgelopen 30 dagen: 1

Altijd: 497