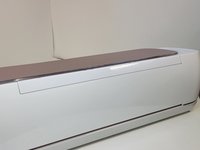
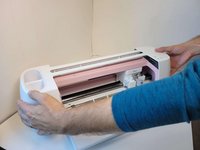
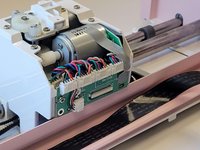
Ga door naar hoofdinhoud

Cricut Maker Roller Bar Replacement

Wat je nodig hebt

  1. Cricut Maker Roller Bar Replacement, Cricut Maker Lid Replacement: stap 1, afbeelding 1 van 3 Cricut Maker Roller Bar Replacement, Cricut Maker Lid Replacement: stap 1, afbeelding 2 van 3 Cricut Maker Roller Bar Replacement, Cricut Maker Lid Replacement: stap 1, afbeelding 3 van 3
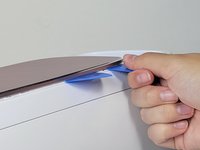
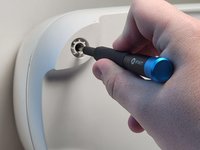
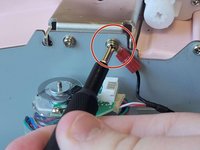
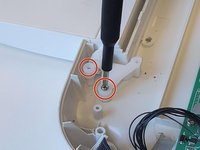
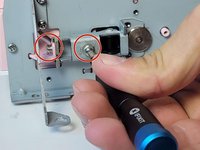
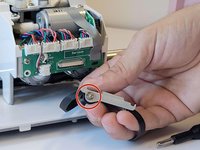
    • To remove the cover from the connecting joint, use an iFixit opening tool, and pry around the perimeter of the cover to release it.

    • Applying too much pressure to this can break it as it is very fragile.

    • There is some adhesive holding the cover, so it may take some patience and finesse to pry the cover off.

    • Remove the cover from the connecting joint and set it aside.

    The outer two attachment points of my Cricut were actually glued on, and I had to reach in with the torx driver and remove them while the strip was still on, to be able to get the lid off. On inspection, there would have been no way to lift the strip off in the way described here.

    cjberry - Antwoord

  2. Cricut Maker Roller Bar Replacement: stap 2, afbeelding 1 van 2 Cricut Maker Roller Bar Replacement: stap 2, afbeelding 2 van 2
    • Remove the four, 10 mm Torx TR8 security screws holding the lid in place.

  3. Cricut Maker Roller Bar Replacement: stap 3, afbeelding 1 van 3 Cricut Maker Roller Bar Replacement: stap 3, afbeelding 2 van 3 Cricut Maker Roller Bar Replacement: stap 3, afbeelding 3 van 3
    • Turn the device around, so that the back is facing you.

    • Look for the small rectangles along the back of the device. For every two rectangles, there is one cylindrical connector in between the two.

    • Wedge one or two iFixit opening picks in the seam connecting the Top Door to the device, and use the iFixit opening tool to pry upwards along the seam.

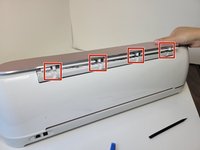
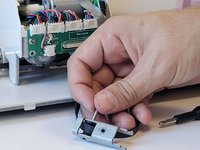
    • These actions should reveal the cylindrical connectors.

    The lid of my Cricut maker 3 was removable by pulling upwards, while the lid was still open. It slides right off. The prying approach as described in this step is unnecessary, and could break the attachment points if forced.

    Chris Schnabel - Antwoord

  4. Cricut Maker Roller Bar Replacement: stap 4, afbeelding 1 van 1
    • Press down on the lid.

    • Push the lid outwards to free it from the jointed clasps.

    Where is/are the steps to get to the point of seeing the motor? I've got the top cover off, but that doesn't reveal the motor. There are steps missing between 4 and 5.

    Patty Ellis - Antwoord

    There are x7 small screws on the inside upper panel that have to be removed as well as x4 long screws under the feet of the machine.

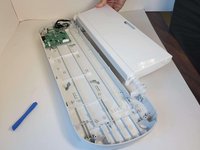
    I had to turn on my machine and send a project to it to have the cutter mechanism move out of the way to remove some of the screws. Once all the screws have been removed the case can be pulled away, but you have to be careful when removing because there are some wires connecting the buttons on the case to the harddrive.

    Margarita Armendariz -

    Where can I get the replacement part(s) to make the door stay up and open?

    David L Dabbs - Antwoord

  5. Cricut Maker Roller Bar Replacement, Front Door Replacement: stap 5, afbeelding 1 van 2 Cricut Maker Roller Bar Replacement, Front Door Replacement: stap 5, afbeelding 2 van 2
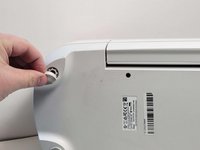
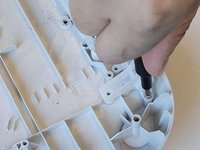
    • Using your hands or an opening tool, remove the four foot pads covering four screws.

    • Use a Phillips #1 screwdriver to remove four 41 mm screws from the feet.

  6. Cricut Maker Roller Bar Replacement: stap 6, afbeelding 1 van 3 Cricut Maker Roller Bar Replacement: stap 6, afbeelding 2 van 3 Cricut Maker Roller Bar Replacement: stap 6, afbeelding 3 van 3
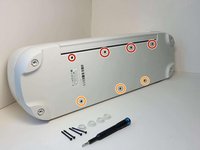
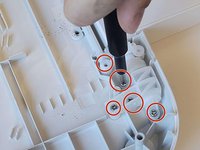
    • Remove the seven screws (Four 8.5 mm screws, and three 12.5 mm screws) on the bottom of the device, this will allow you to remove the cover later on.

    • Use a Phillips #1 screwdriver to remove the four 8.5 mm screws from the bottom of the device.

    • Use a Phillips #0 screwdriver to remove the three 12.5 mm screws.

  7. Cricut Maker Roller Bar Replacement: stap 7, afbeelding 1 van 3 Cricut Maker Roller Bar Replacement: stap 7, afbeelding 2 van 3 Cricut Maker Roller Bar Replacement: stap 7, afbeelding 3 van 3
    • Turn the device on its side.

    • To remove the seven 10 mm screws from the underside of the top of the device, use a Phillips #1 screwdriver with the flex extension.

    A right-angle attachment can also be used. A mechanic's mirror is also helpful because you can't really see a few of the screws unless you're a contortionist.

    Waterit - Antwoord

  8. Cricut Maker Roller Bar Replacement: stap 8, afbeelding 1 van 3 Cricut Maker Roller Bar Replacement: stap 8, afbeelding 2 van 3 Cricut Maker Roller Bar Replacement: stap 8, afbeelding 3 van 3
    • Lift the top case off of the base of the device.

    • After removing this cover, the internals of the device will be exposed.

    When removing the top of the case, be sure to disconnect the daughter board on the right side of the machine.

    Tovakiin - Antwoord

  9. Cricut Maker Roller Bar Replacement: stap 9, afbeelding 1 van 2 Cricut Maker Roller Bar Replacement: stap 9, afbeelding 2 van 2
    • Use a Phillips #1 screwdriver to remove four 10 mm screws on the side of the device next to the motors.

    • Use a Phillips #1 screwdriver to remove the two 22 mm screws.

  10. Cricut Maker Roller Bar Replacement: stap 10, afbeelding 1 van 3 Cricut Maker Roller Bar Replacement: stap 10, afbeelding 2 van 3 Cricut Maker Roller Bar Replacement: stap 10, afbeelding 3 van 3
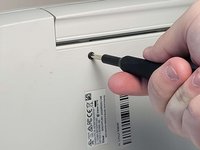
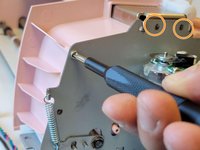
    • Use a Phillips #1 screwdriver to remove two 10 mm screws. These are parallel to one another, one on either side of the machine.

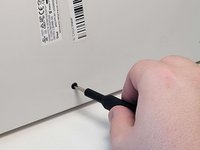
    • Use a Phillips #1 screwdriver to remove two 8mm screws, these are also directly parallel to one another on either side of the machine.

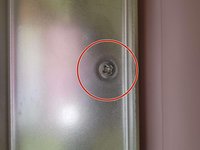
    Note the empty screw hole in the second photo, on the front, just beneath the plastic fin.

    How was this removed without damaging the fin?
    Hint: Since we've already removed the screws holding the right side cover in Step 9, the cover could be moved inward, providing access to that screw, IF we had already removed the lid attachment/hinge mechanism and rear inside cover.

    JCinGG - Antwoord

  11. Cricut Maker Roller Bar Replacement: stap 11, afbeelding 1 van 2 Cricut Maker Roller Bar Replacement: stap 11, afbeelding 2 van 2
    • Unplug the bundled connector from the motor on both sides of the machine. To to avoid damage, coax the connector out of the socket gently using a spudger.

    I need to replace that bundled connector cord - where can I find one?

    Jade9767 - Antwoord

  12. Cricut Maker Roller Bar Replacement: stap 12, afbeelding 1 van 2 Cricut Maker Roller Bar Replacement: stap 12, afbeelding 2 van 2
    • Using a Phillips #1 screwdriver, remove one 10 mm screw from both sides of the machine. This will release wires that are screwed into the sides of device.

    • Once the screws are removed and wires detached, the main body can be lifted off the base, and set aside.

  13. Cricut Maker Roller Bar Replacement: stap 13, afbeelding 1 van 3 Cricut Maker Roller Bar Replacement: stap 13, afbeelding 2 van 3 Cricut Maker Roller Bar Replacement: stap 13, afbeelding 3 van 3
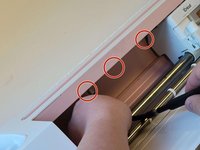
    • Remove a total of seven 10 mm screws from the underside of the door.

    • One side of the base has two 10mm screws.

    • The other side of the base has five 10 mm screws.

    Why is this step here, and not a step to remove the lid attachment hinge mechanism and rear inside cover?
    It is not necessary to remove the front door for this procedure.

    JCinGG - Antwoord

  14. Cricut Maker Roller Bar Replacement: stap 14, afbeelding 1 van 3 Cricut Maker Roller Bar Replacement: stap 14, afbeelding 2 van 3 Cricut Maker Roller Bar Replacement: stap 14, afbeelding 3 van 3
    • Pry the door from hinges using an iFixit opening tool.

    • Lift upwards and towards you, to remove the door from the hinges.

  15. Cricut Maker Roller Bar Replacement, Motor: stap 15, afbeelding 1 van 2 Cricut Maker Roller Bar Replacement, Motor: stap 15, afbeelding 2 van 2
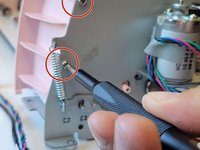
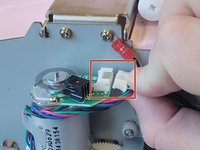
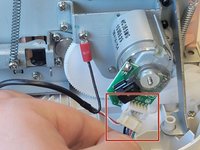
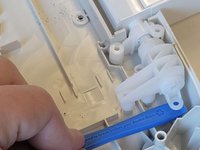
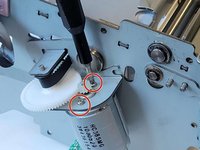
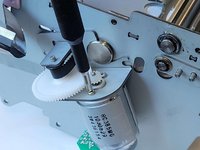
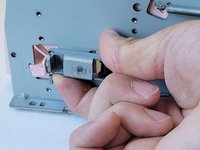
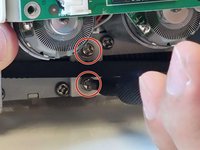
    • Use a Phillips #1 screwdriver to remove the four 5 mm screws that attach the motor on the left side of the machine.

    In this step, we can see the lid attachment hinge mechanism has been removed.

    How was that done? And how are the damper/spring units adjusted after they are reinstalled?

    I also don't know why this motor needs to be removed to replace a belt.

    JCinGG - Antwoord

    Remove the black screws on the right side first. When re-assembling, install them first.

    Waterit - Antwoord

  16. Cricut Maker Roller Bar Replacement: stap 16, afbeelding 1 van 1
    • Remove the motor by pulling it from the device.

    No need to remove this for a belt replacement.

    JCinGG - Antwoord

  17. Cricut Maker Roller Bar Replacement: stap 17, afbeelding 1 van 1
    • Under the motor there is a white plastic gear. To remove it, gently pull it off the axle.

  18. Cricut Maker Roller Bar Replacement: stap 18, afbeelding 1 van 2 Cricut Maker Roller Bar Replacement: stap 18, afbeelding 2 van 2
    • Remove the washer from the top screw above the motor.

    • We found it was easier done by hand.

    That "washer" is properly known as an "E-clip".

    JCinGG - Antwoord

    Do you know here i can get a replacement for the large white gear that drives the belt?

    Rom Koutnik - Antwoord

  19. Cricut Maker Roller Bar Replacement: stap 19, afbeelding 1 van 2 Cricut Maker Roller Bar Replacement: stap 19, afbeelding 2 van 2
    • Remove the two 5 mm screws from the remaining motor on the opposite side, using a Phillips #2 screwdriver.

    I fail to see why this motor needs to be removed from it's bracket.

    Steps 21 and 22 should already have been done first, then you can just push the axle pin out, and free the gear from the belt.

    JCinGG - Antwoord

    Bonjour, à quel moment enlève t on l'arrière de la machine pour accéder au porte outil?

    Maserati Rolish - Antwoord

  20. Cricut Maker Roller Bar Replacement: stap 20, afbeelding 1 van 2 Cricut Maker Roller Bar Replacement: stap 20, afbeelding 2 van 2
    • Twist and remove the motor from the machine.

    • Avoid touching the various tach disks on these motors.

    Avoid touching the various tach disks on these motors.

    JCinGG - Antwoord

  21. Cricut Maker Roller Bar Replacement, Belt: stap 21, afbeelding 1 van 3 Cricut Maker Roller Bar Replacement, Belt: stap 21, afbeelding 2 van 3 Cricut Maker Roller Bar Replacement, Belt: stap 21, afbeelding 3 van 3
    • Remove the two 10 mm screws using a Phillips #2 screwdriver.

  22. Cricut Maker Roller Bar Replacement: stap 22, afbeelding 1 van 2 Cricut Maker Roller Bar Replacement: stap 22, afbeelding 2 van 2
    • Pull the belt holder towards you, and twist it sideways to slide it neatly into the same hole the belt is emerging from.

  23. Cricut Maker Roller Bar Replacement: stap 23, afbeelding 1 van 2 Cricut Maker Roller Bar Replacement: stap 23, afbeelding 2 van 2
    • Pull the bar containing the axel and metal attachment out to remove them.

    • This should free the remaining side of the belt.

  24. Cricut Maker Roller Bar Replacement: stap 24, afbeelding 1 van 2 Cricut Maker Roller Bar Replacement: stap 24, afbeelding 2 van 2
    • Use a Phillips #2 screwdriver to remove the four 10 mm screws from the board on the main motor.

  25. Cricut Maker Roller Bar Replacement: stap 25, afbeelding 1 van 3 Cricut Maker Roller Bar Replacement: stap 25, afbeelding 2 van 3 Cricut Maker Roller Bar Replacement: stap 25, afbeelding 3 van 3
    • Remove the electrical tape from the connecting cable on the backside of the main motor.

    • Use the tip of a spudger or your fingernail to flip up the small locking flap.

    • Pull the cable out.

  26. Cricut Maker Roller Bar Replacement: stap 26, afbeelding 1 van 3 Cricut Maker Roller Bar Replacement: stap 26, afbeelding 2 van 3 Cricut Maker Roller Bar Replacement: stap 26, afbeelding 3 van 3
    • Use a Phillips #1 screwdriver to remove the two 7 mm screws from the belt holder under the main motor.

    • Removing these two screws will cause the belt holder to detach.

    • Slip it through the hole in the main motor frame.

  27. Cricut Maker Roller Bar Replacement: stap 27, afbeelding 1 van 2 Cricut Maker Roller Bar Replacement: stap 27, afbeelding 2 van 2
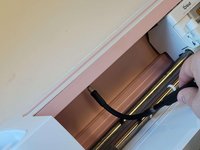
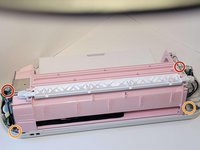
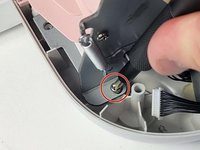
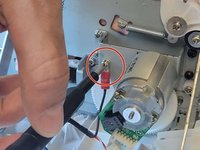
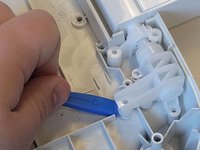
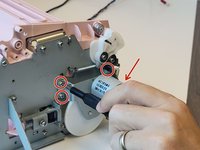
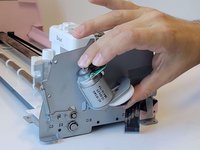
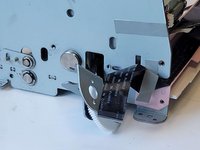
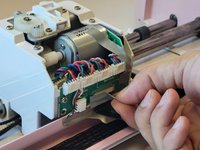
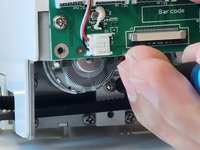
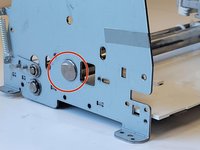
    • Remove the washer (e-clip) securing the bar to the belt holder.

    • We found it is easiest to remove by hand.

    • To remove it, simply twist and pull upwards to free it.

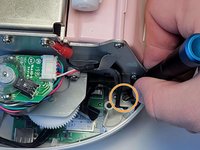
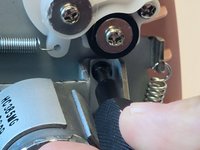
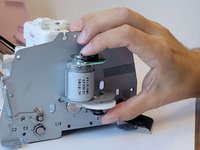
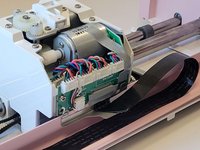
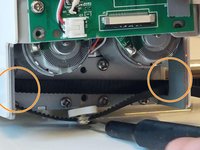
    • Remove the bar from the belt holder and then remove the belt holder.

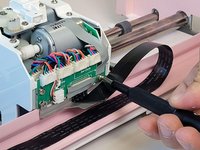
    • Slip the belt out of the machine.

    That "washer" is properly known as an "E-clip".

    JCinGG - Antwoord

    Where fo you get replacement belt

    Michelle Stone - Antwoord

  28. Cricut Maker Roller Bar Replacement, Roller Bar Replacement: stap 28, afbeelding 1 van 2 Cricut Maker Roller Bar Replacement, Roller Bar Replacement: stap 28, afbeelding 2 van 2
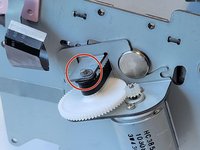
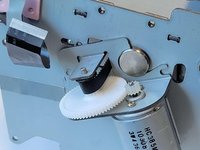
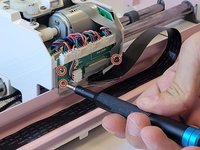
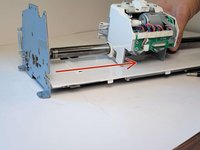
    • Pull the bar to the right of the machine, to free it from its placement.

  29. Cricut Maker Roller Bar Replacement: stap 29, afbeelding 1 van 1
    • Slide the roller bar out to remove it from the machine.

Conclusie

To reassemble your device, follow these instructions in reverse order.

4 andere personen hebben deze handleiding voltooid.

Devyn White

Lid sinds: 09/20/22

1.131 Reputatie

5 handleidingen geschreven

Team

4 opmerkingen

I think there's a step missing between step 4 and 5. Took the lid off in 4 and in 5 we can already see the motor...

Jamie French - Antwoord

For Step #4, for some models, there's 7 silver screws you'll need to remove. You'll need a #1 driver to take them out from the ceiling of the cutting area. That allowed me to take the lid off.

A Regis - Antwoord

Do you have aline the gears when you put it back together that are on the left side for the small roller ?

Tim Norvill - Antwoord

Someone can tell me where we can get this gear?

Rachel Cadot - Antwoord

Voeg opmerking toe

Weergavestatistieken:

Afgelopen 24 uren: 10

Afgelopen 7 dagen: 62

Afgelopen 30 dagen: 268

Altijd: 18,669