Inleiding
The following replacement guide details how to properly replace the OEM Samsung PM981 M.2 NVME SSD. Because this involves replacing internal parts of your computer, this could void any remaining warranty. This replacement is a delicate procedure, there is not much room in this case, and I had to use a Needle-Nose Locking Pliers to help me remove the power connectors from the Graphics Card. You can damage the connectors, the Graphics Card, or other parts of the components, or case If you are not careful. The first part of this guide details how to remove the Graphics Card to get at the M.2 SSD. Please make sure that the Corsair One is powered off and disconnected from the wall. Additionally, ensure you’re careful with the components, as they are incredibly fragile.
Wat je nodig hebt
-
-
Press the button located on the back side upper part of the case.
-
Use a Spudger Tool to help lift the top of the fan assembly. I found that this works better by raising the fan from the top front side of the case, instead of the rear front where the button is located.
-
-
-
Disconnect the top assembly/fan power connector from its housing and remove it.
-
Look down into the unit and locate the graphics card. Orientate the unit so that you are opening the side that contains the graphics card.
-
Remove the two screws from that side.
-
As the panel is hooked in from the bottom and the water cooling tubes from the graphics card are attached to the panel with the radiator, take care in pulling the top part of the panel towards you like you are opening a mailbox and let the panel rest flat on the table.
-
-
-
-
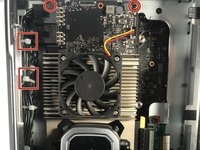
Use a spudger to slightly lift the connector hooks that are locking the power connectors in place and very carefully, use a 9in Needle-Nose Locking Pliers set to the lowest tension with enough grip to help you slowly and carefully rock the two power connectors gently up and down to pull the connectors out of their housings.
-
Remove the top and bottom screws that are holding the graphics card in-place
-
-
-
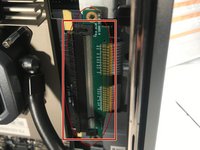
Unscrew the PCIe connector so that the connector is loose from the mount.
-
Slide the PCIe slot off of the connector by hand. Start at the top to gain a little leverage to get the connector started and then leverage the bottom. The connector needs to be removed entirely from the slot gently.
-
-
-
Lay the graphics card on the panel itself with all of the video connectors still connected.
-
-
-
Unscrew the fastener screw
-
Lift the M.2SSD partially up from its base and side it out of the socket.
-


To reassemble your device, follow these instructions in reverse order.
Annuleren: ik heb deze handleiding niet afgemaakt.
2 andere personen hebben deze handleiding voltooid.
