Deze versie kan foutieve bewerkingen bevatten. Schakel over naar de recentste gecontroleerde momentopname.
Wat je nodig hebt
-
Deze stap is niet vertaald. Help het te vertalen
-
Using the Phillips #00 screwdriver, remove the four screws from the side of the speaker.
-
-
Deze stap is niet vertaald. Help het te vertalen
-
Using the Phillips #00 screwdriver, remove the four long screws from the bottom of the camera.
-
-
Deze stap is niet vertaald. Help het te vertalen
-
Using the Phillips #00 screwdriver, remove the four screws from the side opposite of the speaker.
-
-
Deze stap is niet vertaald. Help het te vertalen
-
Pry open bottom casing gently after all screws have been removed.
-
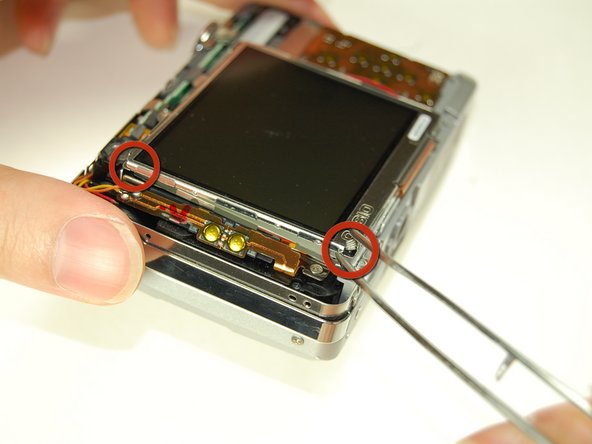
With tweezers, carefully remove the ribbon from the LCD screen.
-
Set the bottom casing aside.
-
-
Deze stap is niet vertaald. Help het te vertalen
-
Pry apart the top casing using tweezers.
-
Set the top casing aside.
-
-
Deze stap is niet vertaald. Help het te vertalen
-
Carefully remove the pieces of black tape on the bottom of the LCD screen that attach it to the frame.
-
Use tweezers to pry the LCD screen off from the opening.
-
-
-
Deze stap is niet vertaald. Help het te vertalen
-
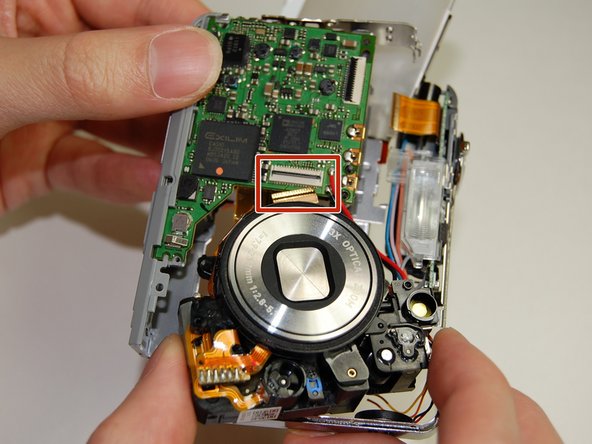
Flip open the connector holding the ribbon.
-
Use the tweezers to carefully pull out the LCD screen with the ribbon from the camera.
-
-
Deze stap is niet vertaald. Help het te vertalen
-
Using the Phillips #00 screwdriver, remove two screws on the side where the battery is located.
-
Remove the lanyard loop after the screws come off.
-
Pull the side casing so it becomes dislocated from the top of the camera frame.
-
-
Deze stap is niet vertaald. Help het te vertalen
-
On the front of the camera near the flash, flip the connector holding the ribbon.
-
Remove the ribbon from the connector.
-
-
Deze stap is niet vertaald. Help het te vertalen
-
Carefully remove the L-shaped frame from the camera.
-
Pop the frame off the bumps and tabs.
-
-
Deze stap is niet vertaald. Help het te vertalen
-
Flip the connector and remove the ribbon cable from the motherboard next to the lens.
-
-
Deze stap is niet vertaald. Help het te vertalen
-
Remove the frame on the back side of the camera where the LCD screen was.
-
Use the Phillips #00 screwdriver to remove the two screws connecting the frame to the camera.
-
Slowly pry off the frame from the camera.
-
After removing the frame, a plastic piece with two yellow buttons should fall off.
-
-
Deze stap is niet vertaald. Help het te vertalen
-
On the back of the camera where the LCD screen was, remove the 3 screws located behind the lens using the Phillips #00 screwdriver.
-
-
Deze stap is niet vertaald. Help het te vertalen
-
Remove the large orange ribbon previously held in by screws from the camera.
-
-
Deze stap is niet vertaald. Help het te vertalen
-
On the backside of the camera where the indicator lamp is located, remove the two screws using the Phillips #00 screwdriver.
-
-
Deze stap is niet vertaald. Help het te vertalen
-
On the front side of the indicator lamp remove the screw using the Phillips #00 screwdriver.
-
-
Deze stap is niet vertaald. Help het te vertalen
-
Desolder the lens from the motherboard.
-
Desolder the wire from the motherboard.
-


Annuleren: ik heb deze handleiding niet afgemaakt.
Één andere persoon heeft deze handleiding voltooid.
Team

Cal Poly, Team 4-38, Regan Winter 2011 Lid van Cal Poly, Team 4-38, Regan Winter 2011
CPSU-REGAN-W11S4G38
4 Leden
13 handleidingen geschreven