Deze versie kan foutieve bewerkingen bevatten. Schakel over naar de recentste gecontroleerde momentopname.
Wat je nodig hebt
-
Deze stap is niet vertaald. Help het te vertalen
-
Remove the two screws from the left side of the camera using a Phillips #00 screwdriver.
-
Remove the two screws from the right side of the camera using a Phillips #00 screwdriver.
-
Remove the two screws from the bottom of the camera using a Phillips #00 screwdriver.
-
-
Deze stap is niet vertaald. Help het te vertalen
-
Using your fingers, manually open the USB cover, labeled as “A/V OUT DIGITAL.”
-
Gently pull the tab of the side cover, completely detaching the cover from the camera.
-
-
Deze stap is niet vertaald. Help het te vertalen
-
Gently grab the sides of the camera and pry off the screen cover using your fingers.
-
Once the screen cover is removed, the front cover and side plate will slide off.
-
-
-
Deze stap is niet vertaald. Help het te vertalen
-
Remove the two screws from the bottom of the camera using a Phillips #00 screwdriver.
-
Remove the screw located below the button release panel.
-
-
Deze stap is niet vertaald. Help het te vertalen
-
Using tweezers, gently slide the LCD cable, horizontally from its white plug towards the camera screen.
-
-
Deze stap is niet vertaald. Help het te vertalen
-
Using your fingers, open the USB port cover (labeled as “A/V OUT DIGITAL” on the camera).
-
Using your fingers, remove the button release panel located on the top of the camera and allow room for it to hang out of the way.
-
-
Deze stap is niet vertaald. Help het te vertalen
-
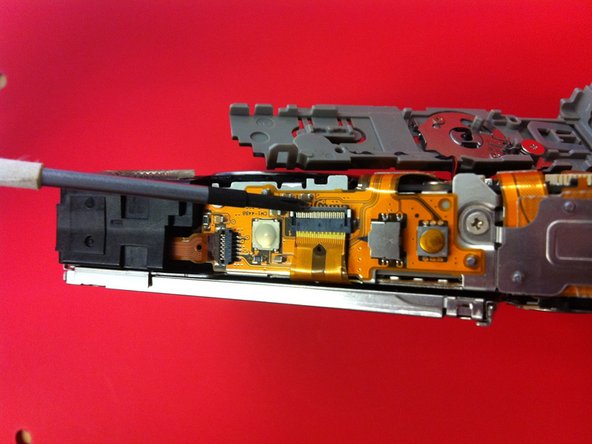
Using the spudger, flip the clip in an upward motion. The clip should remain attached to camera, not removed completely.
-
-
Deze stap is niet vertaald. Help het te vertalen
-
Using tweezers, gently slide the orange, translucent LCD ribbon from its dark gray plug horizontally towards the screen.
-
Remove the screen from the camera, and attach the new screen.
-


Annuleren: ik heb deze handleiding niet afgemaakt.
2 andere personen hebben deze handleiding voltooid.
Team

Cal Poly, Team 4-33, Regan Winter 2011 Lid van Cal Poly, Team 4-33, Regan Winter 2011
CPSU-REGAN-W11S4G33
4 Leden
5 handleidingen geschreven