Ga door naar hoofdinhoud
Word lid van de reparatiegemeenschap - Account aanmaken

Canon PowerShot SD1200 IS Lens Assembly Replacement

Wat je nodig hebt

  1. Canon PowerShot SD1200 IS Lens Assembly Replacement, Front and Rear Covers: stap 1, afbeelding 1 van 1
    • Remove the battery.

    Vraag FixBot
  2. Canon PowerShot SD1200 IS Lens Assembly Replacement: stap 2, afbeelding 1 van 3 Canon PowerShot SD1200 IS Lens Assembly Replacement: stap 2, afbeelding 2 van 3 Canon PowerShot SD1200 IS Lens Assembly Replacement: stap 2, afbeelding 3 van 3
    • Remove the two screws from the side of the camera casing with the strap. (4mm Phillips 00)

    • Remove the two screws from the bottom of the camera. (4mm Phillips 00)

    • Remove the two screws from the right side of the camera opposite the strap. (2mm Phillips 00)

    Vraag FixBot
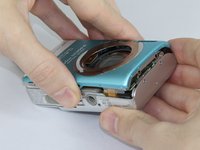
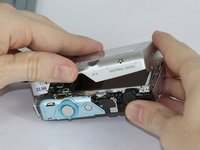
  3. Canon PowerShot SD1200 IS Lens Assembly Replacement: stap 3, afbeelding 1 van 2 Canon PowerShot SD1200 IS Lens Assembly Replacement: stap 3, afbeelding 2 van 2
    • Pull off the front cover.

    • If the top of the cover sticks, use gentle downward pressure on the retention clips above the lens to release.

    • Remove the back cover.

    Vraag FixBot
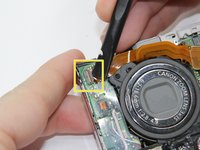
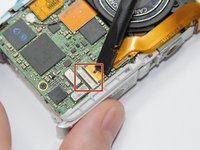
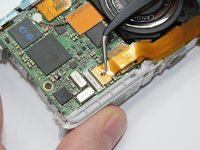
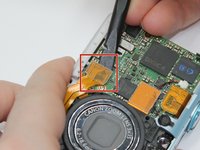
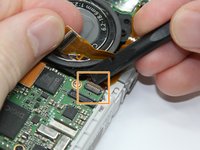
  4. Canon PowerShot SD1200 IS Lens Assembly Replacement, LCD: stap 4, afbeelding 1 van 3 Canon PowerShot SD1200 IS Lens Assembly Replacement, LCD: stap 4, afbeelding 2 van 3 Canon PowerShot SD1200 IS Lens Assembly Replacement, LCD: stap 4, afbeelding 3 van 3
    Gereedschap gebruikt in deze stap:
    Tweezers
    $4.99
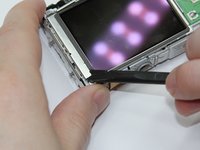
    • Use the spudger to lift the retaining flap on the Zero Insertion Force (ZIF) tab securing the thick ribbon cable.

    • Slide out the ribbon cable using fingers or tweezers.

    • Be sure you are prying up on the hinged retaining flap, not the connector.

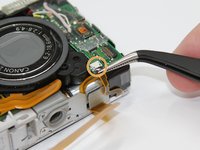
    • Using tweezers, disconnect the small ribbon cable below the flash assembly from the No Fuss Connector by simply pulling the ribbon cable straight out.

    Vraag FixBot
  5. Canon PowerShot SD1200 IS Lens Assembly Replacement: stap 5, afbeelding 1 van 3 Canon PowerShot SD1200 IS Lens Assembly Replacement: stap 5, afbeelding 2 van 3 Canon PowerShot SD1200 IS Lens Assembly Replacement: stap 5, afbeelding 3 van 3
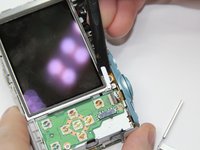
    • Remove the L shaped brackets from the left and right side of the LCD screen with the spudger tool.

    • The Brackets have tabs that need to be pried up.

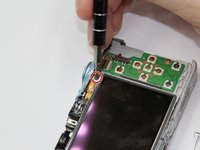
    • Remove the screw below the shutter button. (2.5mm Phillips 00)

    • Holding the sides of the LCD screen, lift the screen up and away to remove.

    Vraag FixBot
  6. Canon PowerShot SD1200 IS Lens Assembly Replacement, Flash Assembly: stap 6, afbeelding 1 van 3 Canon PowerShot SD1200 IS Lens Assembly Replacement, Flash Assembly: stap 6, afbeelding 2 van 3 Canon PowerShot SD1200 IS Lens Assembly Replacement, Flash Assembly: stap 6, afbeelding 3 van 3
    • Use the spudger to pry up each side of the lens assembly Flat-Topped Connector at the bottom of the motherboard.

    • Holding back the lens assembly ribbon cable, use the spudger to lift the Zero Insertion Force (ZIF) connector tab . Slide out the ribbon cable.

    • Be sure you are prying up on the hinged retaining flap, not the connector itself.

    • Use the spudger to lift the Zero Insertion Force (ZIF) connector tab located on the flash unit. Remove the ribbon cable.

    Vraag FixBot
  7. Canon PowerShot SD1200 IS Lens Assembly Replacement: stap 7, afbeelding 1 van 1
    • Remove the two screws (2 mm Phillips 00) along the back edge of the camera frame directly behind the flash assembly.

    Vraag FixBot
  8. Canon PowerShot SD1200 IS Lens Assembly Replacement: stap 8, afbeelding 1 van 1
    • Lift out the flash assembly.

    Vraag FixBot
  9. Canon PowerShot SD1200 IS Lens Assembly Replacement, Lens Assembly: stap 9, afbeelding 1 van 1
    • Use the spudger to gently pry up both sides of the flat-topped connector, then lift the cable directly up out of its socket.

    Vraag FixBot
  10. Canon PowerShot SD1200 IS Lens Assembly Replacement: stap 10, afbeelding 1 van 1
    • Remove the 4 corner screws on the back of the camera in silver metal frame surrounding the back of the lens assembly (2.5 mm Phillips 00) .

    Vraag FixBot
  11. Canon PowerShot SD1200 IS Lens Assembly Replacement: stap 11, afbeelding 1 van 1
    • Use the spudger to gently lift out the LED at the top of the lens assembly.

    Vraag FixBot
  12. Canon PowerShot SD1200 IS Lens Assembly Replacement: stap 12, afbeelding 1 van 1
    • Remove the lens assembly.

    Vraag FixBot
Conclusie

To reassemble your device, follow these instructions in reverse order.

5 andere personen hebben deze handleiding voltooid.

Jeff Casper

Lid sinds: 09/15/16

897 Reputatie

7 handleidingen geschreven

Team

USF Tampa, Team 17-5, Blackwell Fall 2016 Lid van USF Tampa, Team 17-5, Blackwell Fall 2016

USFT-BLACKWELL-F16S17G5

3 Leden

7 handleidingen geschreven

2Gids Commentaar

i have this same camera, and for me all the sudden it stopped focasing completely. everything else works, and it isnt in any weird modes. when i try to focas especially on auto focas with the half button push, i hear some abnormal clicking like it is trying to auto focas but cant. im not sure what to do!

Katelyn Lehmann - Antwoord Deel

I have the same problem after my camera sat unused for a year. Everything functions fine except the camera will not focus.

ROGER - Antwoord Deel

Voeg opmerking toe

Weergavestatistieken:

Afgelopen 24 uren: 3

Afgelopen 7 dagen: 34

Afgelopen 30 dagen: 120

Altijd: 4,111