Ga door naar hoofdinhoud
Word lid van de reparatiegemeenschap - Account aanmaken

Canon PowerShot S50 LCD Screen Replacement

Wat je nodig hebt

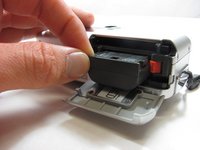
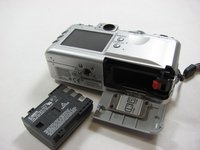
    1. Canon PowerShot S50 LCD Screen Replacement, Battery: stap 1, afbeelding 1 van 2 Canon PowerShot S50 LCD Screen Replacement, Battery: stap 1, afbeelding 2 van 2
      • Place camera LCD side up and press up on the battery door.

      • Let it swing open until you can see the battery inside.

      Vraag FixBot

      Voeg opmerking toe

    2. Canon PowerShot S50 LCD Screen Replacement: stap 2, afbeelding 1 van 1
      • Press down on the orange plastic.

      • This will gently eject the battery from its compartment.

      Vraag FixBot

      Voeg opmerking toe

    3. Canon PowerShot S50 LCD Screen Replacement: stap 3, afbeelding 1 van 2 Canon PowerShot S50 LCD Screen Replacement: stap 3, afbeelding 2 van 2
      • Holding the edges, slide out the battery.

      Vraag FixBot

      Voeg opmerking toe

    1. Canon PowerShot S50 LCD Screen Replacement, Front Panel/Battery Door: stap 4, afbeelding 1 van 1
      • Look at the camera from the side with the lanyard and 4 screws.

      • Remove the two 3.4 mm screws on the metallic colored part.

      Vraag FixBot

      Voeg opmerking toe

    2. Canon PowerShot S50 LCD Screen Replacement: stap 5, afbeelding 1 van 1
      • Remove the 3mm screw on the top left.

      • NOTE: When reassembling, it is helpful to put the top screw back in before placing the front cover back on the camera.

      • Now remove the 5.3mm screw on the bottom.

      Vraag FixBot

      Voeg opmerking toe

    3. Canon PowerShot S50 LCD Screen Replacement: stap 6, afbeelding 1 van 1
      • Place the camera LCD side down.

      • Remove the two 5.3mm screws by the battery door.

      Vraag FixBot

      Voeg opmerking toe

    4. Canon PowerShot S50 LCD Screen Replacement: stap 7, afbeelding 1 van 1
      • Remove the four 3.4mm screws on the bottom of the camera around the tripod mount.

      • Make sure to keep these screws separate from the previous 5.3 mm screws.

      Vraag FixBot

      Voeg opmerking toe

    5. Canon PowerShot S50 LCD Screen Replacement: stap 8, afbeelding 1 van 1
      • Stand the camera back up.

      • Remove the two 3.6mm screws on the side with the A/V Out port.

      Vraag FixBot

      Voeg opmerking toe

    6. Canon PowerShot S50 LCD Screen Replacement: stap 9, afbeelding 1 van 1
      • Lift open the rubber flap covering the A/V Out port.

      • Remove the 3.4mm screw in the center.

      • During reassembly, put the A/V out rubber door on before replacing the front panel of the camera

      Vraag FixBot

      Voeg opmerking toe

    7. Canon PowerShot S50 LCD Screen Replacement: stap 10, afbeelding 1 van 1
      • Use a spudger and gently open up the front panel of the camera.

      • A thin plastic ribbon will stay connected by a brown piece to front panel of the camera.

      Vraag FixBot

      Voeg opmerking toe

    8. Canon PowerShot S50 LCD Screen Replacement: stap 11, afbeelding 1 van 1
      • There will be a brown plastic piece keeping the thin plastic ribbon in place.

      • Use the spudger to pull out the brown plastic piece attached to the orange plastic.

      Vraag FixBot

      Voeg opmerking toe

    9. Canon PowerShot S50 LCD Screen Replacement: stap 12, afbeelding 1 van 1
      Gereedschap gebruikt in deze stap:
      Tweezers
      $4.99
      • Use a pair of tweezers and remove the metal piece inside the camera.

      Vraag FixBot

      Voeg opmerking toe

    10. Canon PowerShot S50 LCD Screen Replacement: stap 13, afbeelding 1 van 1
      • Remove the battery door

      • NOTE: Putting this back on requires aligning the spring on the back of the door with the hole on the camera

      Vraag FixBot

      Voeg opmerking toe

    1. Canon PowerShot S50 LCD Screen Replacement, Right Motherboard: stap 14, afbeelding 1 van 1
      • Disconnect the two plastic ribbons on the lower half of the right motherboard.

      • NOTE: You will have to lift up the brown plastic piece in order to pull out the second ribbon wire.

      Vraag FixBot

      Voeg opmerking toe

    2. Canon PowerShot S50 LCD Screen Replacement: stap 15, afbeelding 1 van 1
      • Remove the two 3.4mm screws on the right motherboard.

      Vraag FixBot

      Voeg opmerking toe

    3. Canon PowerShot S50 LCD Screen Replacement: stap 16, afbeelding 1 van 1
      • Disconnect the two wired plugs below the flash.

      Vraag FixBot

      Voeg opmerking toe

    4. Canon PowerShot S50 LCD Screen Replacement: stap 17, afbeelding 1 van 1
      • Disconnect the wired plug at the bottom of the right motherboard.

      Vraag FixBot

      Voeg opmerking toe

    5. Canon PowerShot S50 LCD Screen Replacement: stap 18, afbeelding 1 van 1
      Gereedschap gebruikt in deze stap:
      Tweezers
      $4.99
      • Use a pair of tweezers to pull the right motherboard away from the main body of the camera.

      Vraag FixBot

      Voeg opmerking toe

    1. Canon PowerShot S50 LCD Screen Replacement, Outer Casing: stap 19, afbeelding 1 van 1
      • Using a spudger, gently separate the back panel from the rest of the camera and remove it.

      Vraag FixBot

      Voeg opmerking toe

    1. Canon PowerShot S50 LCD Screen Replacement, LCD Screen: stap 20, afbeelding 1 van 1
      • Remove the 2.6mm screw on the bottom of the camera located directly under the LCD screen.

      • This screw should be holding two pieces of orange film down.

      • When replacing this screw, make sure that the orange film is secure below it before screwing it in.

      Vraag FixBot

      Voeg opmerking toe

    2. Canon PowerShot S50 LCD Screen Replacement: stap 21, afbeelding 1 van 1
      • Disconnect the film from the bottom of the camera under the LCD Screen.

      Vraag FixBot

      Voeg opmerking toe

    3. Canon PowerShot S50 LCD Screen Replacement: stap 22, afbeelding 1 van 1
      • Remove the 3.3mm screw on the bottom left of the LCD screen.

      Vraag FixBot

      Voeg opmerking toe

    4. Canon PowerShot S50 LCD Screen Replacement: stap 23, afbeelding 1 van 1
      • Remove the 2.4mm screw located just to the upper right of the LCD Screen.

      Vraag FixBot

      Voeg opmerking toe

    5. Canon PowerShot S50 LCD Screen Replacement: stap 24, afbeelding 1 van 1
      • Gently remove the LCD Screen.

      Vraag FixBot

      Voeg opmerking toe

Conclusie

To reassemble your device, follow these instructions in reverse order.

Annuleren: ik heb deze handleiding niet afgemaakt.

Één andere persoon heeft deze handleiding voltooid.

Jacob

Lid sinds: 03/29/12

16 Reputatie

3 handleidingen geschreven

Team

Cal Poly, Team 7-34, Maness Spring 2012 Lid van Cal Poly, Team 7-34, Maness Spring 2012

CPSU-MANESS-S12S7G34

5 Leden

6 handleidingen geschreven

0Gids Commentaar

Voeg opmerking toe

Weergavestatistieken:

Afgelopen 24 uren: 2

Afgelopen 7 dagen: 11

Afgelopen 30 dagen: 37

Altijd: 2,069