Ga door naar hoofdinhoud

Canon PowerShot G7X Lens Replacement

Wat je nodig hebt

  1. Canon PowerShot G7X Lens Replacement, Dial: stap 1, afbeelding 1 van 1
    • Remove the five 2mm Phillips #000 screws that are under the screen of the camera.

  2. Canon PowerShot G7X Lens Replacement: stap 2, afbeelding 1 van 1
    • Remove the two 3mm Phillips #000 screws under the AV-out digital flap.

    • Remove the two 3 mm Phillips #000 screws from the side of the camera.

  3. Canon PowerShot G7X Lens Replacement: stap 3, afbeelding 1 van 1
    • Remove the two 3 mm Phillips #000 screws on the side of camera with the flash toggle.

  4. Canon PowerShot G7X Lens Replacement: stap 4, afbeelding 1 van 1
    • Remove the four 4 mm Phillips #000 screws from the plate on the bottom of the camera.

  5. Canon PowerShot G7X Lens Replacement: stap 5, afbeelding 1 van 1
    • Remove the back plate.

  6. Canon PowerShot G7X Lens Replacement: stap 6, afbeelding 1 van 1
    • Remove the three 3 mm Phillips #000 screws around the dial.

  7. Canon PowerShot G7X Lens Replacement: stap 7, afbeelding 1 van 2 Canon PowerShot G7X Lens Replacement: stap 7, afbeelding 2 van 2
    • Using the nylon spudger, gently lift the ZIF tab.

    • Disconnect the ribbon cable that connects the dial to the motherboard.

    • Remove the dial from the device.

  8. Canon PowerShot G7X Lens Replacement, Flash: stap 8, afbeelding 1 van 2 Canon PowerShot G7X Lens Replacement, Flash: stap 8, afbeelding 2 van 2
    • Remove the three, blue 5 mm Phillips screws from the back plate.

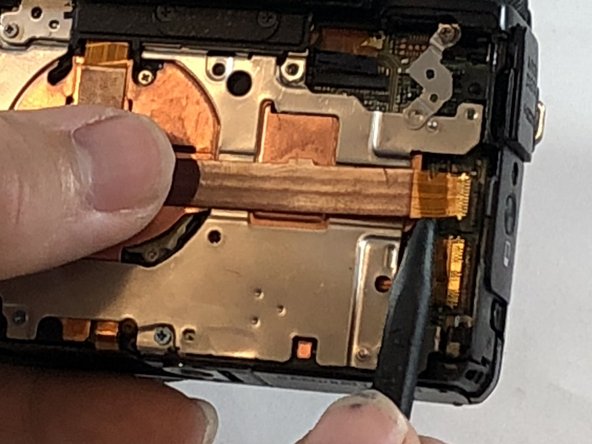
    • Remove seven 2 mm Phillips #000 screws.

  9. Canon PowerShot G7X Lens Replacement: stap 9, afbeelding 1 van 2 Canon PowerShot G7X Lens Replacement: stap 9, afbeelding 2 van 2
    • While using the plastic opening tool, gently pry the top plate off the camera.

  10. Canon PowerShot G7X Lens Replacement: stap 10, afbeelding 1 van 2 Canon PowerShot G7X Lens Replacement: stap 10, afbeelding 2 van 2
    • Using the black nylon spudger, gently lift the ribbon cable connected to the LCD screen housing until it comes out then remove the housing.

  11. Canon PowerShot G7X Lens Replacement: stap 11, afbeelding 1 van 2 Canon PowerShot G7X Lens Replacement: stap 11, afbeelding 2 van 2
    • Remove the 2 mm Phillips #000 screw underneath the top plate.

    • Remove silver plate.

  12. Canon PowerShot G7X Lens Replacement: stap 12, afbeelding 1 van 1
    • Take the Phillips #000 and remove the three 5 mm screws from the front plate.

  13. Canon PowerShot G7X Lens Replacement: stap 13, afbeelding 1 van 2 Canon PowerShot G7X Lens Replacement: stap 13, afbeelding 2 van 2
    • Using the spudger, gently lift the ribbon cable from underneath the front plate.

    • Remove the front plate.

  14. Canon PowerShot G7X Lens Replacement: stap 14, afbeelding 1 van 2 Canon PowerShot G7X Lens Replacement: stap 14, afbeelding 2 van 2
    • Remove flash toggle plate.

    • Remove the 2mm Phillips #000 screws under the flash toggle.

  15. Canon PowerShot G7X Lens Replacement: stap 15, afbeelding 1 van 2 Canon PowerShot G7X Lens Replacement: stap 15, afbeelding 2 van 2
    • Flash contains charged capacitor. Shock hazard.

    • Using the black nylon spudger, gently lift the ribbon cable that connects the flash to motherboard and remove the flash from the device.

  16. Canon PowerShot G7X Lens Replacement, Lens: stap 16, afbeelding 1 van 1
    • Remove the 5 mm Phillips #000 screw from the copper plate.

  17. Canon PowerShot G7X Lens Replacement: stap 17, afbeelding 1 van 1
    • Using the black nylon spudger, lift the ribbon cable gently until it comes out.

  18. Canon PowerShot G7X Lens Replacement: stap 18, afbeelding 1 van 1
    • Remove the copper plate to reveal connections to the lens.

  19. Canon PowerShot G7X Lens Replacement: stap 19, afbeelding 1 van 1
    • Using the black nylon spudger, lift gently on the pin connector until it comes off.

  20. Canon PowerShot G7X Lens Replacement: stap 20, afbeelding 1 van 2 Canon PowerShot G7X Lens Replacement: stap 20, afbeelding 2 van 2
    • Using the spudger, gently lift on the ribbon cable until it comes out.

    • Separate the lens from the motherboard.

Conclusie

To reassemble your device, follow these instructions in reverse order.

Één andere persoon heeft deze handleiding voltooid.

3 opmerkingen

Not that great of step by step. Lots of missed steps and lots different screw length and thread. Over all it's just an ok guide.

Nick Thomas - Antwoord

how do you tell if the lens is CCD or not

kingwayne77none - Antwoord

Poor instructions indeed. At step 11 silver plate still stuck. More screws than indicated.

Hugo Lyppens - Antwoord

Voeg opmerking toe

Weergavestatistieken:

Afgelopen 24 uren: 5

Afgelopen 7 dagen: 24

Afgelopen 30 dagen: 77

Altijd: 6,643