Ga door naar hoofdinhoud

Canon PowerShot G1 X Motherboard Replacement

Wat je nodig hebt

  1. Canon PowerShot G1 X Motherboard Replacement, Back Camera Casing: stap 1, afbeelding 1 van 2 Canon PowerShot G1 X Motherboard Replacement, Back Camera Casing: stap 1, afbeelding 2 van 2
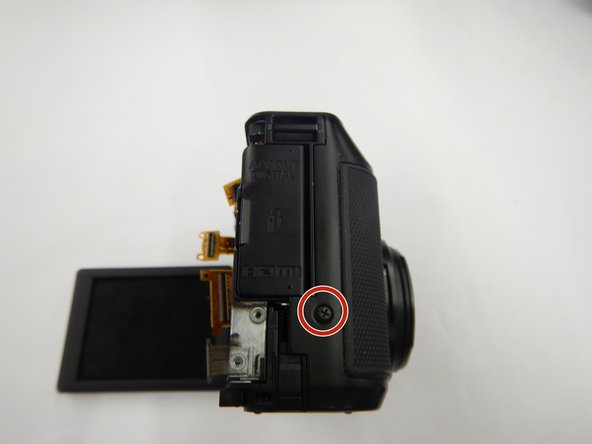
    • To begin removing the back camera casing, unscrew the Phillips screw underneath the panel covering the USB connections on the side of the camera. Use a Phillips Head 00 screwdriver for this screw.

    • Remove the screw located directly beneath the USB cover located in the second photo. Use a Phillips Head 00 screwdriver for this screw.

  2. Canon PowerShot G1 X Motherboard Replacement: stap 2, afbeelding 1 van 1
    • After removing the first screw flip to the bottom side of the camera and unscrew the two screws located toward the back side of the casing. The screw on the front side can be left in. Use a Phillips Head 00 screwdriver for both of these screws.

  3. Canon PowerShot G1 X Motherboard Replacement: stap 3, afbeelding 1 van 1
    • Now flip to the opposite side of the USB panel screw and unscrew the two screws holding the small speaker cover portion of the camera. Use a Phillips Head 00 screwdriver for both of these screws.

  4. Canon PowerShot G1 X Motherboard Replacement: stap 4, afbeelding 1 van 1
    • The last screw is located towards the top side of the back of the camera next to the view finder. Unscrew by using a Phillips Head 00 screwdriver.

  5. Canon PowerShot G1 X Motherboard Replacement: stap 5, afbeelding 1 van 1
    • Remove the side panel covering the speaker by gently pulling it away from the camera. You can also use spudgers to create a lever to help remove the panel.

  6. Canon PowerShot G1 X Motherboard Replacement: stap 6, afbeelding 1 van 1
    • Remove the back casing by gently pulling. You could also use spudger to create a lever to help pry it off.

  7. Canon PowerShot G1 X Motherboard Replacement, Buttons: stap 7, afbeelding 1 van 2 Canon PowerShot G1 X Motherboard Replacement, Buttons: stap 7, afbeelding 2 van 2
    • Remove the two screws above the buttons followed by the screw on the bottom, using a Phillips #00 screwdriver.

  8. Canon PowerShot G1 X Motherboard Replacement: stap 8, afbeelding 1 van 1
    • Remove the screw on the side of the buttons using a Phillips #00 screwdriver.

  9. Canon PowerShot G1 X Motherboard Replacement: stap 9, afbeelding 1 van 1
    • Gently remove buttons by hand, once all of the screws holding the buttons in are removed.

  10. Canon PowerShot G1 X Motherboard Replacement, Motherboard: stap 10, afbeelding 1 van 2 Canon PowerShot G1 X Motherboard Replacement, Motherboard: stap 10, afbeelding 2 van 2
    • Remove the two screws on the front casing using a Phillips #00 screwdriver.

  11. Canon PowerShot G1 X Motherboard Replacement: stap 11, afbeelding 1 van 1
    • Remove the Canon Zoom Lens by pressing this button down while pulling the lens up.

  12. Canon PowerShot G1 X Motherboard Replacement: stap 12, afbeelding 1 van 1
    • Gently remove the front casing with your hands or a spudger.

  13. Canon PowerShot G1 X Motherboard Replacement: stap 13, afbeelding 1 van 1
    • Remove the ribbon wire that is on top of the motherboard by gently pulling it out of its attachment.

  14. Canon PowerShot G1 X Motherboard Replacement: stap 14, afbeelding 1 van 1
    • Remove the three screws on the top of the motherboard using a Phillips #00 screwdriver.

  15. Canon PowerShot G1 X Motherboard Replacement: stap 15, afbeelding 1 van 1
    • Remove the bottom two screws on the motherboard using a Phillips #00 screwdriver.

  16. Canon PowerShot G1 X Motherboard Replacement: stap 16, afbeelding 1 van 1
    • Remove motherboard by gently pulling it out.

Conclusie

To reassemble your device, follow these instructions in reverse order.

0 opmerkingen

Voeg opmerking toe

Weergavestatistieken:

Afgelopen 24 uren: 2

Afgelopen 7 dagen: 5

Afgelopen 30 dagen: 21

Altijd: 523