Ga door naar hoofdinhoud

Canon PowerShot A540 Front Cover Replacement

Wat je nodig hebt

  1. Canon PowerShot A540 Front Cover Replacement, Back Cover: stap 1, afbeelding 1 van 2 Canon PowerShot A540 Front Cover Replacement, Back Cover: stap 1, afbeelding 2 van 2
    • Turn off the camera.

    • Turn the camera upside-down and press the tab to release the battery cover. Remove the batteries.

  2. Canon PowerShot A540 Front Cover Replacement: stap 2, afbeelding 1 van 1
    • Turn the camera upside down to view the "Card/Batt. Open" Cover.

    • Use a Phillips head #000 screwdriver to remove the three (3) 4.0 mm screws.

  3. Canon PowerShot A540 Front Cover Replacement: stap 3, afbeelding 1 van 1
    • Open "Card/Batt. Open" Cover.

    • Remove the one (1) 5.0 mm screw with the Phillips head #000 screwdriver.

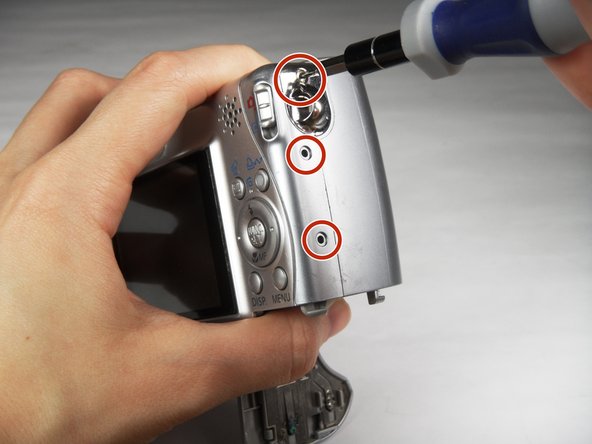
  4. Canon PowerShot A540 Front Cover Replacement: stap 4, afbeelding 1 van 1
    • Turn the camera to the right side of the LCD screen.

    • Remove the three (3) 4.0 mm screws with the Phillips head #000 screwdriver.

  5. Canon PowerShot A540 Front Cover Replacement: stap 5, afbeelding 1 van 3 Canon PowerShot A540 Front Cover Replacement: stap 5, afbeelding 2 van 3 Canon PowerShot A540 Front Cover Replacement: stap 5, afbeelding 3 van 3
    • Gently remove the back cover.

    • Start at the bottom at the corner of the "Card/Batt. Open" Cover.

    • Then move onto the other edges and the top.

    • It may be tight at the top!

  6. Canon PowerShot A540 Front Cover Replacement, Front Cover: stap 6, afbeelding 1 van 2 Canon PowerShot A540 Front Cover Replacement, Front Cover: stap 6, afbeelding 2 van 2
    • Turn the camera to view the front.

    • Remove the lens guard.

    • Press the lens guard's button as you turn the guard counterclockwise.

  7. Canon PowerShot A540 Front Cover Replacement: stap 7, afbeelding 1 van 1
    • Turn the camera to the side left of the LCD screen.

    • Remove the one (1) 4.0 mm screw with the Phillips head #000 screwdriver.

  8. Canon PowerShot A540 Front Cover Replacement: stap 8, afbeelding 1 van 1
    • Remove the front cover gently.

    • When removing the front cover, a thin, black rubber washer may fall off the lens. If it does, make sure to put it back on the lens before reassembly.

Conclusie

To reassemble your device, follow these instructions in reverse order.

2 andere personen hebben deze handleiding voltooid.

Carley Fuller

Lid sinds: 03/23/15

434 Reputatie

3 handleidingen geschreven

Team

Baylor, Team 7-12, Williams Spring 2015 Lid van Baylor, Team 7-12, Williams Spring 2015

BU-WILLIAMS-S15S7G12

3 Leden

20 handleidingen geschreven

0 opmerkingen

Voeg opmerking toe

Weergavestatistieken:

Afgelopen 24 uren: 1

Afgelopen 7 dagen: 2

Afgelopen 30 dagen: 19

Altijd: 1,457