Ga door naar hoofdinhoud

Canon EOS Rebel T5 Motherboard Replacement

Wat je nodig hebt

  1. Canon EOS Rebel T5 Motherboard Replacement, Battery: stap 1, afbeelding 1 van 1
    • Lay the camera on its back so that the card/battery door is facing you.

    • Using your fingernail, slide the tab on the battery door up to release the battery door latch.

  2. Canon EOS Rebel T5 Motherboard Replacement: stap 2, afbeelding 1 van 1
    • Lift the now free card/battery door to reveal the battery compartment.

    • Push the gray lever to the right side so that the battery can be removed and replaced with a new one.

  3. Canon EOS Rebel T5 Motherboard Replacement, Back Panel: stap 3, afbeelding 1 van 1
    • Turn the camera so that the back is facing to your right.

    • Remove the 5mm Phillips #000 screw above the rubber USB port cover.

    2 more screws behind rubber cover.

    Michael Gill - Antwoord

  4. Canon EOS Rebel T5 Motherboard Replacement: stap 4, afbeelding 1 van 1
    • Remove the rubber piece.

    • Unscrew the two screws under the rubber cover to completely remove the rubber cover piece.

    • It is held in place by a notched tether, but can be easily manipulated to slide out.

  5. Canon EOS Rebel T5 Motherboard Replacement: stap 5, afbeelding 1 van 1
    • Turn your camera so that the bottom is facing you.

    • Remove the 5mm Phillips #000 screws.

    There is a 6th screw next to the battery door.

    Michael Gill - Antwoord

  6. Canon EOS Rebel T5 Motherboard Replacement: stap 6, afbeelding 1 van 1
    • Now turn the camera so that the front is facing towards your right.

    • Remove the two remaining 5mm Phillips #000 screws.

    Instructions are forgetting the two screws on either side of the viewfinder…. Viewfinder slides up to reveal two screws.

    Hugh Morand - Antwoord

  7. Canon EOS Rebel T5 Motherboard Replacement: stap 7, afbeelding 1 van 3 Canon EOS Rebel T5 Motherboard Replacement: stap 7, afbeelding 2 van 3 Canon EOS Rebel T5 Motherboard Replacement: stap 7, afbeelding 3 van 3
    • Now that all of the exterior screws have been removed, grip the camera firmly on both sides.

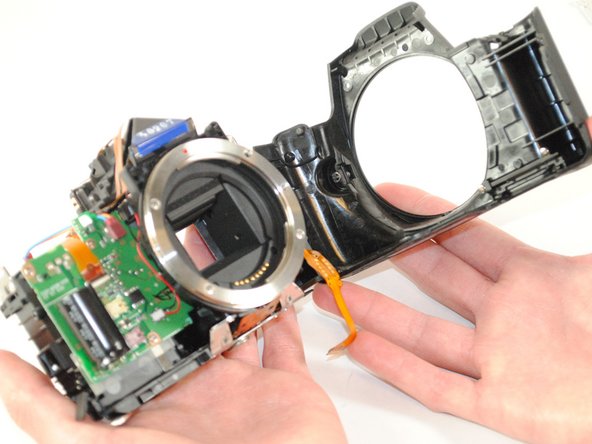
    • Gently pry the back panel from the main body of the camera.

    • There are two ribbon cables that need to be removed in order for the back panel to come free from the camera body, as indicated.

    • This back panel contains various control components of the camera as well as the LCD screen.

    Do NOT pry until you’ve removed the eye gasket, and the 2 screws behind this! You will break the camera.

    Michael Gill - Antwoord

  8. Canon EOS Rebel T5 Motherboard Replacement, Motherboard: stap 8, afbeelding 1 van 1
    • Remove all ribbon cables with the plastic spudger.

    • Gently pry up the black plastic tabs to slide out the ribbon cables

  9. Canon EOS Rebel T5 Motherboard Replacement: stap 9, afbeelding 1 van 1
    • Turn your camera so that the top is facing you.

    • Remove the two black 5 mm Phillips #000 screws.

  10. Canon EOS Rebel T5 Motherboard Replacement: stap 10, afbeelding 1 van 3 Canon EOS Rebel T5 Motherboard Replacement: stap 10, afbeelding 2 van 3 Canon EOS Rebel T5 Motherboard Replacement: stap 10, afbeelding 3 van 3
    • Turn the grip side toward you.

    • Remove the rubber grip, using the plastic spudger.

  11. Canon EOS Rebel T5 Motherboard Replacement: stap 11, afbeelding 1 van 1
    • Remove the black 5 mm Phillips #000 screw, located under the grip.

    they is a cable i think gray in color on the top panel, where does it fit, it seems to come out easily

    Tshepiso Marques Molefe - Antwoord

  12. Canon EOS Rebel T5 Motherboard Replacement: stap 12, afbeelding 1 van 1
    • Remove the top panel of the device.

  13. Canon EOS Rebel T5 Motherboard Replacement: stap 13, afbeelding 1 van 2 Canon EOS Rebel T5 Motherboard Replacement: stap 13, afbeelding 2 van 2
    • Remove the front panel of the camera.

  14. Canon EOS Rebel T5 Motherboard Replacement: stap 14, afbeelding 1 van 3 Canon EOS Rebel T5 Motherboard Replacement: stap 14, afbeelding 2 van 3 Canon EOS Rebel T5 Motherboard Replacement: stap 14, afbeelding 3 van 3
    • Remove the five silver 5mm Phillips #000 screws.

    • The motherboard can now be removed.

    Where can I buy a Motherboard for a T7 and what would the cost be?

    Dean Smith - Antwoord

Conclusie

To reassemble your device, follow these instructions in reverse order.

9 andere personen hebben deze handleiding voltooid.

Austin Tucker

Lid sinds: 08/27/15

1.027 Reputatie

4 handleidingen geschreven

Team

USF Tampa, Team 16-4, Wollert Fall 2015 Lid van USF Tampa, Team 16-4, Wollert Fall 2015

USFT-WOLLERT-F15S16G4

4 Leden

16 handleidingen geschreven

2 opmerkingen

This guide is amazing, but if you change the mainboard do you have to initialize it by software, like Spt?

Edgar Nunes - Antwoord

New main board from canon .

How to instalize?

Thomas Nguyen - Antwoord

Voeg opmerking toe

Weergavestatistieken:

Afgelopen 24 uren: 0

Afgelopen 7 dagen: 2

Afgelopen 30 dagen: 24

Altijd: 4,150