Deze versie kan foutieve bewerkingen bevatten. Schakel over naar de recentste gecontroleerde momentopname.
Wat je nodig hebt
-
Deze stap is niet vertaald. Help het te vertalen
-
Locate the battery cover at the bottom of the camera.
-
Pull down on the black tab to open the cover.
-
-
Deze stap is niet vertaald. Help het te vertalen
-
Push the grey tab on the right side of the battery.
-
Remove the battery from the slot.
-
-
Deze stap is niet vertaald. Help het te vertalen
-
Use the spudger to pry off the rubber grip and reveal the screws.
-
Unscrew the four 5.5mm Torx screws using the Torx T6 screwdriver.
-
-
Deze stap is niet vertaald. Help het te vertalen
-
Pull off the plastic cover from the viewfinder.
-
Unscrew the two 3.4mm Phillips screws using the Phillips #00 screwdriver.
-
-
Deze stap is niet vertaald. Help het te vertalen
-
Remove the following screws from the device using the Phillips #00 screwdriver:
-
Two 3.4mm Phillips head screws.
-
Two 5.9mm Phillips head screw.
-
-
-
Deze stap is niet vertaald. Help het te vertalen
-
Remove the following screws from the device using the Phillips #00 screwdriver:
-
One 3.4mm Phillips head screw.
-
One 5.9 mm Phillips head screw.
-
-
Deze stap is niet vertaald. Help het te vertalen
-
In the lower right corner of the mother board, detach the blue cable.
-
Then detach the ribbon cable going from the motherboard to the rear panel.
-
-
Deze stap is niet vertaald. Help het te vertalen
-
In the upper left corner of the motherboard, remove the small multicolored wire from the motherboard.
-
-
Deze stap is niet vertaald. Help het te vertalen
-
Use the plastic opening tool to flip up ribbon cable connector.
-
Gently disconnect the ribbon cable by pulling it away from the motherboard.
-
-
Deze stap is niet vertaald. Help het te vertalen
-
In the upper right corner of the motherboard, use the plastic opening tool to remove the clear cable connector from the motherboard.
-
-
Deze stap is niet vertaald. Help het te vertalen
-
Use the plastic opening tool to remove the ribbon cable connecting the image sensor to the motherboard.
-
-
Deze stap is niet vertaald. Help het te vertalen
-
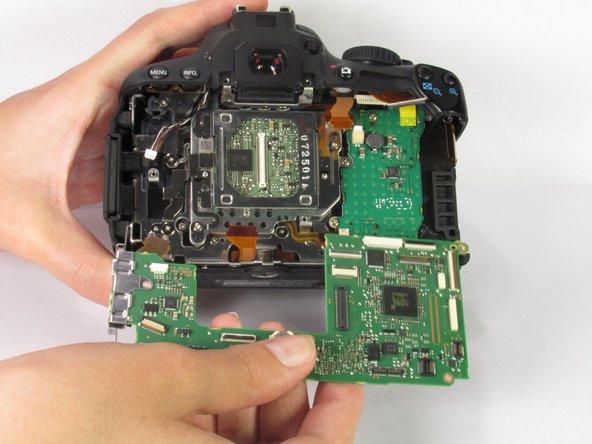
Use the plastic opening tool to push on the indents of the plastic header to disconnect from the motherboard.
-
Make sure all cables are disconnected from the motherboard.
-
-
Deze stap is niet vertaald. Help het te vertalen
-
Remove the following screws from the motherboard using the Phillips #00 screwdriver:
-
Two 3.9mm Phillips head screws.
-
Three 2.9mm Phillips head screws
-
Gently pull the motherboard out of the camera.
-


Annuleren: ik heb deze handleiding niet afgemaakt.
16 andere personen hebben deze handleiding voltooid.
Team

Cal Poly, Team 12-33, Maness Spring 2014 Lid van Cal Poly, Team 12-33, Maness Spring 2014
CPSU-MANESS-S14S12G33
4 Leden
14 handleidingen geschreven
2 opmerkingen
This guide gets an upvote.
It's the first camera disassembly guide I've seen so far on ifixit that includes the single most important precaution: the camera has a body cap fitted to avoid dust, dirt or other objects getting into the mirror box. Bravo!