Ga door naar hoofdinhoud

Canary CAN100USBK Ethernet PCB Board Replacement

Wat je nodig hebt

  1. Canary CAN100USBK Ethernet PCB Board Replacement, Bottom Casing: stap 1, afbeelding 1 van 2 Canary CAN100USBK Ethernet PCB Board Replacement, Bottom Casing: stap 1, afbeelding 2 van 2
    • Grip the rubber ring with your fingers and pull up.

    • Rotate the Canary as you pull out one tab at a time.

  2. Canary CAN100USBK Ethernet PCB Board Replacement: stap 2, afbeelding 1 van 1
    • Use your Phillips #0 screwdriver to remove the four 6mm screws.

  3. Canary CAN100USBK Ethernet PCB Board Replacement: stap 3, afbeelding 1 van 3 Canary CAN100USBK Ethernet PCB Board Replacement: stap 3, afbeelding 2 van 3 Canary CAN100USBK Ethernet PCB Board Replacement: stap 3, afbeelding 3 van 3
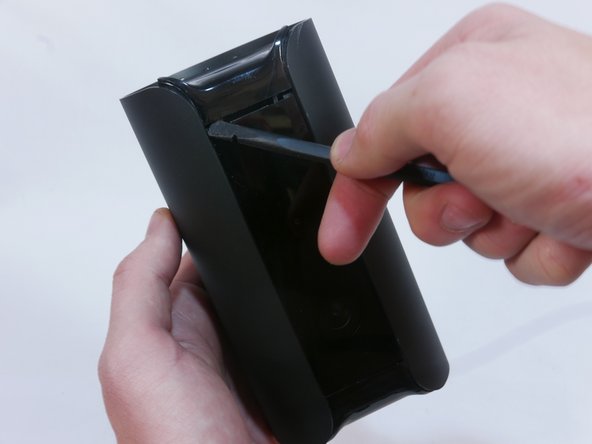
    • Use the flat end of the spudger to carefully pry off the bottom casing.

    • Alternate pushing up on the left and right sides until the clips holding the case in are visible.

  4. Canary CAN100USBK Ethernet PCB Board Replacement: stap 4, afbeelding 1 van 2 Canary CAN100USBK Ethernet PCB Board Replacement: stap 4, afbeelding 2 van 2
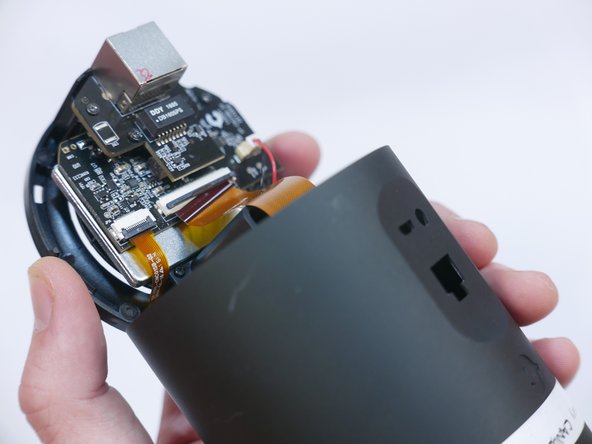
    • Do not yank the bottom off or you may damage the ribbon cable or the ZIF connector.

    • Carefully remove the bottom casing by gripping it on both sides and pulling straight up.

  5. Canary CAN100USBK Ethernet PCB Board Replacement: stap 5, afbeelding 1 van 2 Canary CAN100USBK Ethernet PCB Board Replacement: stap 5, afbeelding 2 van 2
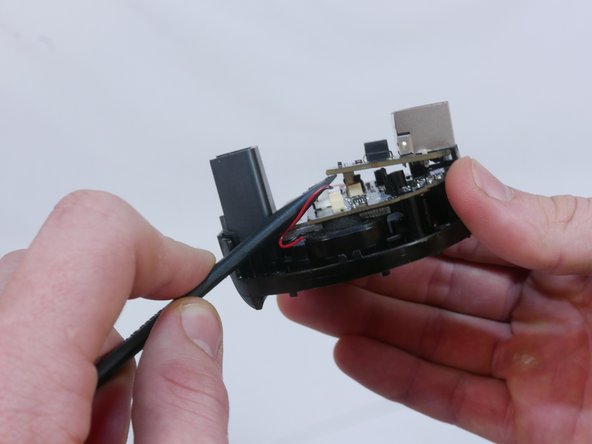
    • Use the pointed end of the spudger to flip up the small retaining flap on the ZIF (zero insertion force) connector.

    • Pull the ribbon cable out towards the device.

  6. Canary CAN100USBK Ethernet PCB Board Replacement, Ethernet PCB Board: stap 6, afbeelding 1 van 1
    • Use your Phillips #0 screwdriver to remove the three 5mm screws.

  7. Canary CAN100USBK Ethernet PCB Board Replacement: stap 7, afbeelding 1 van 2 Canary CAN100USBK Ethernet PCB Board Replacement: stap 7, afbeelding 2 van 2
    • Place the flat end of the spudger underneath the Ethernet PCB board and slowly pry up until it's loose.

  8. Canary CAN100USBK Ethernet PCB Board Replacement: stap 8, afbeelding 1 van 1
    • Carefully pull the Ethernet PCB board away from the board that sits underneath.

Conclusie

To reassemble your device, follow these instructions in reverse order.

Tommy Nguyen

Lid sinds: 02/28/17

597 Reputatie

5 handleidingen geschreven

Team

USF Tampa, Team S1-G2, Nance Spring 2017 Lid van USF Tampa, Team S1-G2, Nance Spring 2017

USFT-NANCE-S17S1G2

4 Leden

16 handleidingen geschreven

0 opmerkingen

Voeg opmerking toe

Weergavestatistieken:

Afgelopen 24 uren: 2

Afgelopen 7 dagen: 3

Afgelopen 30 dagen: 12

Altijd: 914