Deze versie kan foutieve bewerkingen bevatten. Schakel over naar de recentste gecontroleerde momentopname.
Wat je nodig hebt
-
Deze stap is niet vertaald. Help het te vertalen
-
Remove the Power- and USB-Cable!
-
Remove the paper tray that contains the paper completely.
-
Open the front cover and remove the screw on the left side.
-
Turn around the printer and open the back cover.
-
-
Deze stap is niet vertaald. Help het te vertalen
-
Hang out the back cover: After opening it, you can start to hang it out. Press from the left parts ro the right and move it towards yourself.
-
Please remove the Screw on the right side, as shown in the image. If you want to remove the Automated Document Feed (ADF) you might now remove this screw as well.
-
-
-
Deze stap is niet vertaald. Help het te vertalen
-
To remove the cover from the side where the internal cables are pluged in and the motherboard is located, follow these steps:
-
Raise the upper cover (not the automated document feed). I mean the cover benath the scanner glas.
-
Now turn the side to you, where you've already removed the screws from.
-
-
Deze stap is niet vertaald. Help het te vertalen
-
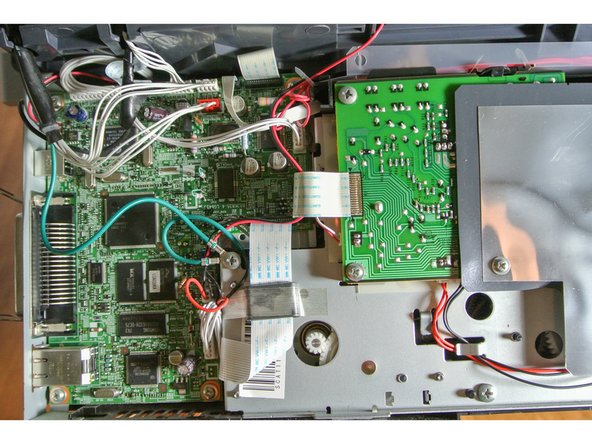
After you fully removed the cover, you'll have a view on the motherboard, the cable and the plugs.
-
-
Deze stap is niet vertaald. Help het te vertalen
-
To change or remove the ADF-Scanner-Unit, you'll have to remove the cables I've marked in the first picture.
-
On the back side remove the screw at the right ADF-hinge.
-
Pull out the cable carefully.
-
-
Deze stap is niet vertaald. Help het te vertalen
-
Open the scanner glas area and be carefull that the ADF falls not down on the left side. It could break the hinge on the other side.
-
Now remove the screw on the inner side of the right hinge. Please take care to use a screwdriver with the correct screwsize. Here it could be tricky otherwise.
-
Now you can remove or change the ADF.
-


Annuleren: ik heb deze handleiding niet afgemaakt.
3 andere personen hebben deze handleiding voltooid.

2 opmerkingen
I used this guide to open up the printer and replace the network interface card. Just do everything up to Step 4, then
* unscrew the two screws on the back that secure the parallel printer port
* unplug all cables (take some pictures first, so you remember where each cable goes)
* unscrew the four (or in my case, five) screws that secure the card in place
* the card can then be carefully worked free
Suggestions for Step 3:
* Use a plastic spudger to work the top of the side cover free
* Take care with the plastic tab on the lower right (front of machine) so that you don't break it when pulling off the cover