Ga door naar hoofdinhoud

Bosch 3727DEVS On/Off Switch Replacement

Wat je nodig hebt

  1. Bosch 3727DEVS On/Off Switch Replacement, On/Off Switch: stap 1, afbeelding 1 van 3 Bosch 3727DEVS On/Off Switch Replacement, On/Off Switch: stap 1, afbeelding 2 van 3 Bosch 3727DEVS On/Off Switch Replacement, On/Off Switch: stap 1, afbeelding 3 van 3
    • Ensure that the power chord is not plugged into an outlet.

    • Using the T20 Torx Screwdriver, remove the four 15.6 mm screws securing the top cover to the sander.

    • Lift the top cover off the sander.

  2. Bosch 3727DEVS On/Off Switch Replacement: stap 2, afbeelding 1 van 3 Bosch 3727DEVS On/Off Switch Replacement: stap 2, afbeelding 2 van 3 Bosch 3727DEVS On/Off Switch Replacement: stap 2, afbeelding 3 van 3
    • Using the T20 Torx Screwdriver, remove the two 15.6 mm screws securing the cable clip to the motor housing.

    • Lift the cable clip and cord from motor housing.

  3. Bosch 3727DEVS On/Off Switch Replacement: stap 3, afbeelding 1 van 3 Bosch 3727DEVS On/Off Switch Replacement: stap 3, afbeelding 2 van 3 Bosch 3727DEVS On/Off Switch Replacement: stap 3, afbeelding 3 van 3
    Gereedschap gebruikt in deze stap:
    Flathead 3/32" or 2.5 mm Screwdriver
    $5.49
    Koop
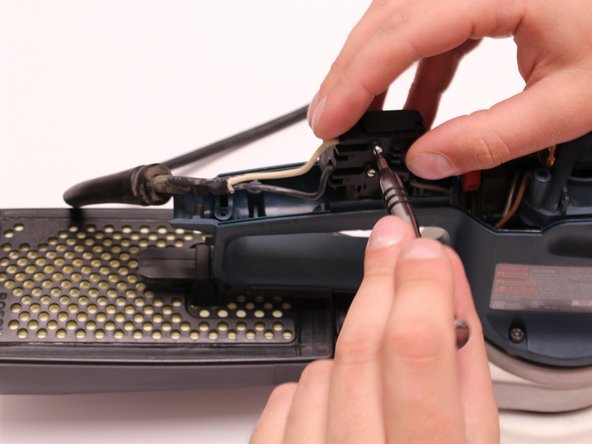
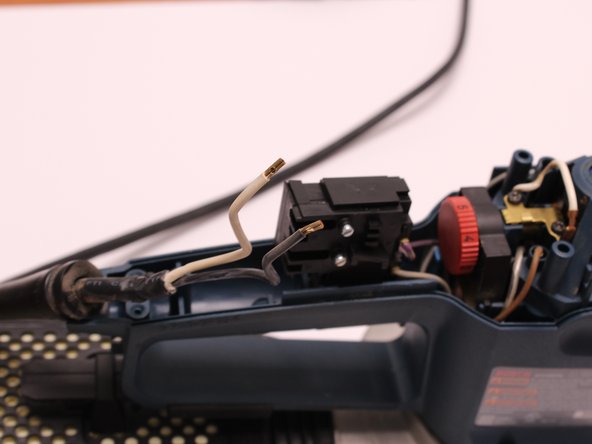
    • Using the 2.5 mm Flathead Screwdriver, loosen the two screws securing the white and black wires to the On/Off Switch.

  4. Bosch 3727DEVS On/Off Switch Replacement: stap 4, afbeelding 1 van 3 Bosch 3727DEVS On/Off Switch Replacement: stap 4, afbeelding 2 van 3 Bosch 3727DEVS On/Off Switch Replacement: stap 4, afbeelding 3 van 3
    • Remove the gray and purple wires by pulling on the wire terminals.

Conclusie

To reassemble your device, follow these instructions in reverse order.

Één andere persoon heeft deze handleiding voltooid.

0 opmerkingen

Voeg opmerking toe

Weergavestatistieken:

Afgelopen 24 uren: 0

Afgelopen 7 dagen: 4

Afgelopen 30 dagen: 9

Altijd: 435