Ga door naar hoofdinhoud

Blossom Ultrasonic Essential Oil Diffuser ARM-510GY Fan Replacement

Wat je nodig hebt

  1. Blossom Ultrasonic Essential Oil Diffuser ARM-510GY Fan Replacement, Fan: stap 1, afbeelding 1 van 3 Blossom Ultrasonic Essential Oil Diffuser ARM-510GY Fan Replacement, Fan: stap 1, afbeelding 2 van 3 Blossom Ultrasonic Essential Oil Diffuser ARM-510GY Fan Replacement, Fan: stap 1, afbeelding 3 van 3
    • Make sure the diffuser is not plugged into a socket and that there is no water or oil near or in the diffuser before beginning the guide.

    • Use a Phillips #2 screwdriver to remove the four 8 mm screws on the bottom of the diffuser.

  2. Blossom Ultrasonic Essential Oil Diffuser ARM-510GY Fan Replacement: stap 2, afbeelding 1 van 3 Blossom Ultrasonic Essential Oil Diffuser ARM-510GY Fan Replacement: stap 2, afbeelding 2 van 3 Blossom Ultrasonic Essential Oil Diffuser ARM-510GY Fan Replacement: stap 2, afbeelding 3 van 3
    • Lift the ceramic top of the oil diffuser.

    • Then lift off the plastic top off the diffuser.

  3. Blossom Ultrasonic Essential Oil Diffuser ARM-510GY Fan Replacement: stap 3, afbeelding 1 van 3 Blossom Ultrasonic Essential Oil Diffuser ARM-510GY Fan Replacement: stap 3, afbeelding 2 van 3 Blossom Ultrasonic Essential Oil Diffuser ARM-510GY Fan Replacement: stap 3, afbeelding 3 van 3
    • Lift the last plastic lid.

    • You will see a circuit board, and there will be a cord connecting it to the circuit board.

  4. Blossom Ultrasonic Essential Oil Diffuser ARM-510GY Fan Replacement: stap 4, afbeelding 1 van 2 Blossom Ultrasonic Essential Oil Diffuser ARM-510GY Fan Replacement: stap 4, afbeelding 2 van 2
    • Gently unplug the cord from the circuit board.

    • Place the plastic lid somewhere safe on the a flat surface.

  5. Blossom Ultrasonic Essential Oil Diffuser ARM-510GY Fan Replacement: stap 5, afbeelding 1 van 3 Blossom Ultrasonic Essential Oil Diffuser ARM-510GY Fan Replacement: stap 5, afbeelding 2 van 3 Blossom Ultrasonic Essential Oil Diffuser ARM-510GY Fan Replacement: stap 5, afbeelding 3 van 3
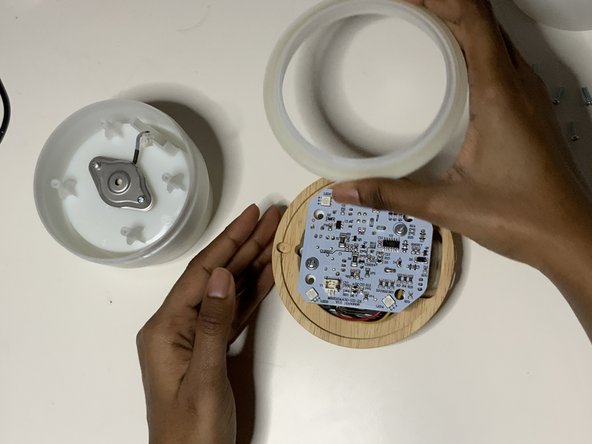
    • Remove the plastic ring and place somewhere safe on a flat surface.

  6. Blossom Ultrasonic Essential Oil Diffuser ARM-510GY Fan Replacement: stap 6, afbeelding 1 van 3 Blossom Ultrasonic Essential Oil Diffuser ARM-510GY Fan Replacement: stap 6, afbeelding 2 van 3 Blossom Ultrasonic Essential Oil Diffuser ARM-510GY Fan Replacement: stap 6, afbeelding 3 van 3
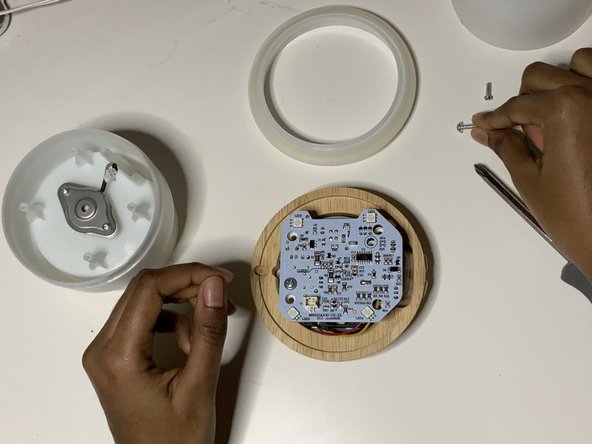
    • Remove two Truss head 4 mm screws with a Phillips #2 screwdriver and place safely nearby.

  7. Blossom Ultrasonic Essential Oil Diffuser ARM-510GY Fan Replacement: stap 7, afbeelding 1 van 3 Blossom Ultrasonic Essential Oil Diffuser ARM-510GY Fan Replacement: stap 7, afbeelding 2 van 3 Blossom Ultrasonic Essential Oil Diffuser ARM-510GY Fan Replacement: stap 7, afbeelding 3 van 3
    • Gently lift the circuit board onto it's side

    • The white connector plugs the fan into the circuit board.

  8. Blossom Ultrasonic Essential Oil Diffuser ARM-510GY Fan Replacement: stap 8, afbeelding 1 van 2 Blossom Ultrasonic Essential Oil Diffuser ARM-510GY Fan Replacement: stap 8, afbeelding 2 van 2
    • Unplug the white connector.

    • There are four #M1 6 mm Phillips pan head screws holding down the fan.

  9. Blossom Ultrasonic Essential Oil Diffuser ARM-510GY Fan Replacement: stap 9, afbeelding 1 van 3 Blossom Ultrasonic Essential Oil Diffuser ARM-510GY Fan Replacement: stap 9, afbeelding 2 van 3 Blossom Ultrasonic Essential Oil Diffuser ARM-510GY Fan Replacement: stap 9, afbeelding 3 van 3
    • Remove the #M1 6 mm screws with a Phillips #2 screwdriver while holding down the fan.

    • Gently lift the fan and place the fan someplace safe on the flat surface.

Conclusie

To reassemble your device, follow these instructions in reverse order.

Muniira Mohamoud

Lid sinds: 01/18/22

169 Reputatie

1 Handleiding geschreven

Team

0 opmerkingen

Voeg opmerking toe

Weergavestatistieken:

Afgelopen 24 uren: 1

Afgelopen 7 dagen: 5

Afgelopen 30 dagen: 23

Altijd: 355