Deze versie kan foutieve bewerkingen bevatten. Schakel over naar de recentste gecontroleerde momentopname.
Wat je nodig hebt
-
Deze stap is niet vertaald. Help het te vertalen
-
Turn the device upside down.
-
Using your finger, slide the silver cover release button towards the top of the device.
-
Lift and remove the back cover.
-
-
Deze stap is niet vertaald. Help het te vertalen
-
Using your fingernails, lift the sides of the battery.
-
Remove the battery.
-
-
Deze stap is niet vertaald. Help het te vertalen
-
Orient the device so that the screen is facing the ground.
-
Using your finger, gently lift the top of the SIM card.
-
-
Deze stap is niet vertaald. Help het te vertalen
-
Using a T6 Torx screwdriver, remove the four screws from the bottom half of the device.
-
-
-
Deze stap is niet vertaald. Help het te vertalen
-
Orient the device so that the screen is facing you.
-
Using a spudger, remove the ear piece cover.
-
-
Deze stap is niet vertaald. Help het te vertalen
-
Using a T6 Torx screwdriver, remove the two screws from the top corners of the device.
-
-
Deze stap is niet vertaald. Help het te vertalen
-
Remove the back chassis by gently pulling the chassis back and forth.
-
-
Deze stap is niet vertaald. Help het te vertalen
-
Orient the device so that the screen is facing the ground, and the top of the phone is facing you.
-
Using a pair of tweezers, lift and remove the following:
-
The two round connectors on the top of the mother board.
-
The flat connector in the lower corner of the mother board.
-
-
Deze stap is niet vertaald. Help het te vertalen
-
Using your fingers, carefully lift and remove the mother board.
-
-
Deze stap is niet vertaald. Help het te vertalen
-
Using a pair of tweezers, remove the three ribbon connectors.
-
-
Deze stap is niet vertaald. Help het te vertalen
-
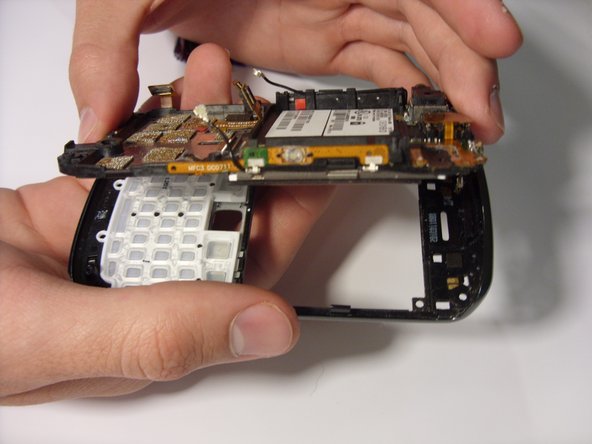
Remove the mother board by lifting the board upward.
-
-
Deze stap is niet vertaald. Help het te vertalen
-
Using a pry tool, lift up on the four tabs located on the edges of the faceplate.
-
Remove the faceplate by lifting the plate upward.
-


Annuleren: ik heb deze handleiding niet afgemaakt.
4 andere personen hebben deze handleiding voltooid.
Team

Clemson, Team 2-5, Benson Spring 2012 Lid van Clemson, Team 2-5, Benson Spring 2012
CLEM-BENSON-S12S2G5
2 Leden
14 handleidingen geschreven