Ga door naar hoofdinhoud

Back Cover Removal

Alleen vereisten
Deze gids is alleen bedoeld voor beginners! Deze gids maakt deel uit van een andere procedure en is niet bedoeld om alleen te worden gebruikt.

Wat je nodig hebt

  1. Back Cover Removal, Back Cover Removal: stap 1, afbeelding 1 van 2 Back Cover Removal, Back Cover Removal: stap 1, afbeelding 2 van 2
    Gereedschap gebruikt in deze stap:
    Tweezers
    $4.99
    • Before you begin, be sure to turn off your laptop and unplug it from the outlet.

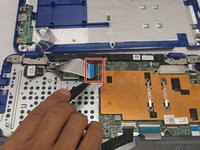
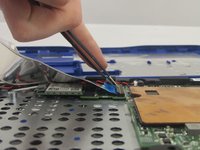
    • Use tweezers to pry and remove the center screw cover on the back cover.

  2. Back Cover Removal: stap 2, afbeelding 1 van 2 Back Cover Removal: stap 2, afbeelding 2 van 2
    • Use a Phillips screwdriver to unscrew the nine 6.8 mm screws securing the back cover.

  3. Back Cover Removal: stap 3, afbeelding 1 van 1
    • Use a spudger to pry around the base edges of the back cover to loosen it from the laptop.

    • Do not fully remove the cover, as it is still attached to the laptop with cables.

  4. Back Cover Removal: stap 4, afbeelding 1 van 3 Back Cover Removal: stap 4, afbeelding 2 van 3 Back Cover Removal: stap 4, afbeelding 3 van 3
    • If you are only replacing the battery, you can skip this step. Be careful not to strain the still-connected cable as you work.

    • Unlock the wide ZIF connector securing the flex cable.

    • To unlock a ZIF connector, use the tip of a spudger or your fingernail to flip up the small, hinged locking flap.

    • Pull the ribbon cable outwards to disconnect the back cover from the motherboard.

Conclusie

To reassemble your device, follow these instructions in reverse order.

Één andere persoon heeft deze handleiding voltooid.

0Gids Commentaar

Voeg opmerking toe

Weergavestatistieken:

Afgelopen 24 uren: 0

Afgelopen 7 dagen: 0

Afgelopen 30 dagen: 1

Altijd: 98