Ga door naar hoofdinhoud

Back Cover Removal

Wat je nodig hebt

  1. Back Cover Removal, Battery: stap 1, afbeelding 1 van 1
    • Turn the laptop face down to expose the back.

    • Locate the battery.

  2. Back Cover Removal: stap 2, afbeelding 1 van 3 Back Cover Removal: stap 2, afbeelding 2 van 3 Back Cover Removal: stap 2, afbeelding 3 van 3
    • Locate the battery latches. The battery latch mechanism can be compared to a door -- The right latch, when pushed right, unlocks the battery, while the left latch, when pushed left, releases the battery, pushing it out from its container.

    • Push the latch on the right to the right to unlock the battery latch locking mechanism.

    • Push the battery latch on the left to the left to unlock the battery.

  3. Back Cover Removal: stap 3, afbeelding 1 van 2 Back Cover Removal: stap 3, afbeelding 2 van 2
    • With the left battery latch pushed left, remove the battery from its port by lifting the battery from the middle of the battery.

    • The battery will come free.

  4. Back Cover Removal, Back Plate Removal: stap 4, afbeelding 1 van 3 Back Cover Removal, Back Plate Removal: stap 4, afbeelding 2 van 3 Back Cover Removal, Back Plate Removal: stap 4, afbeelding 3 van 3
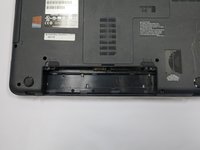
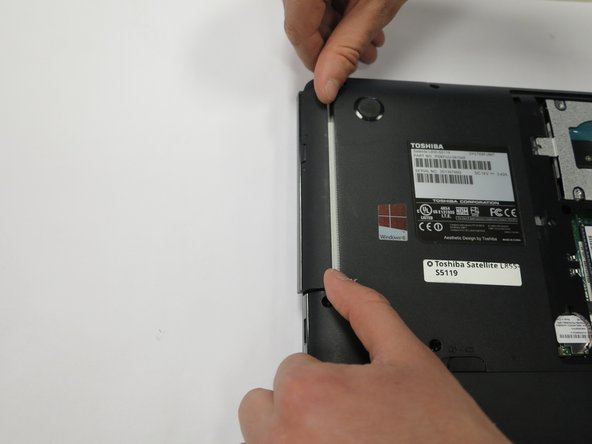
    • Turn the laptop over to place it top down.

    • Use a Phillips #1 screwdriver to remove the screw holding in the back plate. This screw does not come out of the plate.

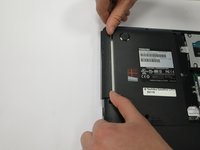
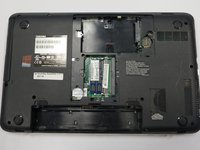
    • Lift the back plate off the laptop, exposing the RAM and Hard Disk.

  5. Back Cover Removal, Optical Drive: stap 5, afbeelding 1 van 2 Back Cover Removal, Optical Drive: stap 5, afbeelding 2 van 2
    • Using a Phillips #0 screwdriver, remove the single 3mm screw.

  6. Back Cover Removal: stap 6, afbeelding 1 van 2 Back Cover Removal: stap 6, afbeelding 2 van 2
    • Rotate the laptop so that you have access to the optical drive.

    • The optical drive is now only attached by a port in the drive's back. The optical drive can be pulled straight out of its housing.

    • Remove the drive.

  7. Back Cover Removal, Hard Drive: stap 7, afbeelding 1 van 2 Back Cover Removal, Hard Drive: stap 7, afbeelding 2 van 2
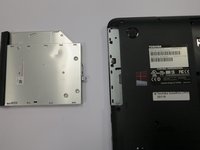
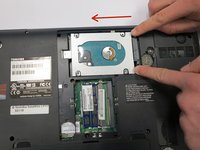
    • Unscrew the hard drive.

    • There could be up to five 3mm screws - One on each corner of the hard drive, and one at one end of the hard drive, attaching the drive to the laptop's frame.

    • Carefully push the hard drive away from its port. This should not require substantial force.

    • Lift the hard drive out.

    • Some hard drives have a plastic tab, which can be lifted from to remove the hard drive.

    • Otherwise, take hold of opposite sides of the hard drive and lift the drive straight up.

  8. Back Cover Removal, Back Cover Removal: stap 8, afbeelding 1 van 2 Back Cover Removal, Back Cover Removal: stap 8, afbeelding 2 van 2
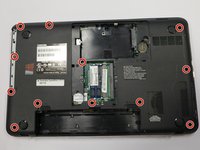
    • Unscrew the screws circled in red. This includes eleven 6mm screws, and one 5mm screw underneath where the optical drive was housed. All screws can be removed with a Phillips #0 screwdriver.

    • Carefully remove the back cover. The battery holder contains notches that help hold the case in place, so take care not to break those.

Conclusie

To reassemble your device, follow these instructions in reverse order.

Één andere persoon heeft deze handleiding voltooid.

Monte Roden

Lid sinds: 02/14/18

465 Reputatie

4 handleidingen geschreven

Team

0 opmerkingen

Voeg opmerking toe

Weergavestatistieken:

Afgelopen 24 uren: 1

Afgelopen 7 dagen: 12

Afgelopen 30 dagen: 44

Altijd: 3,478