Ga door naar hoofdinhoud

Deze handleiding heeft recentere wijzigingen. Schakel over naar de nieuwste niet-geverifieerde versie.

BLU Vivo XL2 LCD Screen Replacement

Wat je nodig hebt

  1. BLU Vivo XL2 LCD Screen Replacement, Removing the back cover: stap 1, afbeelding 1 van 3 BLU Vivo XL2 LCD Screen Replacement, Removing the back cover: stap 1, afbeelding 2 van 3 BLU Vivo XL2 LCD Screen Replacement, Removing the back cover: stap 1, afbeelding 3 van 3
    • locate the edge the phone, to find a easy entre point, then using a Isesamo opening tool to open the four sides, and removed back cover.

  2. BLU Vivo XL2 LCD Screen Replacement, Removing metal bracket: stap 2, afbeelding 1 van 3 BLU Vivo XL2 LCD Screen Replacement, Removing metal bracket: stap 2, afbeelding 2 van 3 BLU Vivo XL2 LCD Screen Replacement, Removing metal bracket: stap 2, afbeelding 3 van 3
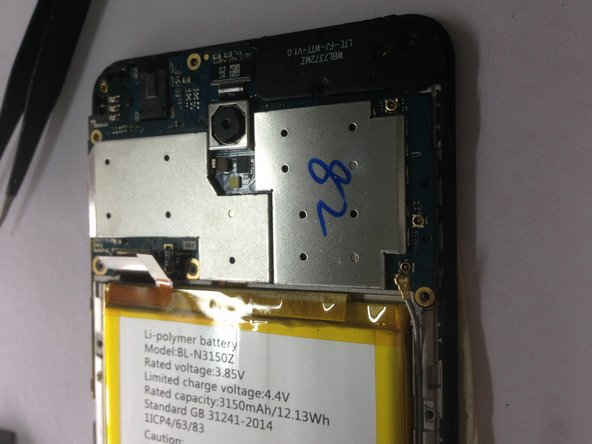
    • After removed the Back Plastic Cover, a metal bracket is covering the battery connector and the LCD screen connector. Removed all the screws in the metal bracket, then removed the Metal Bracket. Now, disconnect the two connectors of the LCD and Battery.

  3. BLU Vivo XL2 LCD Screen Replacement, Disconnect LCD screen and Battery Connector: stap 3, afbeelding 1 van 2 BLU Vivo XL2 LCD Screen Replacement, Disconnect LCD screen and Battery Connector: stap 3, afbeelding 2 van 2
    • After removed the metal bracket, you will see the two connectors, disconnect them

  4. BLU Vivo XL2 LCD Screen Replacement, Lifting up the battery, removed both connectors: stap 4, afbeelding 1 van 2 BLU Vivo XL2 LCD Screen Replacement, Lifting up the battery, removed both connectors: stap 4, afbeelding 2 van 2
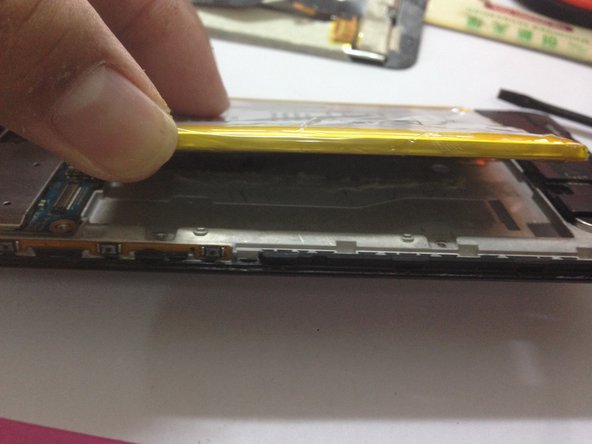
    • Here is tough part of all, the battery had two stripe of adhesive at tha bottom to secured it down. Just like the Iphone 6, you can carefully pull the adhesive stripe out or using tool to lift up the battery on the side where the connector of the battery located. After lift the battery up, disconnect the both connectors.

  5. BLU Vivo XL2 LCD Screen Replacement, Separate LCD Screen: stap 5, afbeelding 1 van 1
    • Using a heat gun or other tool to apply some heat to the screen, making the glue softing and using tool to separate the screen. Be carfully at the bottom where the flex connection.

  6. BLU Vivo XL2 LCD Screen Replacement, install new LCD Screen: stap 6, afbeelding 1 van 3 BLU Vivo XL2 LCD Screen Replacement, install new LCD Screen: stap 6, afbeelding 2 van 3 BLU Vivo XL2 LCD Screen Replacement, install new LCD Screen: stap 6, afbeelding 3 van 3
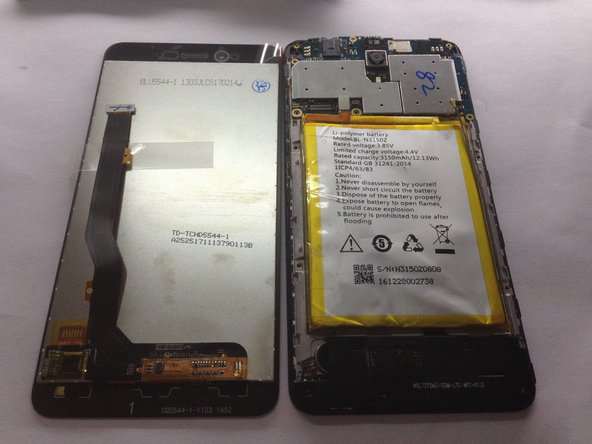
    • After the damaged LCD screen were removed, install the new LCD screen, remember the flex and connector need to go thought the small opening below the battery. Connecting back both connectors, and secure the metal bracket on top of the battery.

  7. BLU Vivo XL2 LCD Screen Replacement, Test new LCD Screen and Charging Port: stap 7, afbeelding 1 van 3 BLU Vivo XL2 LCD Screen Replacement, Test new LCD Screen and Charging Port: stap 7, afbeelding 2 van 3 BLU Vivo XL2 LCD Screen Replacement, Test new LCD Screen and Charging Port: stap 7, afbeelding 3 van 3
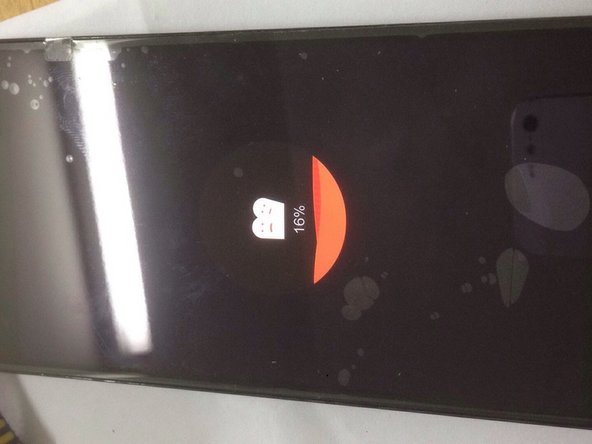
    • After put back all the screws in the Metal bracket, time to test the new LCD Screen. Connecting the charger, to see the charging port is functional, then do a power on to verified the LCD Screen working or not. If both working as they should, job almost done. Now put back the Back Plastic Cover and we call it done.

  8. BLU Vivo XL2 LCD Screen Replacement, A working Blu VIVO XL 2 phone!!: stap 8, afbeelding 1 van 1
    • A working Blu VIVO XL 2 phone!!

Conclusie

To reassemble your device, follow these instructions in reverse order.

Één andere persoon heeft deze handleiding voltooid.

nickzhao2010

Lid sinds: 09/17/18

157 Reputatie

1 Handleiding geschreven

Één opmerking

Where is the best place to get parts

JEFFREY G BRYANT - Antwoord

Voeg opmerking toe

Weergavestatistieken:

Afgelopen 24 uren: 0

Afgelopen 7 dagen: 1

Afgelopen 30 dagen: 4

Altijd: 1,761