Ga door naar hoofdinhoud

Asus Zenfone 4 Max Charging Port Replacement

Wat je nodig hebt

  1. Asus Zenfone 4 Max Charging Port Replacement, Battery: stap 1, afbeelding 1 van 2 Asus Zenfone 4 Max Charging Port Replacement, Battery: stap 1, afbeelding 2 van 2
    • Using a removable head screwdriver and a T3 bit, begin by removing the two screws located on either side of the charging port.

  2. Asus Zenfone 4 Max Charging Port Replacement: stap 2, afbeelding 1 van 1
    • Gently wedge the opening tool between the phone and the back casing.

    • Move the opening tool up and down to pry the back off of the device.

  3. Asus Zenfone 4 Max Charging Port Replacement: stap 3, afbeelding 1 van 3 Asus Zenfone 4 Max Charging Port Replacement: stap 3, afbeelding 2 van 3 Asus Zenfone 4 Max Charging Port Replacement: stap 3, afbeelding 3 van 3
    • Once the back has been removed, you will need to unscrew the four screws on the bottom panel with an AT3 bit.

  4. Asus Zenfone 4 Max Charging Port Replacement: stap 4, afbeelding 1 van 1
    • Remove the bottom panel.

  5. Asus Zenfone 4 Max Charging Port Replacement: stap 5, afbeelding 1 van 2 Asus Zenfone 4 Max Charging Port Replacement: stap 5, afbeelding 2 van 2
    • Wedge an opening tool between the battery and phone.

    • Gently pry the battery out of the device.

    • You can move the opening on either side of the battery as well as the bottom to aid in removal.

  6. Asus Zenfone 4 Max Charging Port Replacement: stap 6, afbeelding 1 van 1
    • Remove the battery and replace it with the new battery.

  7. Asus Zenfone 4 Max Charging Port Replacement, Charging Port: stap 7, afbeelding 1 van 3 Asus Zenfone 4 Max Charging Port Replacement, Charging Port: stap 7, afbeelding 2 van 3 Asus Zenfone 4 Max Charging Port Replacement, Charging Port: stap 7, afbeelding 3 van 3
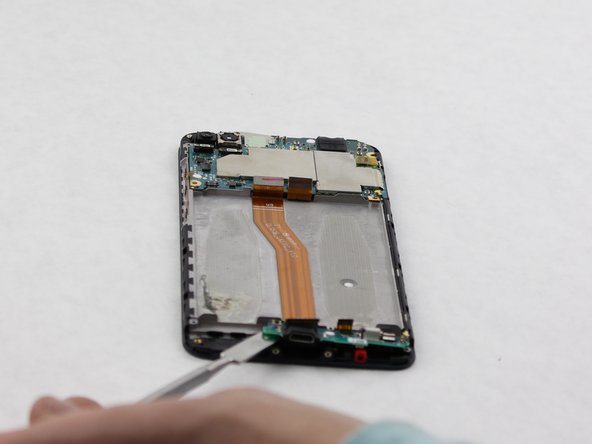
    • Once the battery has been removed, gently wedge the metal spudger beneath the green panel.

    • Lift the panel along with the charging port out the device and replace with the new charging port.

Conclusie

To reassemble your device, follow these instructions in reverse order.

3 andere personen hebben deze handleiding voltooid.

Maegan West

Lid sinds: 10/02/18

839 Reputatie

4 handleidingen geschreven

Team

2 opmerkingen

repair microfone asus zenfone 4 selfie pro please

John Wesley - Antwoord

I have managed to replace the charging port but now it shows Charging Port Temperatures Abnormalities Reminder which is loud and annoying to see every time. I also see that one of my sensors in the cpu-z program (thermal sensor pa_therm0) hitting a constant 75-84 degree centigrade and another sensor (chg_temp) hitting 65 constantly. Any help in regards to this manner?

Max Orwell - Antwoord

Voeg opmerking toe

Weergavestatistieken:

Afgelopen 24 uren: 1

Afgelopen 7 dagen: 10

Afgelopen 30 dagen: 19

Altijd: 3,192