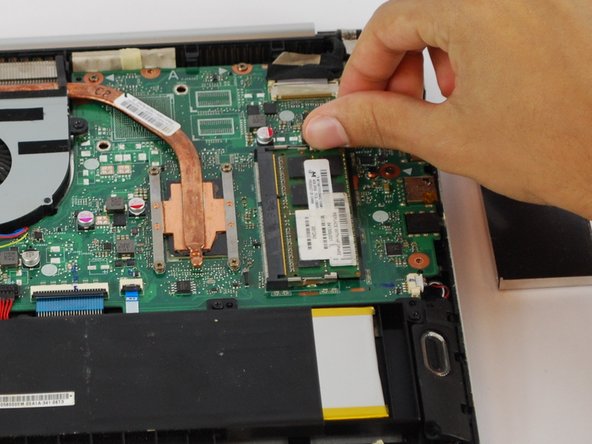
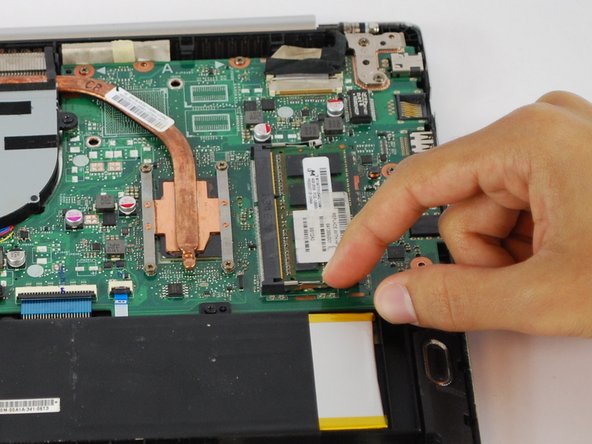
Ga door naar hoofdinhoud

Asus Vivobook Q301LA-BHI5T02 RAM Replacement

Wat je nodig hebt

  1. Asus Vivobook Q301LA-BHI5T02 RAM  Replacement, Back Cover: stap 1, afbeelding 1 van 1
    • Make sure the computer is turned off.

    • Flip the device over so that the back cover is facing you.

  2. Asus Vivobook Q301LA-BHI5T02 RAM  Replacement: stap 2, afbeelding 1 van 2 Asus Vivobook Q301LA-BHI5T02 RAM  Replacement: stap 2, afbeelding 2 van 2
    • Remove the four 5mm Phillips #1 screws from the top of the laptop.

    • Remove the two 6mm Phillips #1 screws from the sides of the laptop.

    • Remove the four 2mm Phillips #1 screws from the bottom of the laptop.

  3. Asus Vivobook Q301LA-BHI5T02 RAM  Replacement: stap 3, afbeelding 1 van 3 Asus Vivobook Q301LA-BHI5T02 RAM  Replacement: stap 3, afbeelding 2 van 3 Asus Vivobook Q301LA-BHI5T02 RAM  Replacement: stap 3, afbeelding 3 van 3
    • Use a plastic opening tool to gently pry the bottom of the laptop up. Slowly slide it along the edges, twisting it every so often to pop the bottom of the laptop out of the clips holding it in place.

  4. Asus Vivobook Q301LA-BHI5T02 RAM  Replacement: stap 4, afbeelding 1 van 1
    • Lift off the cover and remove the back cover from the device.

  5. Asus Vivobook Q301LA-BHI5T02 RAM  Replacement, RAM: stap 5, afbeelding 1 van 3 Asus Vivobook Q301LA-BHI5T02 RAM  Replacement, RAM: stap 5, afbeelding 2 van 3 Asus Vivobook Q301LA-BHI5T02 RAM  Replacement, RAM: stap 5, afbeelding 3 van 3
    • Remove the top covering the RAM chips.

  6. Asus Vivobook Q301LA-BHI5T02 RAM  Replacement: stap 6, afbeelding 1 van 3 Asus Vivobook Q301LA-BHI5T02 RAM  Replacement: stap 6, afbeelding 2 van 3 Asus Vivobook Q301LA-BHI5T02 RAM  Replacement: stap 6, afbeelding 3 van 3
    • Gently push the RAM chip holder to the sides.

  7. Asus Vivobook Q301LA-BHI5T02 RAM  Replacement: stap 7, afbeelding 1 van 3 Asus Vivobook Q301LA-BHI5T02 RAM  Replacement: stap 7, afbeelding 2 van 3 Asus Vivobook Q301LA-BHI5T02 RAM  Replacement: stap 7, afbeelding 3 van 3
    • Remove the RAM from the device.

Conclusie

To reassemble your device, follow these instructions in reverse order.

Jorge Villarreal

Lid sinds: 10/02/17

397 Reputatie

3 handleidingen geschreven

Team

USF Tampa, Team S10-G3, Thompson Fall 2017 Lid van USF Tampa, Team S10-G3, Thompson Fall 2017

USFT-THOMPSON-F17S10G3

4 Leden

6 handleidingen geschreven

0 opmerkingen

Voeg opmerking toe

Weergavestatistieken:

Afgelopen 24 uren: 0

Afgelopen 7 dagen: 4

Afgelopen 30 dagen: 6

Altijd: 701