Inleiding
If your Asus VivoBook E203MA-TBCL432B keyboard isn’t working properly – certain or all keys are not responding when pressed, keys are getting stuck – use this guide to replace the keyboard.
A properly working keyboard should have each key respond immediately when depressed; there should be no glitches, freezing, or nonresponse. If you are experiencing any of those issues, the keyboard may need to be replaced.
Before starting this guide, make sure that the keyboard is clean. There are multiple methods to clean a keyboard, but they have the same goal of ensuring that there are no particles blocking the keys that may prohibit the keyboard’s performance.
If the keyboard still does not work after cleaning, then this guide should be used. Before beginning, make sure to power off your laptop completely and disconnect from any external power source. The repairs difficulty is considered moderate as the user will need to remove the battery as well as ribbon cables, which can break if not removed correctly.
Wat je nodig hebt
-
-
Position the laptop so that the bottom panel is facing upwards, the hinge is away from you, and the ASUS logo is against the table.
-
-
-
Insert the iFixit opening tool in between the back panel and the rest of the laptop.
-
With the iFixit opening tool, lift the panel from the laptop body. Work your way around the device creating separation with the tool.
-
Once there is enough separation between the back panel and the device, gently pull off the back panel with your hands and completely remove it.
-
-
-
Now that the back panel is removed you can clearly see the battery and all of its connectors.
-
Begin by removing the silver ribbon cable along the back of the battery.
-
To disconnect it from the motherboard, lift the black tab on the Zero Insertion Force (ZIF) connector up and pull the cable away using the blue tab.
-
Disconnect the ribbon cable from the left side in the same way.
-
-
-
-
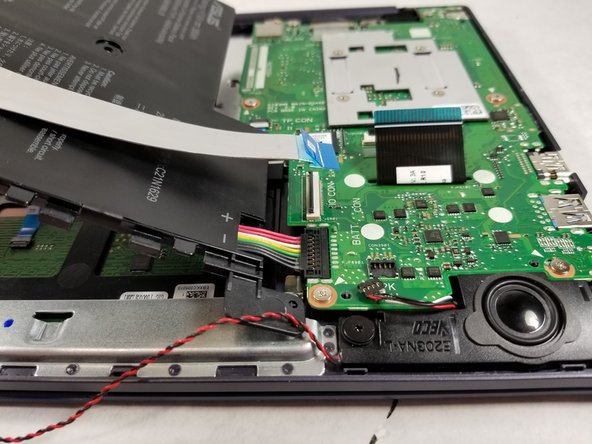
Disconnect the small black and red bundled cable by lifting it directly up from the connector on the motherboard.
-
-
-
Use a Phillips #00 screwdriver to remove the four 2.0 mm screws holding the speakers in place.
-
Carefully pry both of the speakers up from the laptop using the iFixit opening tool as seen in the picture and remove. Only one picture is shown, but it is the same procedure for the other speaker.
-
With both speakers removed, carefully set the speakers off to the side.
-
-
-
At this stage, there should be a ribbon cable exposed.
-
Insert the iFixit opening tool under the white tab on the I/O board and gently pry up to disconnect the ribbon cable.
-
Grab and remove the ribbon cable using the metal tweezers.
-
-
-
Using a Phillips #00 screwdriver, remove the three 2.00 mm screws. These screws hold the trackpad in place.
-
Insert the iFixit opening tool under the trackpads frame and carefully pry and pull the frame upwards.
-
With the trackpad frame lifted up by hand, pull the trackpad towards the hinges to remove.
-


To reassemble your device, follow these instructions in reverse order.
To reassemble your device, follow these instructions in reverse order.
Annuleren: ik heb deze handleiding niet afgemaakt.
2 andere personen hebben deze handleiding voltooid.
Team

IUPUI, Team S3-G3, Wilson Fall 2019 Lid van IUPUI, Team S3-G3, Wilson Fall 2019
IUPUI-WILSON-F19S3G3
4 Leden
3 handleidingen geschreven