Ga door naar hoofdinhoud

Asus Transformer T100 Button Module Replacement

Wat je nodig hebt

  1. Asus Transformer T100 Button Module Replacement, Rear Cover: stap 1, afbeelding 1 van 2 Asus Transformer T100 Button Module Replacement, Rear Cover: stap 1, afbeelding 2 van 2
    • Separate the tablet from the base by pressing the large silver button below the tablet. The silver button is located at the base of the tablet.

    • Remove the tablet by lifting up.

  2. Asus Transformer T100 Button Module Replacement: stap 2, afbeelding 1 van 2 Asus Transformer T100 Button Module Replacement: stap 2, afbeelding 2 van 2
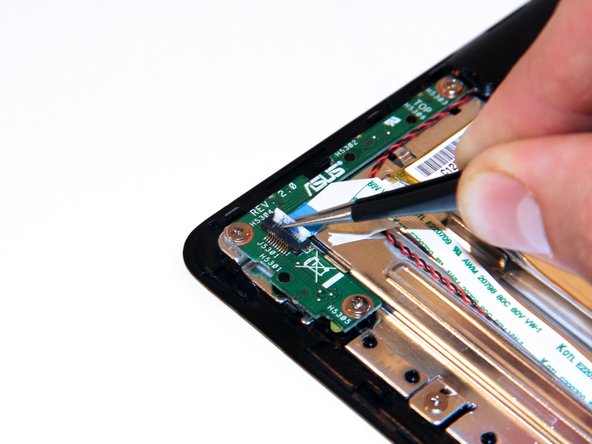
    • Insert the opening tool into the seam of the tablet casing and gently pry upwards.

    • With a little force, you will feel the clips release.

    This image seems not to show the correct position where to place the tip of the tool initially. It suggests to pry between the frame and the glass pane from the top of the tablet. That's what I did and broke the glass - one device spoilt. Only the next picture correctly shows where to apply the tool.

    Ole Hoppe - Antwoord

  3. Asus Transformer T100 Button Module Replacement: stap 3, afbeelding 1 van 1
    • Slide the tool along all four edges of the tablet, making sure that all the clips are released.

    • Do not break these clips; otherwise, the screen will become less secure.

  4. Asus Transformer T100 Button Module Replacement: stap 4, afbeelding 1 van 2 Asus Transformer T100 Button Module Replacement: stap 4, afbeelding 2 van 2
    • Remove the rear casing.

  5. Asus Transformer T100 Button Module Replacement, Button Module: stap 5, afbeelding 1 van 1
    • Unclip the white connection clip using a pair of tweezers.

  6. Asus Transformer T100 Button Module Replacement: stap 6, afbeelding 1 van 2 Asus Transformer T100 Button Module Replacement: stap 6, afbeelding 2 van 2
    • Pull the connection apparatus from the connection clip on the board using a pair of tweezers.

  7. Asus Transformer T100 Button Module Replacement: stap 7, afbeelding 1 van 1
    • Gently fold the connection apparatus back away from your work area.

  8. Asus Transformer T100 Button Module Replacement: stap 8, afbeelding 1 van 3 Asus Transformer T100 Button Module Replacement: stap 8, afbeelding 2 van 3 Asus Transformer T100 Button Module Replacement: stap 8, afbeelding 3 van 3
    • Remove the screws using a Phillips Head #1 screwdriver.

    • Remove the power button module.

Conclusie

To reassemble your device, follow these instructions in reverse order.

4 andere personen hebben deze handleiding voltooid.

Taylor Pantiga

Lid sinds: 04/14/14

1.596 Reputatie

6 handleidingen geschreven

Team

Cal Poly, Team 13-31, Maness Spring 2014 Lid van Cal Poly, Team 13-31, Maness Spring 2014

CPSU-MANESS-S14S13G31

3 Leden

6 handleidingen geschreven

Één opmerking

My problem is that when reinstalltng the back cover the button does not fit the button module to press the on/off switch. The switch works allright.

What can i do? At this moment I can only switch the tablet on after removing the back cover.

Rudolf Guys - Antwoord

Voeg opmerking toe

Weergavestatistieken:

Afgelopen 24 uren: 0

Afgelopen 7 dagen: 1

Afgelopen 30 dagen: 7

Altijd: 5,967