Inleiding
This guide will show you how to replace the RAM in your Asus Q534U laptop. Perhaps your laptop is experiencing slow-downs with multiple programs open, signaling that you may need to upgrade to a larger amount of RAM. Or maybe your laptop won’t boot, indicating that your current RAM may be faulty. If you need to upgrade to a larger capacity RAM stick, or if your current RAM is faulty and in need of replacement, this guide will help you through the process.
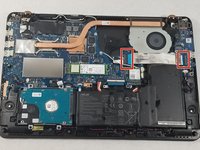
The RAM is located underneath a metal cover on the motherboard so it will not be immediately visible upon opening the case. However, the metal cover can be easily pried from the motherboard, for it is affixed by a clip mechanism rather than screws or glue. To replace the metal cover, be sure to align all four sides of the cover with each of the clips and simply press it into place.
Wat je nodig hebt
-
-
-
Use a T5 screwdriver to remove all 10 screws that secure the bottom cover.
-
Pull off the back cover of the laptop.
 Vraag FixBot
-
-
-
Wedge an opening tool under the battery's bundled cable connector, and gently pry the connector up and to disconnect the battery.
-
-
-
-
Lift up the black tab next to the silver ribbon cable.
-
Pull lightly on the blue tabs until the silver cable is free.
-
-
-
Use a Phillips #00 screwdriver to remove the 5 marked screws.
-
Gently remove the battery.
-
-
-
-
-
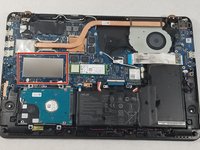
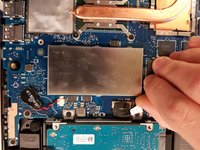
Locate the metal RAM cover
-
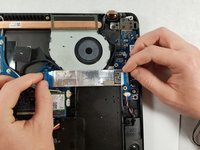
Pull the metal tab on the corner of the metal cover to lift the cover from its clips
-
-
-
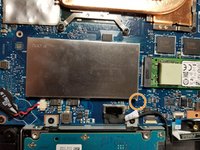
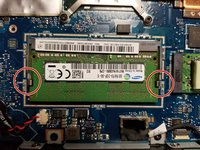
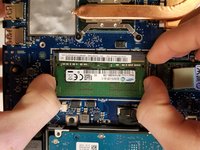
While pushing out the metal clips on both sides of the RAM, lift up the RAM to release it
-
Pull the RAM out gently and bring it up from the slot
-
-


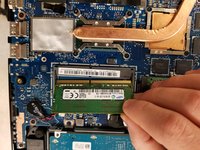
To reassemble your device, follow these instructions in reverse order.
Annuleren: ik heb deze handleiding niet afgemaakt.
5 andere personen hebben deze handleiding voltooid.
4Gids Commentaar
One question: I have this model and have determined that I have a bad stick of RAM. I have removed this stick but still have 8 gigs available. Is there another stick that I m not seeing or is this built in?
There are 4, 2GB chips of ram, hard built into the motherboard. Located right above the SSD m.2 bay, and beside the copper cooling line. This model of Laptop has one RAM bay, I'm not sure how the Built in and Bay RAM work together but for all intents and purposes, just assume you are only using the Bay for RAM. @svggrk @elijahelliott
This is too old but I hope someone can help me. I open the memory section just to clean all the dust accumulated there. After putting everything back laptop is bricked... Battery led is green. Power led is on but laptop is not booting. Any ideas?