Wat je nodig hebt
-
-
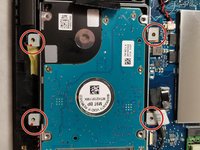
Use a T5 screwdriver to remove all 10 screws that secure the bottom cover.
-
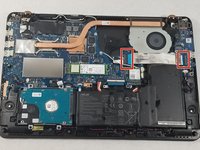
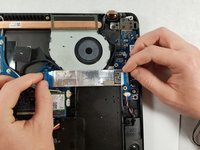
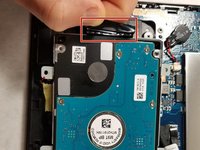
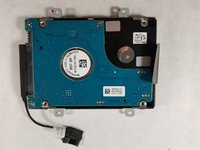
Pull off the back cover of the laptop.
-
-


To reassemble your device, follow these instructions in reverse order.
To reassemble your device, follow these instructions in reverse order.
Annuleren: ik heb deze handleiding niet afgemaakt.
5 andere personen hebben deze handleiding voltooid.
Team

UMass Dartmouth, Team S66-G6, Rockett Fall 2017 Lid van UMass Dartmouth, Team S66-G6, Rockett Fall 2017
UMASSD-ROCKETT-F17S66G6
3 Leden
5 handleidingen geschreven
4 opmerkingen
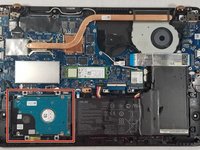
I’m not sure if they changed the design but I did not have to remove anything other than the case cover to replace the hard drive. Also, there weren’t any fasteners holding the hard drive at all. It was just laying in there and the foam on the cover held it in place. Since I was replacing it with a slightly thinner drive (SSD) I put an extra piece of foam in there so that it would be held securely. The job was only 10 minutes.
I have to identical versions of that model Q534U, one used daily for four years and the other one was dormant in storage as a backup.
.
I replaced the RAM in both and have 24 RAM now in each, and replaced the batteries in both, as the stored one was completely dead and the one I have been using showed a slight bloating.
.
NOW… I also bought a new 2TB SSD drive (D: drive) and cloned the C: drive, which is currently in a SABRENT enclosure, using ACRONIS (2022 Version Home Cyber Protect). I did it creating a useable clone. However, even after a BIOS drive assignment to the bootable Sabrent drive, it’s not booting and installing the C: drive.
.
Acronis Tech Support says I have to physically install the cloned 512 SSD drive into this laptop. I followed all your steps to make all adjustments, but the accessible and swappable drive is the D drive only and I don’t see the C: drive at all (is it on the other side?
.
How do I access the 512 HDD C: drive to swap out with the cloned one? Or do you know a trick that ACRONIS Tech doesn’t know so that I can clone via USB drive?
The bootable drive is the M.2, just get a larger M.2 and clone the original to it. I will probably put a 1TB in its place.
CSPhone -