Inleiding
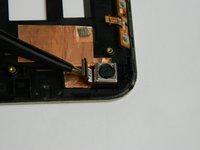
Due to the nature of the component being replaced be sure to wear appropriate gloves to avoid getting any skin based oils or residues onto the camera lens as these will inhibit the lens from functioning properly. As well be careful removing and connecting the ribbon wires as they are very fragile and internal breakages of the wire can lead to the camera being broken as well as other components being damaged.
Wat je nodig hebt
-
-
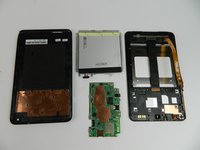
Insert a plastic opening tool into the seam between the rear case and the screen.
-
Work the plastic opening tool around the perimeter of the device to completely remove the rear case.
-
-
-
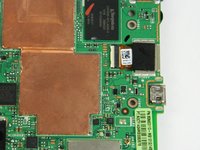
Working from top to bottom, you will remove all screws with a #000 Phillips head driver, (20) total.
-
(2) screws located in the top corners. NOTE: These screws will be in the speakers.
-
(4) screws located along the top of the battery, (3) along each side of the battery, and (3) along the bottom of the battery.
-
(1) screw in the middle of the motherboard on the side with the orange ribbon cable, (4) screws in the bottom of the motherboard .
-
-


To reassemble your device, follow these instructions in reverse order.
To reassemble your device, follow these instructions in reverse order.
Team

USF Tampa, Team 5-6, Lacy Fall 2016 Lid van USF Tampa, Team 5-6, Lacy Fall 2016
USFT-LACY-F16S5G6
3 Leden
6 handleidingen geschreven