Ga door naar hoofdinhoud

Asus G53JW-A1 Hard Drive Hard Drive Replacement

Wat je nodig hebt

  1. Asus G53JW-A1 Hard Drive Hard Drive Replacement, Keyboard: stap 1, afbeelding 1 van 3 Asus G53JW-A1 Hard Drive Hard Drive Replacement, Keyboard: stap 1, afbeelding 2 van 3 Asus G53JW-A1 Hard Drive Hard Drive Replacement, Keyboard: stap 1, afbeelding 3 van 3
    • There are five tabs underneath the keyboard that hold the keyboard in place along the top edge. Refer to the photo for a rough idea of the location of these tabs.

    • Using the spudger and iFixit Opening Tool at the indicated locations, pry the keyboard directly up. Ensure that the tools reach under both the plastic keyboard cover and the metal base of the keyboard, as both will be removed.

    • Once you have a few tools in place, it's possible to slide your tool along the underside of the keyboard and unclip all of the tabs at once.

    • Remove the keyboard.

  2. Asus G53JW-A1 Hard Drive Hard Drive Replacement: stap 2, afbeelding 1 van 2 Asus G53JW-A1 Hard Drive Hard Drive Replacement: stap 2, afbeelding 2 van 2
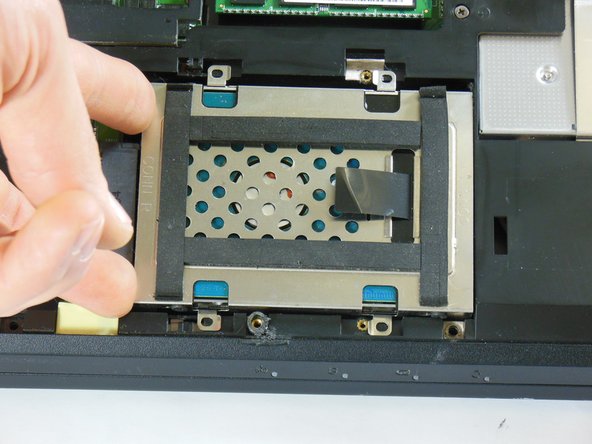
    • Lift the keyboard so that you can see the housing and cables underneath. Be sure you lifted the metal baseplate of the keyboard and not just the plastic covering.

    • This will reveal a ribbon wire on the right side of the laptop connected to the motherboard through a small window in the metal top plate. Use tweezers to carefully pull the connector gently to the left, unplugging it from its port.

  3. Asus G53JW-A1 Hard Drive Hard Drive Replacement: stap 3, afbeelding 1 van 2 Asus G53JW-A1 Hard Drive Hard Drive Replacement: stap 3, afbeelding 2 van 2
    • Just above the trackpad, there is a second, wider ribbon cable connected to the motherboard. Unplug this cable.

    • This cable uses a zero insertion force connector. Read step one of this article for information on how to safely remove this connector.

  4. Asus G53JW-A1 Hard Drive Hard Drive Replacement: stap 4, afbeelding 1 van 1
    • Remove the keyboard from the computer.

  5. Asus G53JW-A1 Hard Drive Hard Drive Replacement, Trackpad Plate: stap 5, afbeelding 1 van 3 Asus G53JW-A1 Hard Drive Hard Drive Replacement, Trackpad Plate: stap 5, afbeelding 2 van 3 Asus G53JW-A1 Hard Drive Hard Drive Replacement, Trackpad Plate: stap 5, afbeelding 3 van 3
    • Locate the 1.5 x 7mm Phillips #00 screw at the bottom right of the keyboard housing.

    • Remove this screw. Note that this is the only 1.5x7 mm screw in the entire laptop, so it is very important to keep track of it.

    • Place a screwdriver or other firm tool with a fine tip inside the hole to the left of the screw hole. Push all the way to the left to unlock the slide.

    • It will take a good bit of force to move the slide, as it unlocks a series of clips underneath the trackpad plate.

  6. Asus G53JW-A1 Hard Drive Hard Drive Replacement: stap 6, afbeelding 1 van 2 Asus G53JW-A1 Hard Drive Hard Drive Replacement: stap 6, afbeelding 2 van 2
    • Use an iFixit Opening Tool to unclip the tabs on the sides of the laptop, just underneath the top plastic cover. Once one of them is off, it should pop off willingly. You may need to slide the tool around the edge like you did for the keyboard.

  7. Asus G53JW-A1 Hard Drive Hard Drive Replacement: stap 7, afbeelding 1 van 3 Asus G53JW-A1 Hard Drive Hard Drive Replacement: stap 7, afbeelding 2 van 3 Asus G53JW-A1 Hard Drive Hard Drive Replacement: stap 7, afbeelding 3 van 3
    • Tilt the trackpad plate up towards you to reveal a white ribbon cable connecting the trackpad to the motherboard.

    • Unplug it using tweezers at the base of the cable, and gently slide it through the wire guide found directly underneath the top of the trackpad plate.

  8. Asus G53JW-A1 Hard Drive Hard Drive Replacement: stap 8, afbeelding 1 van 1
    • Remove the trackpad.

  9. Asus G53JW-A1 Hard Drive Hard Drive Replacement, Underside Panel: stap 9, afbeelding 1 van 1
    • Unscrew the nine 2.5x7mm Phillips #0 screws highlighted in this image.

  10. Asus G53JW-A1 Hard Drive Hard Drive Replacement: stap 10, afbeelding 1 van 3 Asus G53JW-A1 Hard Drive Hard Drive Replacement: stap 10, afbeelding 2 van 3 Asus G53JW-A1 Hard Drive Hard Drive Replacement: stap 10, afbeelding 3 van 3
    • Close the lid of the laptop and flip it over so that the battery faces away from you.

    • Use an iFixit Opening Tool to fit inside the tab exactly opposite the battery pack, and use it to pry off the back cover.

    • If the cover is reluctant to come off, feel free to use a second Opening Tool or a spudger to run along the edge of the cover to help remove it.

    • Remove the cover.

  11. Asus G53JW-A1 Hard Drive Hard Drive Replacement, Hard Drive: stap 11, afbeelding 1 van 1
    • Remove the two Phillips #00 2.5x4mm screws as located in the picture.

  12. Asus G53JW-A1 Hard Drive Hard Drive Replacement: stap 12, afbeelding 1 van 2 Asus G53JW-A1 Hard Drive Hard Drive Replacement: stap 12, afbeelding 2 van 2
    • Slide the now detached hard drive out of the slots

  13. Asus G53JW-A1 Hard Drive Hard Drive Replacement: stap 13, afbeelding 1 van 2 Asus G53JW-A1 Hard Drive Hard Drive Replacement: stap 13, afbeelding 2 van 2
    • Remove the hard drive, lifting gently by the tab as shown.

Conclusie

To reassemble your device, follow these instructions in reverse order.

0 opmerkingen

Voeg opmerking toe

Weergavestatistieken:

Afgelopen 24 uren: 2

Afgelopen 7 dagen: 2

Afgelopen 30 dagen: 5

Altijd: 443