Ga door naar hoofdinhoud

Asus Chromebook C300SA-DS02 LED Screen Replacement

Wat je nodig hebt

  1. Asus Chromebook C300SA-DS02 LED Screen Replacement, Keyboard: stap 1, afbeelding 1 van 2 Asus Chromebook C300SA-DS02 LED Screen Replacement, Keyboard: stap 1, afbeelding 2 van 2
    • Power the laptop off and make sure the charger is unplugged before starting.

    • Remove the eight 8.0mm Phillips #0 screws on the bottom of the laptop.

    • Remove the three 6.0mm Phillips #0 screws.

  2. Asus Chromebook C300SA-DS02 LED Screen Replacement: stap 2, afbeelding 1 van 3 Asus Chromebook C300SA-DS02 LED Screen Replacement: stap 2, afbeelding 2 van 3 Asus Chromebook C300SA-DS02 LED Screen Replacement: stap 2, afbeelding 3 van 3
    • Open the laptop.

    • Using an iFixit opening tool, pry along the edges of the keyboard.

    • Lift the keyboard and slide it gently towards you.

    • Do not completely remove the keyboard. It is still connected to the back panel by a pair of ribbon cables.

  3. Asus Chromebook C300SA-DS02 LED Screen Replacement: stap 3, afbeelding 1 van 3 Asus Chromebook C300SA-DS02 LED Screen Replacement: stap 3, afbeelding 2 van 3 Asus Chromebook C300SA-DS02 LED Screen Replacement: stap 3, afbeelding 3 van 3
    • Disconnect the two ZIF connectors by prying up the locking bar with a spudger and removing the ribbon cable.

  4. Asus Chromebook C300SA-DS02 LED Screen Replacement: stap 4, afbeelding 1 van 1
    • Remove the keyboard from the laptop.

  5. Asus Chromebook C300SA-DS02 LED Screen Replacement, Battery: stap 5, afbeelding 1 van 2 Asus Chromebook C300SA-DS02 LED Screen Replacement, Battery: stap 5, afbeelding 2 van 2
    • Remove the six 5.6mm Phillips #0 screws around the battery.

  6. Asus Chromebook C300SA-DS02 LED Screen Replacement: stap 6, afbeelding 1 van 2 Asus Chromebook C300SA-DS02 LED Screen Replacement: stap 6, afbeelding 2 van 2
    • Using your thumb and index finger, pinch the multi-color cable and disconnect it from the motherboard.

  7. Asus Chromebook C300SA-DS02 LED Screen Replacement: stap 7, afbeelding 1 van 1
    • Lift the battery out of the laptop.

  8. Asus Chromebook C300SA-DS02 LED Screen Replacement, LED Screen: stap 8, afbeelding 1 van 2 Asus Chromebook C300SA-DS02 LED Screen Replacement, LED Screen: stap 8, afbeelding 2 van 2
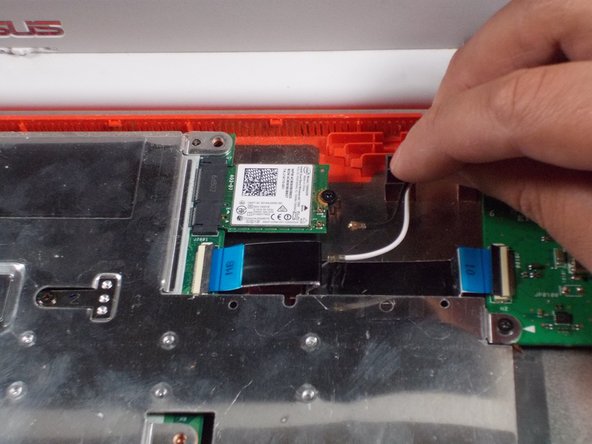
    • Unplug the black and white cable from the motherboard.

    • These two wires connect to the antenna within the display assembly. The white cable is longer and connects to the bottom import.

  9. Asus Chromebook C300SA-DS02 LED Screen Replacement: stap 9, afbeelding 1 van 1
    • Peel back the tape covering the plug.

    • Slide the cable towards the screen and out of the input.

  10. Asus Chromebook C300SA-DS02 LED Screen Replacement: stap 10, afbeelding 1 van 1
    • Unscrew the 6 screws (5 millimeter) on the top right and left.

  11. Asus Chromebook C300SA-DS02 LED Screen Replacement: stap 11, afbeelding 1 van 1
    • Gently lift the screen up and away from the laptop.

  12. Asus Chromebook C300SA-DS02 LED Screen Replacement: stap 12, afbeelding 1 van 1
    • Pry off the face panel on the screen using the blue prying tool.

  13. Asus Chromebook C300SA-DS02 LED Screen Replacement: stap 13, afbeelding 1 van 1
    • Remove the four 2mm Phillips #0 screws from the four corners of the screen.

  14. Asus Chromebook C300SA-DS02 LED Screen Replacement: stap 14, afbeelding 1 van 2 Asus Chromebook C300SA-DS02 LED Screen Replacement: stap 14, afbeelding 2 van 2
    • Gently lift screen

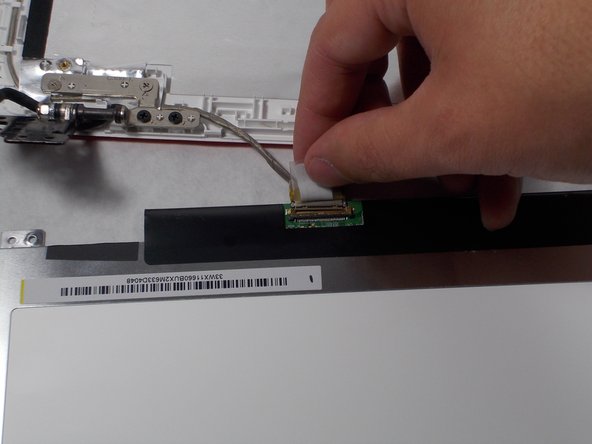
    • Peel back the adhesive covering the cable.

    • Remove the cable to free the screen.

Conclusie

To reassemble your device, follow these instructions in reverse order.

Één andere persoon heeft deze handleiding voltooid.

Celina Monteiro

Lid sinds: 10/17/17

224 Reputatie

2 handleidingen geschreven

Team

UMass Dartmouth, Team S1-G7, Simcock Fall 2017 Lid van UMass Dartmouth, Team S1-G7, Simcock Fall 2017

UMASSD-SIMCOCK-F17S1G7

3 Leden

9 handleidingen geschreven

Één opmerking

I used this honestly I broke the screen and some of the wires in the screen are severed. Now I know for sure where the wires go and how to deconstruct it. Thank you so much!

Glorybringers Child - Antwoord

Voeg opmerking toe

Weergavestatistieken:

Afgelopen 24 uren: 0

Afgelopen 7 dagen: 2

Afgelopen 30 dagen: 5

Altijd: 689