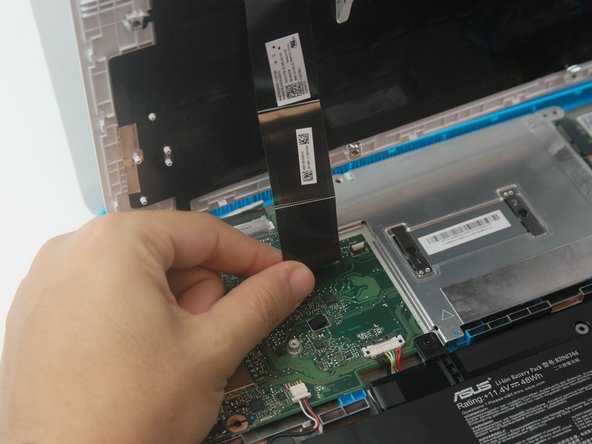
Ga door naar hoofdinhoud

Asus Chromebook C300MA-DH02 Battery Replacement

Wat je nodig hebt

  1. Asus Chromebook C300MA-DH02 Battery Replacement, Keyboard Panel: stap 1, afbeelding 1 van 3 Asus Chromebook C300MA-DH02 Battery Replacement, Keyboard Panel: stap 1, afbeelding 2 van 3 Asus Chromebook C300MA-DH02 Battery Replacement, Keyboard Panel: stap 1, afbeelding 3 van 3
    • Flip the Chromebook over so that the underside is facing up.

    • Using the Phillips PH #000 screwdriver, remove the 11 "4mm" screws on the back of the device.

  2. Asus Chromebook C300MA-DH02 Battery Replacement: stap 2, afbeelding 1 van 1
    • Wedge the plastic opening tool between the bottom cover of the laptop and the keyboard panel.

    • Apply pressure and move the plastic opening tool around the border of the laptop until it pops out.

  3. Asus Chromebook C300MA-DH02 Battery Replacement: stap 3, afbeelding 1 van 2 Asus Chromebook C300MA-DH02 Battery Replacement: stap 3, afbeelding 2 van 2
    • Once the keyboard panel pops out, slowly move it upwards so that the keyboard connection is visible.

    • Remove the keyboard connection from the motherboard by pulling it outwards from the connector.

  4. Asus Chromebook C300MA-DH02 Battery Replacement, Battery: stap 4, afbeelding 1 van 2 Asus Chromebook C300MA-DH02 Battery Replacement, Battery: stap 4, afbeelding 2 van 2
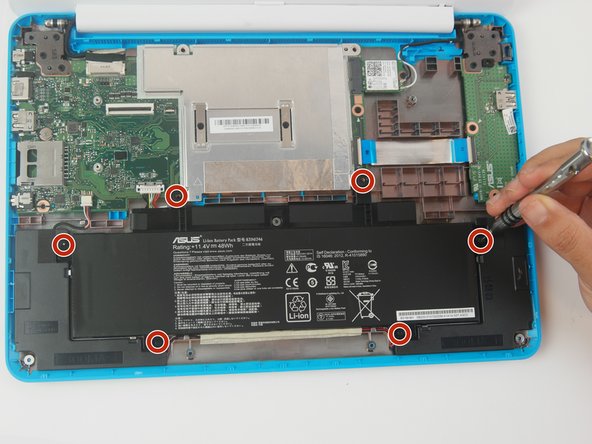
    • Remove (6) six "4mm" screws that hold the battery using the Phillips #000 screwdriver.

  5. Asus Chromebook C300MA-DH02 Battery Replacement: stap 5, afbeelding 1 van 1
    • Placing two plastic opening tools on each side of the battery connector and gently pull with an even force on both sides of the connector until the connector pops out.

  6. Asus Chromebook C300MA-DH02 Battery Replacement: stap 6, afbeelding 1 van 1
    • Note: Your battery may have adhesive on the underside. If you cannot easily remove the battery you can use a hair dryer to evenly warm the glue.

    • Remove the battery by applying even force on both sides.

    • During reassembly, purchase of adhesive may be necessary.

Conclusie

To reassemble your device, follow these instructions in reverse order.

Één andere persoon heeft deze handleiding voltooid.

Zachary Leonard

Lid sinds: 10/02/17

304 Reputatie

3 handleidingen geschreven

Team

USF Tampa, Team S6-G4, Remmell Fall 2017 Lid van USF Tampa, Team S6-G4, Remmell Fall 2017

USFT-REMMELL-F17S6G4

4 Leden

12 handleidingen geschreven

0 opmerkingen

Voeg opmerking toe

Weergavestatistieken:

Afgelopen 24 uren: 0

Afgelopen 7 dagen: 1

Afgelopen 30 dagen: 5

Altijd: 217