Ga door naar hoofdinhoud

Aluratek ADMPF310F Motherboard Replacement

Wat je nodig hebt

  1. Aluratek ADMPF310F Motherboard Replacement, Motherboard: stap 1, afbeelding 1 van 3 Aluratek ADMPF310F Motherboard Replacement, Motherboard: stap 1, afbeelding 2 van 3 Aluratek ADMPF310F Motherboard Replacement, Motherboard: stap 1, afbeelding 3 van 3
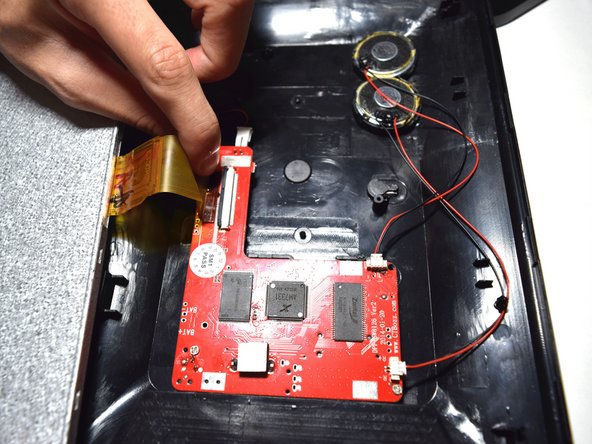
    • Using the black nylon spudger, pry off the clips all around the frame. You will hear a popping sound for every clip

    • Be sure not to pry to hard because you could crack or break the plastic facing of the device.

  2. Aluratek ADMPF310F Motherboard Replacement: stap 2, afbeelding 1 van 1
    • Lift screen out of place so you can access the plugs that connect it.

  3. Aluratek ADMPF310F Motherboard Replacement: stap 3, afbeelding 1 van 2 Aluratek ADMPF310F Motherboard Replacement: stap 3, afbeelding 2 van 2
    • Using the plastic spudger tool lift the plastic zif(zero instertion force) connector clip up.

    • Pull the ribbon cable away from the mother board.

    • Be careful as this zif connector is very frail plastic.

  4. Aluratek ADMPF310F Motherboard Replacement: stap 4, afbeelding 1 van 1
    • Disconnect the red and black cable connecting the screen to the motherboard by just pulling it out.

  5. Aluratek ADMPF310F Motherboard Replacement: stap 5, afbeelding 1 van 1
    • Pull out remote receiver out of its clip.

    • Be careful to not move the wires around for the remote receiver too much, as they are soldered to the motherboard.

  6. Aluratek ADMPF310F Motherboard Replacement: stap 6, afbeelding 1 van 2 Aluratek ADMPF310F Motherboard Replacement: stap 6, afbeelding 2 van 2
    • Using fingers pull the first speaker wire that is located closest to the speakers

    • Again using your fingers, pull out the second speaker wire near the far side of the motherboard.

  7. Aluratek ADMPF310F Motherboard Replacement: stap 7, afbeelding 1 van 3 Aluratek ADMPF310F Motherboard Replacement: stap 7, afbeelding 2 van 3 Aluratek ADMPF310F Motherboard Replacement: stap 7, afbeelding 3 van 3
    • Using the ph0 phillips head screwdriver unscrew the four 4mm screws circled in the picture.

  8. Aluratek ADMPF310F Motherboard Replacement: stap 8, afbeelding 1 van 1
    • Pull up the smaller end of the motherboard.

    • Apply force pulling away from the USB ports to get the mother board out of place.

Conclusie

To reassemble your device, follow these instructions in reverse order.

Pascal Alexis

Lid sinds: 11/05/15

427 Reputatie

3 handleidingen geschreven

Team

UMass Dartmouth, Team 5-1, Martin Fall 2016 Lid van UMass Dartmouth, Team 5-1, Martin Fall 2016

UMASSD-MARTIN-F16S5G1

3 Leden

5 handleidingen geschreven

0 opmerkingen

Voeg opmerking toe

Weergavestatistieken:

Afgelopen 24 uren: 1

Afgelopen 7 dagen: 3

Afgelopen 30 dagen: 6

Altijd: 552